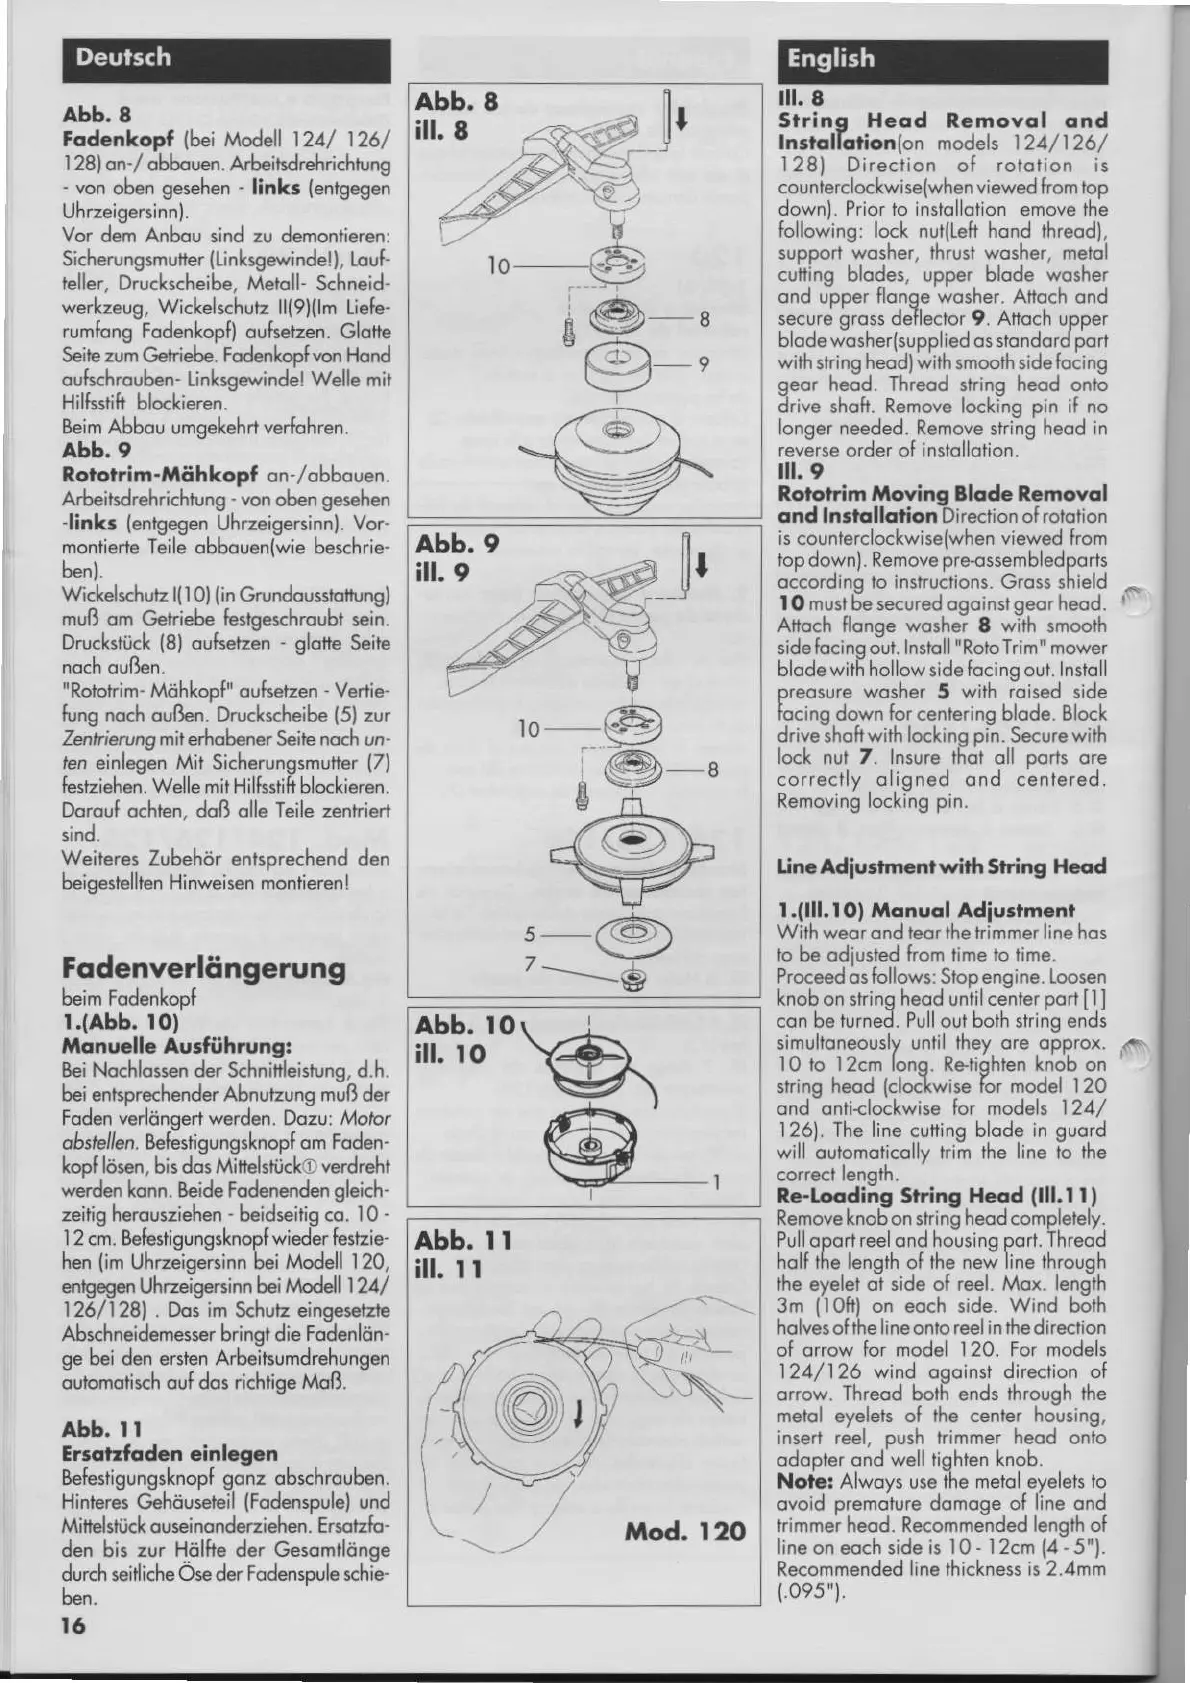
abb. 8
Fodcnkopf
l&i
\Ädell 12a/ 126/
128)on-lobbouen AÄeitsdrehrichtung
-
von ob€n gesehen
-
linkr
{engegen
Uhrzeioersinnl.
Vor dä anbou sind zu
demontieren:
Sicherungsmutter
{Linksgewindel l,
l,oul
teller. Druckscheibe. Metoll- Schneid-
*erkzeug,
Wickelschutz lll9){lm tiefe-
rumfong
Fodenhopf) oufsetzen.
Glotte
Seic zum Getriebe. Fodeokoofron Hond
oufschrouben- Linksoe*indel Welle mit
Hilfsstih
blockieren.-
Beim Abbou r:mgekehrt
verfoh
ren.
abb.
9
Rofotrim-ilöhkopf on'lobbo!en.
AÄeitsdrehrichtung
-
von
oben
gesehen
Jinkr
(entgegen
Uhrzeigersinn). Vor-
montierte
Teile obbouen(wie beschrie-
Wckekhurz l( I
0)
(in
Grundouslom-rng)
muß om
Getriebe bstexhroubl sein.
Drucksück
{8}
oufsetzön
-
glotte
SeiC
noch
oußen.
"Rolohim-
Möhkopf"
ouheEen
-
Verlie-
fung noch
ouflen.
Druckscheibe
(5)
zur
Zntlaung nit eÄobner Seile noch
un-
ten €inl€€n Mil Sicherungsmutter
{7)
fe*iehan. welle mit Hilfssiift blockiärän
Dorouf ochten, doß olle Teile zentriea
sind.
Weit€ros Zub€hör
entsorechend den
beig6st€llten Hinw€isen montieren!
Fodenverlöngerung
beim Fodenkopf
r.(abb. r0)
f|lonucllc Aurführung:
Bei
Nochlossen
der fthninleisirng, d.h.
bei entsprechender Abnutzung
muß
der
Foden verlönoert werden. Dozv. Molor
obsbi/en. Be6s
gungsknopf
om
Foden-
kopf
lösen,
bis dos Mihd!ücko
verdrehr
serden
konn. Beide Fodenenden
gleich-
zeitig herousziehen
-
beidseitig co. l0
-
I 2 cm. Be6stigungsknoplwieder 6sEie-
hen
(im
Uhneigersinn bei
i.{odell I20,
entg€en Uhrzeigeßinn bei
lv.cdf/]l l2A/
1261128) . Dos im
Schut
einges€tde
Abschneidemesser
brinot die
Fodenlön-
ge
bei den enten
Aöeitsumdrehungen
out'cmolisch ouf dos
richlige Moß.
abb, | |
Errotrfcdcn cinlcgcn
Befestigungsknopf
gonz
obschroub€n.
Hinteres
Gehöuseteil
{Fodenspule)
und
Mitblstkk
ouseinondecziehen.
Ersotfo
-
den
bis
zur Höllte d€r Gesomtlönoe
durch seitliche
öse der Fodenspule schL-
ben.
t6
abb. rl
ill. | |
l. 8
Slring Heod Rcmovol ond
fn.toffolion{on
nodels 124/
126/
l28l
Direction of rololion is
counierclockwiselwhen viewed lrom loo
downl. Prio.lo inslollofion
emove
thä
following:
lock nul(Leh hond üreod),
supporl wosher, lhrusl wosher, m€lol
cuttino blodes. uooer blode wosher
."d ;.* 11.".";.,her Attcch ond
secu.i
ä.oss
de]lector 9.
Attoch
upper
blode w:oshe(suppled
os stondord
jort
wilh strino heodlwith
smoofi
srdefocino
oeor heäd rhleod stino heod onü
ärive shoh Remove loch'hq
pin
i[
no
lonoer
needed. Remove stri-nci hecd in
revärse order of;nsrollorion.
-
.9
Rororrim Moving
Blode l.movol
ond ln.ndlldlio|r Direclion of roblion
is counlerclockwise(when viewed from
top
down). Remove
pre-ossembl6dporls
occordino lo inshuctions Grox shield
lOmu
Se secured oqoinstqeor
heod.
Afioch flonoe woshei 8 wih smoorh
side {ocino o'ut. In3bll"RoloTrim" mower
blode witt hollow
side
focino out. Insbll
preosure
wosher
5
wrrh
ioised side
focino down for centerino bloda. Blocl
drive-shoftwith
lockinq
oin.
Secure
*ith
lock nut 7. Insure ß-dt
oll
ports
ore
correclly oligned
ond cenlered.
Romoving locking
pin.
ün.Adiu.ftncntwilh srring Hcod
l.(llllO) Monuol Adiusrm.nr
Wilh weor ond ieor ihe t immer line hos
b b€ odiusEd from time lo lim6.
Proceed os follows: Stop eng
ine.
Loosen
knobon sking heod uniilcenler
porl
[|]
con ba turned. Pullout bolh strino ends
simuhoneously unlil lhey ore o;prox.
lO lo l2cm lono. Reriähten kridb
on
strinq heod
lclo<lwise
lor model 120
ond-onti<loiLwise tor nodals 12a/
1261. Th6 line cultino blode in ouord
will ;ubmolicollv tri-m the
line
io the
correcl leno$,
R.-l,oodi;g Srring Heod
(lll.l
r)
Remove
knob on trino
heod comol€ljelv.
Pull
ooort
reel
ond
ho-usino
oo*.
ihreod
holf üe lenoth
of
the nei line throuoh
lhe evelel o'i side of reel. Mox. lendih
3m liofil on eoch side. wind bärh
holväs of the line onto reel
in 6e
d
irection
of orow for model 120.
For models
124/126 wind oqoint direclion
ol
onow. Threod bort ends rhrouoh rhe
mebl
eyeleb
of üe cenEr ho-using,
inserl reel. oush lrimmer heod onlo
odooter ond well tiqhten knob.
Noic: Al*ovs use ile melol evelels lo
ovoid
premoture
domoge
ol llne ond
trimmei heod. Recomme-nded
length
of
lineon eoch 3ide is l0- l2cm 14-5"1.
Recommended line thickness is 2.4mm
{.095"1.
abb.9
iil.9
'o
--@
A
_8
5_
7-
xh
@_
I
abb. to
ill. ro
 Loading...