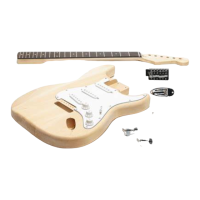
Solo ST Style DIY Electric Guitar Kit
Copyright © 2017 Solo Music Gear. All rights reserved | v2.0
ASSEMBLY
STEP 1 – Install the Machine Heads and String Tree Retainers on the neck’s headstock. Use the threaded hex
peghead bushings with washers - initially tightening them with your fingers only. Align each machine head to
match the holes for mounting screws and use the screws to secure the heads. Finally, tighten the hex
bushings with a socket wrench (or regular hex wrench). Note that the string tree retainers have different
heights; install the higher one with a longer screw between the 3
rd
and 4
th
strings (G and D), and a shorter
one between the 1
st
and 2
nd
(E and B) strings.
STEP 2 - Attach the neck to the body using 4 screws with a neckplate and a setter.
STEP 3 – Install the tremolo bridge. First install the spring claw: locate two predrilled holes for the
mounting screws on the wall of the cavity on the back of the body and screw in the claw. Initially screw
it in just about 1/3” (8mm) as it allow you to install tension springs easier – you will be using these two
screws later to adjust springs tension. Mount the tremolo unit on the top of the body with 6 mounting
screws – don’t screw it down too tight as you need to leave some space allowing the tremolo bridge to
float. It is recommended to screw down all the way only the two outside screws while the 4 inside screws
are raised about 1/16" (1.6 mm) above the top of the bridge plate. This little trick will improve tuning
stability. To install tension springs insert angled ends of the springs into the small holes at the bottom of
the tremelo’s sustain bar (there are 5 holes - use the two outer and one central hole) then stretch springs
and put the strings loops into the corresponding notches of the spring claw (the two outer and one center.
The alternative way is to put the outer springs on the notches next to the central one – it also improves
tuning stability.
 Loading...