Do you have a question about the SOMFY Glydea DCT and is the answer not in the manual?
Details on connecting power for RTS integrated motors, covering WireFree, 24V DC, and 230V AC types.
Connect the motor to power for programming. Choose channel first for multi-channel control.
Verify motor direction. If incorrect, proceed to step 3 for correction.
Procedure to reverse motor rotation direction if it's incorrect. Involves pressing until motor jogs.
Manually position the blind at the desired upper limit before setting the UP position.
Procedure to set the lower limit for the blind. Involves short press until motor jogs.
Verify the set UP and DOWN limits. Press until motor jogs to confirm.
Process to pair an RTS transmitter with the motor. Involves pressing prog button until motor jogs.
Set or re-adjust the blind's lower limit. Involves positioning and confirming with 'My' button.
Set or re-adjust the blind's upper limit. Involves positioning and confirming with 'My' button.
Define a preferred 'My' position for blinds without tilt function. Involves positioning and pressing 'My'.
Define a preferred 'My' position for blinds with tilt function. Involves positioning and pressing 'My'.
Procedure to delete a previously set 'My' position. Involves specific button presses until motor jogs.
Configure the blind type (Roller or Venetian). Default is Venetian for Tilt & Lift.
Diagrams showing wiring for DC RTS Receiver and Integrated DC RTS Receiver.
Steps to program the RTS receiver. Includes setting mode and recording the first transmitter.
Instructions for selecting output channels for Power 4 x 2,5 DC RTS receivers.
Steps for connecting the RTS remote control to the RTS receiver and recording the first transmitter.
Procedure to set the blind type (Roll up or Tilt/Lift) via the receiver. Includes confirmation step.
Steps to check and change the motor's rotation direction. Includes putting receiver in programming mode.
Setting the timing for blind opening and closing movements. Requires setting UP position and down movement time.
Procedure to set the down movement time. Involves measuring and confirming the time.
Procedure to set the up movement time. Involves measuring and confirming the time.
Finalizing the timing settings for open and close movements. Confirms settings with motor jogs.
Verifies the programmed open and close movement times. A MY-position is automatically set.
Setting a preferred 'My' position for Tilt & Lift blinds. Involves moving to position and confirming.
Setting a preferred 'My' position for Roll up blinds. Involves moving to position and confirming.
Procedure to delete a previously set 'My' position for the blind.
Activating the motor run timer for specific end products. Limits power output to programmed operation time.
Steps to add a new RTS transmitter to the system. Involves pressing program buttons on transmitter and motor.
Procedure to remove an existing RTS transmitter from the system. Involves pressing program buttons.
Steps to replace a lost transmitter. Involves pressing programming buttons and recording new transmitter.
Procedure to reset the motor to factory mode by holding the programming button.
Resetting the motor by cycling power. Involves unplugging and replugging the device.
Resetting the motor using an RTS transmitter. Involves button presses and timing.
Steps to assign individual channels to a group channel for simultaneous control.
Adjusting the upper and lower limits for the Sonesse 40 WT motor. Involves adjusting screws.
Procedure to adjust the motor's stop limit using adjustment screws 1 and 2.
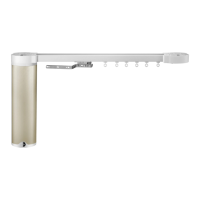
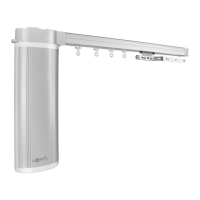
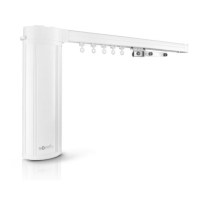
Guidelines for mounting Glydea curtain tracks, including bracket distance and wall mounting distance.
Illustrations showing different options for motor cable output on the Glydea system.
Instructions on how to attach the motor to the curtain rail.
Wiring diagram for DCT & RTS systems, detailing wire connections for power.
General programming steps for Glydea RTS motors. Includes connecting transmitter and checking direction.
Procedure to set a preferred 'My' position for the curtain. Involves positioning and pressing 'MY'.
How to adjust or re-set the end limits for the Glydea curtain track system.
Configuring touch control or manual override modes for the Glydea system.
Adjusting the track speed for the Glydea curtain system. Possible speeds are listed.
Instructions on how to add a new transmitter to the Glydea RTS system.
Procedure to reset the Glydea motor to factory defaults, erasing all programmed settings.
Connection guide for wiring control units to the Glydea DCT system.
Programming steps for Glydea DCT motors. Includes connecting, modifying rotation, and re-adjusting limits.
Configuring touch control or manual override modes for the Glydea DCT system.
Procedure to reset the Glydea DCT motor to factory defaults, erasing all programmed settings.
Details on setting motor rotation, track speed, and back release for Glydea WT.
General programming instructions for Glydea WT, noting power connection requirement.
Steps to change the motor's rotation direction for Glydea WT.
Procedure for setting the back release point on Glydea WT motors.
Procedure to reset the Glydea WT motor to factory defaults, erasing all programmed settings.
Wiring diagram for the Glydea WT motor, showing connections for motor operation.
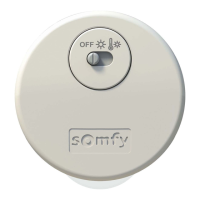
Configuring receiver settings for outside sun sensors, including privacy function.
Steps to deactivate or activate the privacy function for sun sensors.
Setting a sun disappearing position for the blind. Requires a programmed 'My' position.
Procedure to set or adjust the motor speed for the connected blinds.
Adjusting the tilt speed or scroll wheel step for blinds. Involves setting speed or position.
Instructions for decreasing or increasing the tilt speed/scroll wheel step.
Steps to change the motor's rotation direction. Involves checking and verifying rotation.
Adjusting the scroll wheel's rotation direction for tilt mode blinds.
Instructions for wiring the Sonesse 30 DCT. Recommends using DCT setting tool.
Default is roll up application. Instructions to change to Tilt and Lift application.
Procedure to set or adjust the rolling speed of the Sonesse 30 DCT motor.
Procedure to set or adjust the tilt speed of the Sonesse 30 DCT motor.
Procedure to reset the Sonesse 30 DCT motor to factory settings.
Setting a preferred 'My' position for roll-up blinds from the upper end limit.
Setting a preferred 'My' position for roll-up blinds from the lower end limit.
Procedure to adjust the tilt speed for Tilt & Lift applications.
Configuring the automatic slat tilting function for Tilt & Lift blinds.
Setting a preferred 'My' position from the upper end limit for Tilt & Lift blinds.
Prerequisites and conditions for adding and setting the Sunis RTS sensor.
Steps to add an exterior sun sensor to the system.
Putting the system into programming mode to add a sensor.
Connecting the sun sensor to the system. Involves pressing the prog button.
Procedure to check and set the sun sensor's operating mode (ON/OFF).
Steps for checking and installing the sun sensor, including setting sensitivity.
Switching the Demo mode OFF and removing the sun sensor from the mounting plate.
Procedure to turn off the Demo mode for the sun sensor.
Understanding the meaning of LED signals on the Sunis Sensor RTS in operational and DEMO modes.
Information on how to determine if the Sunis Sensor RTS is in DEMO mode.
Explanation of different usage positions (exterior blinds, interior blinds) for the Thermosunis sensor.
Steps to add an interior sun sensor. Involves programming the transmitter.
Connecting the sun sensor to the system. Involves pressing the prog button.
Instructions for mounting the Thermosunis sensor on window frames or panes.
Details on setting the 3-position switch for different usage scenarios (exterior/interior blinds).
Notes and conditions for using the Thermosunis sensor, including temperature and sun sensitivity.
Steps for activating and connecting the sun sensor to the RTS motor/receiver.
Procedure to activate the sun sensor. Involves setting sensor to 'Off' and connecting.
Connecting the sun sensor to the RTS motor/receiver. Involves a short press of the prog button.
Procedure to erase the sun sensor from the motor. Involves putting motor in programming mode and pressing button.
Adjusting sensitivity threshold values for sun and temperature. Involves turning buttons and observing LEDs.
Using DEMO mode for demonstration and threshold adjustment. Sensor reverts to user mode after 3 min.
Steps to place the sun sensor into DEMO mode.
Procedure to switch the sun sensor back from DEMO mode to user mode.
Overview of the Chronis Smart RTS display elements and button functions.
Description of programming options: Standard week programme and SEC (Security) function.
Basic principles for using the Chronis Smart RTS timer, including motor adjustment and insulation strip removal.
Information about the wireless timer, including pre-installed batteries and insulation strip.
Instructions for setting the UP time for the Chronis Smart RTS.
Instructions for setting the DOWN times for the Chronis Smart RTS.
Step-by-step guide to setting the current time on the Chronis Smart RTS.
Step-by-step guide to setting the current date on the Chronis Smart RTS.
Detailed guide on setting UP times, including fixed times, Cosmic UP function, and time limits.
Instructions for setting DOWN times, including Cosmic DOWN function, offset values, and time limits.
Adjusting time shift and limits for the COSMIC DOWN time function.
Procedure to deactivate the COSMIC function for DOWN time.
Detailed guide on setting DOWN times, including fixed times, Cosmic DOWN function, and time limits.
Procedure to activate the COSMIC function for the DOWN time.
Steps to activate the SECURITY function on the Chronis Smart RTS.
Steps to deactivate the SECURITY function on the Chronis Smart RTS.
Disabling programmed UP and DOWN times on the Chronis Smart RTS.
Enabling programmed UP and DOWN times on the Chronis Smart RTS.
Specific settings for using RTS receivers with DC RTS and RTS 2.5 DC modules.
Basic principles for using Chronis Comfort RTS, including motor adjustment and timer connection.
Overview of the Chronis Comfort RTS display elements and button functions.
Description of programming options: Standard week programme and SEC (Security) function.
Instructions for setting UP times, including fixed times and Cosmic UP function.
Instructions for setting DOWN times, including fixed times and Cosmic DOWN function.
Step-by-step guide to setting the current time on the Chronis Comfort RTS.
Step-by-step guide to setting the current date on the Chronis Comfort RTS.
Detailed guide on setting UP times, including fixed times, Cosmic UP function, and time limits.
Procedure to set the second UP time to a fixed time for the Chronis Comfort RTS.
Steps to activate the Cosmic UP function on the Chronis Comfort RTS.
Adjusting time shift and limits for the COSMIC UP time function.
Procedure to deactivate the COSMIC UP function.
Detailed guide on setting DOWN times, including fixed times, Cosmic DOWN function, and time limits.
Adjusting time shift and limits for the COSMIC DOWN time function.
Procedure to deactivate the COSMIC DOWN function.
Procedure to set the first DOWN time to a fixed time for the Chronis Comfort RTS.
Procedure to set the second DOWN time to a fixed time for the Chronis Comfort RTS.
Steps to activate the COSMIC function for the first DOWN time.
Information about the light sensor, its connection, and automatic control functionality.
Steps to activate the light sensor. Involves connecting sensor and setting threshold level.
Steps to deactivate the light sensor.
Steps to activate the SECURITY mode on the Chronis Comfort RTS.
Steps to deactivate the SECURITY mode on the Chronis Comfort RTS.
Disabling programmed UP and DOWN times on the Chronis Comfort RTS.
Enabling programmed UP and DOWN times on the Chronis Comfort RTS.
Specific settings for using RTS receivers with DC RTS and RTS 2.5 DC modules.
Using Chronis Comfort RTS to command products to an intermediate position.
Sending intermediate position commands using UP, DOWN, or light commands.
Overview of the 6-channel transmitter, its features, operation modes, and product benefits.
Key benefits of the Telis 6 Chronis RTS transmitter, including centralized control and display features.
List of components included with the Telis 6 Chronis RTS and explanation of remote control features.
Explanation of display elements when the Telis 6 Chronis RTS is in manual mode.
Explanation of display elements when the Telis 6 Chronis RTS is in automatic mode.
Introduction to using the Telis 6 Chronis RTS for activating motors and end position set-up.
Procedure for installing batteries in the Telis 6 Chronis RTS remote control.
Step-by-step guide for initial setup of the remote control after battery installation.
List and explanation of parameters to be set, including year, month, day, time, and twilight settings.
Instructions for naming the 6 channels on the Telis 6 Chronis RTS in manual mode.
Procedure to add a Telis 6 Chronis RTS transmitter to control solar shading.
Steps to erase a Telis 6 Chronis RTS transmitter from a channel or solar shading system.
Configuring the tilt mode (EU or US) for channels with moveable slats.
Setting up automatic commands for specific days of the week in automatic mode.
Procedure for selecting the day of the week to program automatic commands.
Steps to create a new automatic command, including setting time, channels, and commands.
Procedure for selecting channels to be included in an automatic command.
Choosing the command type (e.g., up, down, stop, my) for an automatic program.
Copying an entire day's program to another day for identical configurations.
Steps to erase a previously programmed automatic command for a specific day.
How to switch the remote control between automatic and manual operating modes.
Using the Telis 6 Chronis RTS in manual mode to send commands to specific channels.
Sending commands to applications assigned to specific channels in manual mode.
Using automatic mode to control applications based on programmed commands and days of the week.
Enabling or disabling the sun function in automatic mode by programming automatic commands.
Using the presence simulation function to randomly change command activation times for security.
Adjusting general parameters of the remote control, such as year, month, day, and time.
Controlling product movement (upwards/downwards) and stopping them using the remote.
Procedure to set a preferred 'My' position for the product. Involves positioning and holding 'My' key.
Activating the preferred 'My' position. Product moves automatically, stops when 'My' key is pressed.
Instructions for mounting the remote control to the wall using the provided bracket.
Troubleshooting common issues and recommendations for using the Telis 6 Chronis RTS.
Specifications for the Telis 6 Chronis RTS, including power supply, temperature, and frequency.
Physical dimensions of the Telis 6 Chronis RTS remote control.
General note for programming Moco DCE with LWE motors.
Procedure to change the Moco DCE application setting to 'Li' mode.
Instructions for connecting motors and setting end limits for the Moco DCE system.
| Power Supply | 24 V DC |
|---|---|
| Installation | Ceiling or wall mount |
| Protection Index | IP20 |
| Noise Level | <44 dBA |
| Battery Backup | No |
| IP Rating | IP20 |
| Warranty | 5 years |
| Control | Dry Contact |
| Maximum Shade Weight | 12 kg |
| Compatibility | Home Automation Systems via Dry Contact |
| Rated Torque | 10 Nm |