This manual describes the assembly and use of the VASAGLE LSB061 storage bench, a product designed for indoor use. It emphasizes safe and proper handling, assembly, and maintenance to ensure longevity and prevent injury or damage.
Function Description
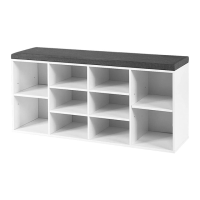
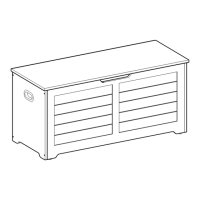
The VASAGLE LSB061 is a storage bench primarily intended for indoor use. Its main function is to provide storage space, likely within a living area, entryway, or bedroom, while also serving as a seating surface. The design suggests a blend of utility and aesthetics, offering a discreet way to store various items while complementing interior decor. The bench features a lid that opens to reveal the storage compartment, and its construction includes multiple wooden panels and hardware for assembly.
Important Technical Specifications
- Product Model: LSB061
- Maximum Static Load Capacity: 100 kg (220 lb)
- Intended Use: Indoor use only
- Materials: Primarily wooden boards, with various metal fittings (hinges, screws, dowels) and plastic components (feet).
- Dimensions (assembled): Not explicitly stated in the provided pages, but implied to be a bench-sized piece of furniture.
- Assembly: Requires user assembly with provided hardware and tools (screwdriver, Allen key, hammer, pencil, drill - though a drill is not strictly required for all steps, it is shown as a "needed tool").
Usage Features
The LSB061 storage bench offers several usage features designed for convenience and safety:
- Storage Compartment: A spacious internal compartment accessible by lifting the lid, suitable for storing blankets, pillows, books, toys, or other household items.
- Seating Surface: The sturdy top panel (lid) allows the bench to be used as an additional seating option, provided the maximum static load capacity of 100 kg is not exceeded.
- Lid Mechanism: The lid is equipped with hinges and a support mechanism (likely a gas strut or similar soft-close hinge, indicated by parts H and I) to ensure smooth opening and closing, and to hold the lid open safely during access to the storage compartment.
- Stability: Designed to be placed on a level, solid ground to ensure stability during use.
- Ease of Access: The lift-top design allows for easy access to stored items.
Maintenance Features
Proper maintenance is crucial for the longevity and appearance of the LSB061 storage bench. The manual provides several guidelines:
- Cleaning:
- Immediately wipe clean any spilled water or other liquids from the surface with a dry towel to prevent damage.
- Avoid using sharp, pointed objects or corrosive substances on the product, as these can cause surface damage.
- Environmental Protection:
- Avoid long-term exposure to humid environments to prevent mildew.
- Keep the product away from fire sources and high temperatures.
- Do not expose the product to direct sunlight, as this can cause material degradation or discoloration.
- Do not place hot objects directly on the surface.
- Structural Integrity:
- Periodically inspect the tightness of screws while the product is in use. If necessary, retighten them to ensure structural integrity and prevent loosening over time.
- The product should be placed on a level, solid ground to maintain its structural stability.
- Handling:
- Wear gloves during assembly and disassembly to avoid scratches from sharp edges of the components.
- Avoid standing or sitting on individual wooden boards during assembly to prevent damage.
- Assemble the item on a spacious surface to prevent damage to the product or the floor.
Safety Guidelines
The manual emphasizes several safety warnings:
- Children's Safety:
- Children are not allowed to assemble the product.
- Keep all small parts out of reach of children during assembly, as they may be fatal if swallowed or inhaled.
- Children are forbidden to climb or play on the product to avoid serious bodily injury caused by toppling.
- Keep plastic packing bags out of reach of children to avoid potential dangers such as suffocation.
- Load Capacity: Do not place overweight items on the product, respecting the maximum static load capacity of 100 kg (220 lb).
- Proper Use: The product must be assembled and used strictly in accordance with the manual's provisions. Any use outside of its intended purpose or modifications to its original design may result in personal injury and/or product damage. The seller disclaims responsibility for injuries or damages caused by incorrect assembly or improper use.
- Inspection: Upon unpacking, immediately cease assembly and contact customer service if any parts are defective or missing.
Assembly Process Overview
The assembly process involves several steps, starting with attaching hardware to individual panels and then connecting the panels to form the bench structure.
- Preparation of Panel F: Attach fittings (part 2 and 5) to panel F.
- Connecting Panel F and C: Attach panel F to panel C using screws (part 2 and 4).
- Connecting Panel C and B: Attach panel C to panel B using screws (part 2 and 4).
- Connecting Panel E and B: Attach panel E to the main structure (panel B) using screws (part 1 and 4).
- Connecting Panel D and B: Attach panel D to the main structure (panel B) using screws (part 1 and 4).
- Securing Top Edges: Attach additional fittings (part 2) to the top edges of the assembled structure.
- Attaching Feet: Install the feet (part 7) to the bottom of the bench.
- Attaching Hinges to Bench: Secure hinges (part G) to the back edge of the bench structure using screws (part 3 and 6).
- Attaching Hinges to Lid: Secure the remaining hinges (part G) to the underside of the lid (panel A) using screws (part 3).
- Final Lid Assembly: Attach the lid (panel A) to the bench structure, connecting the hinges (part G) and the lid support mechanisms (parts H and I) using screws (part 3). This step ensures the lid opens and closes correctly and stays open when needed.
The manual emphasizes aligning screws loosely first, then tightening them one by one to ensure proper fit and structural integrity.