- 4 -
6) Press
or until a consistent measure-
ment appears (about 2 seconds). The unit will
continue to take and display rapid measure-
ments as long as the button is held. Release
button to freeze the measurement.
Press and release
or to validate
measurement.
NOTE: When a measurement is taken in single
unit mode, the
icon will appear in the
upper left hand of the LCD.
7) Your unit is factory preset to display metric. To
set your display to desired mode (m, ft:in,ft:ft
or yds) Press and hold
button until desired
mode displays, then release.
NOTE: Unit will now default to your preset
mode even after unit is turned off.
HELPFUL MEASURING HINTS
FOR SINGLE UNIT MODE
MEASURING:
1) Measurements cannot be taken through glass
or off of soft or padded surfaces.
2) The SONIN COMBO PROs range and ability
to measure in tight spaces can be increased.
Stand in the middle of the distance to be
measured and add measurements taken in
opposite directions.
3) When measuring in confined spaces (hallways),
try to measure down the center line and midway
between the floor and ceiling.
4) To find a specific distance from a wall, walk
toward or away from the wall while holding
down
or .
5) When the surface being measured to has pro-
trusions and recesses, you can determine
where the beam is hitting. Move sideways
parallel to the target surface, while holding
- 5 -
down the measure button. You will see the
distance increase for recesses and decrease
for protrusions.
6) Be sure the surface you are measuring to is
hard, flat and uniform. Some surfaces such as
stucco or clapboard may scatter signals.
7) When using tracking mode, the unit may lock
on to a stronger (usually closer) measurement.
If this happens, release the measure button
and try again.
8) REMEMBER:
Measures from bottom of unit.
Measures from top of unit.
TAKING A MEASUREMENT IN
DUAL UNIT MODE:
1) Install a fresh 9V alkaline battery in rear of
Receiver and Target. Push contacts firmly
in place.
2) Select DUAL UNIT MODE by sliding the
switch on the side of the Receiver to the
position.
3) Move the switch on the side of the Target to
the ON position. Light on front of Target will
blinking slowly indicating target is on.
4) Place the Target at one end of the distance
to be measured.
NOTE: The measurement will be taken to the
back of the Target.
5) Walk with the Receiver to the other end of
the distance to be measured and aim the
Receiver directly at the face of the Target
Aiming at an angle to the face of the Target
will decrease the maximum distance the
COMBO PRO can measure.
6) Make certain you have a clear path to the
Target.
- 6 -
7) Press
or until a consistent measure-
ment appears (about 5 seconds). The unit will
continue to take and display rapid measure-
ments as long as the button is held. Release
the button to freeze the measurement.
Press and release
or to validate
measurement.
NOTE: When a measurement is taken in Dual
Unit Mode, the
icon will appear in the
upper left hand of the LCD.
8) Your unit is factory preset to display metric. To
set your display to desired mode (m, ft:in,
ft:ft or yds) Press and hold
button until
desired mode displays, then release.
NOTE: Unit will now default to your preset
mode even after unit is turned off.
HELPFUL HINTS FOR DUAL UNIT
MODE MEASURING:
1) Make certain there is a clear line of sight
between the Receiver and the Target.
2) Use validate mode when taking measurements
near traffic, construction or other noise sources.
3) The Target is not affected by noise. If there
are loud noise sources such as machinery,
traffic, etc., arrange the measurement so the
Receiver is furthest from the noise source.
4) Use DUAL UNIT MODE Operation
even for short measurements [under 60 ft
(18m)] if there are obstacles in the path of the
measurement. SINGLE UNIT MODE
Operation requires a path 1 ft (30 cm) wide
for each 10 ft (3m) of measured distance.
For example, at 60 ft (18m), SINGLE UNIT
MODE Operation requires a path 6 ft
(1.8m) wide and high. DUAL UNIT MODE
Operation only requires that the Receiver is
- 7 -
able to see the Target.
5) If the wind is gusting, make certain you use
validate mode for measurements. See the
section on ENVIRONMENTAL CONDI-
TIONS.
6) When measuring distances beyond the
maximum range (see section on ENVIRON-
MENTAL CONDITIONS) break the measure-
ment into 2 or more measurements and use
the ADD function to sum them.
REMEMBER:
Your COMBO PRO will automatically power
down and lose all measurements 7 minutes
after the last key press.
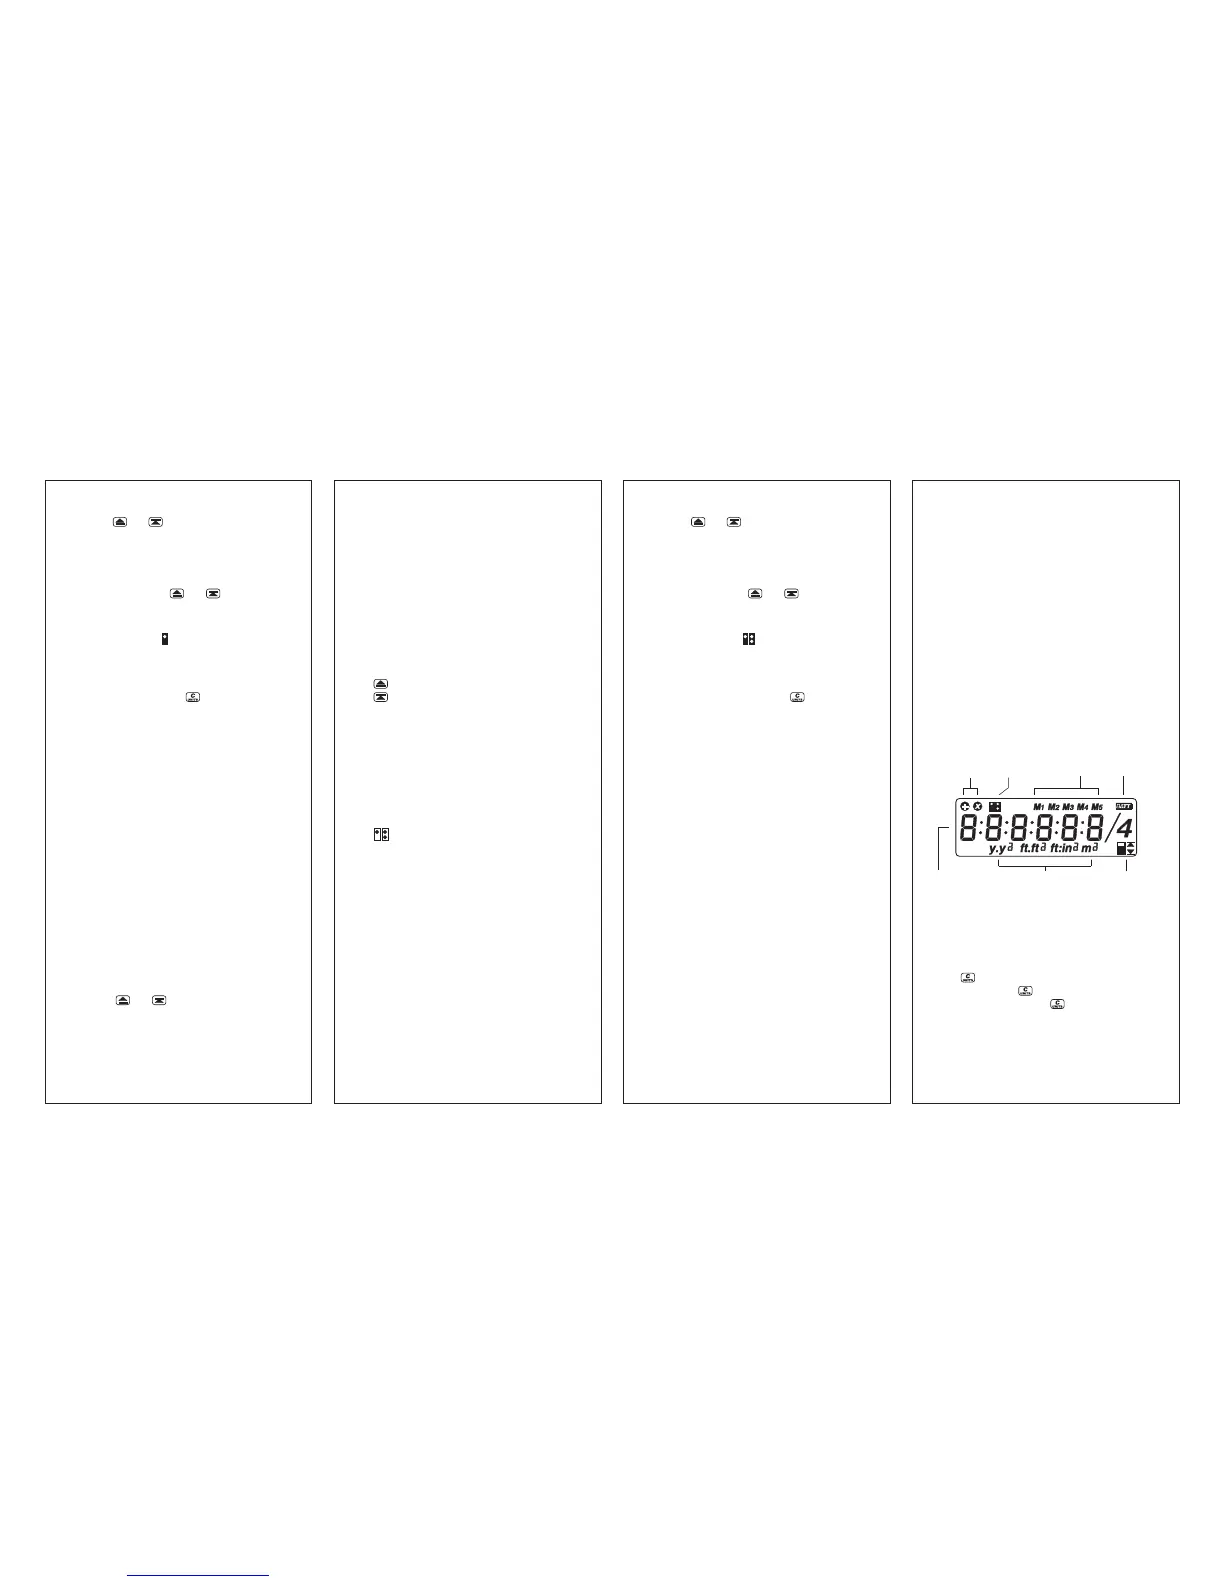
READING THE DISPLAY:
The SONIN COMBO PRO can display
measurements in 4 modes.
To change the display units or convert a displayed
value from one set of units to another, press and
hold . The displayed value will change with
the units. Release
when the desired units are
displayed. If you release
before the reading
changes units, the display will clear and the reading
will be erased unless first stored (see MEMORIES).
Battery Low
Indicator
Bottom & Top
Measuring Icon
Units / Sq / Cu
Icon
Single / Dual
Unit Mode Icon
Memories
Register
Six Digits & Fraction
Data Display Line
Multiply & Add
Memory Register
 Loading...