To preform the computations as described below, the [READ]
button symbol indicates taking an actual measurement (length,
width or height).
Adding Distances:
The display shows the total distance. Continue until you are
done adding measurements.
Subtracting Distances:
The display shows subtracted distance. Continue until you are
done subtracting measurements.
Multiplying to compute Areas:
Display shows square (SQ) measurement.
Multiplying to compute Volumes:
Display shows cubic (CU) measurement.
To Add Areas:
Area 1
Area 2
Display shows total area. Continue until you are done adding
areas.
To Add Volumes:
Volume 1
Volume 2
Display shows total volume. Continue until you are done adding
volumes.
Remarks: You can also compute Distance, Area and Volume
between memories M1, M2 and M3
For example: Adding distances between memories M1 and
M2. Store 2 distances into M1 and M2 before calculation,
then press:
For example: Compute Area or Volume between memories
M1, M2 and M3. Store 3 distances (length, width and height)
into M1, M2 and M3 before calculation, then press:
For example: Adding 2 Area between M1 and M2.
Store 2 Area measurements into M1 and M2, then press:
The display shows total Area.
- 6 - - 7 - - 8 -
- 9 - - 10 - - 11 -
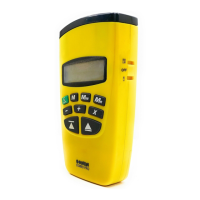
DESCRIPTION OF LCD DISPLAY GETTING STARTED / QUICK START GETTING STARTED / QUICK START
HELPFUL MEASURING HINTS COMPUTATION FUNCTIONS COMPUTATION FUNCTIONS
1. Icon indicates the measuring position.
2. Icon indicates measurement in process.
3. Icon indicates the Laser settings.
4. Icon indicates the 2ND function key pressed.
5. Icon indicates users memories in use.
6. Icon indicates measurement recall.
7. Digits indicate temperature reading and number of recall.
8. Temperature display units.
9. Battery low indicator.
10. Icons for calculating functions in process.
11. Cube and Square measurements.
12. Measurement units.
13. Six digits of main display.
14. Indicates Fraction of an inch in feet/inch mode.
DISPLAY MODES
Four display modes are available. To change or convert the
displayed value to your desired units, press [2ND] then
[CLR/UNITS] button, the displayed value will change to other
units. Repeat until you reach the desired mode.
Change Unit
1) Install a fresh 9V
alkaline battery in rear
of unit. Push contacts
firmly in place.
2) Press [READ]
button one second to
turn ON unit. The LCD
screen will show the
display units, current
temperature,
measuring position and
the laser setting.
3) Aim cone at a hard, flat, unobstructed surface such as a
wall or floor, and make certain you have a clear path to the
surface (wall).
4) Hold your LTRF perpendicular to the surface to which you
are measuring.
5) Press [READ] button to take a measurement. When taking
a measurement, the laser pointer will indicate the approximate
center of the target area for your reference.
Note: the laser pointer is a factory set function, however,
you can turn it off or reset by pressing [2ND] and [RCL]
buttons.
6) Your LTRF may be factory preset to display in Feet-Inch-
Fraction mode. To set the display to your desired mode, press
[2ND] then press [CLR/UNITS] button to change the display
units between Feet-Inch-Fraction, Decimal Feet, Yards or Meters.
NOTE: Unit will now default to your set mode until battery is
removed.
1) Remember your LTRF is
preset to measure from the
BOTTOM of the unit
(Measurement displayed is from
bottom of unit to the target
surface). If you need to measure
from the TOP of the unit, press
[2ND] then press [READ], the
setting will appear on the upper
left corner of the LCD.
2) Measurements cannot be taken through glass or off of soft
or padded surfaces.
3) The LTRF range and ability to measure in tight spaces can
be increased. Stand in the middle of the distance to be measured
and add measurements taken in opposite directions.
4) When measuring in confined spaces (hallways), try to
measure down the center line and midway between the floor
and ceiling.
5) When the surface being measured to has protrusions and
recesses, you can determine where the beam is hitting. Move
sideways, parallel to the target, then try again, you will see the
distance increase for recesses and decrease for protrusions.
6) Be sure the surface you are measuring to is hard, flat and
uniform. Some surfaces such as stucco or clapboard may
scatter signals.
FEET-INCH-FRACTION DECIMAL FEET
YARDS METERS
YES NO YES NO
Measure from
top of unit.
Measure from
bottom of unit.
The sound waves emitted from this unit
spread 1 ft (30 cm) for every 10 ft (3m) measured.
Laser is for reference only.
R
C
L
M1 M3M2
STO
R
E
2N
D
C
LR
U
N
ITS
R
EA
D
Measure from
TOP of unit
Measure from
BOTTOM of unit
1 Second
 Loading...