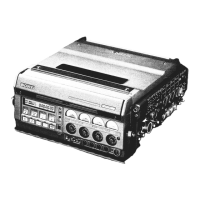
The Sony BVV-5PS is a portable in-camera video cassette recorder designed for use with the "Betacam SP" (Superior Performance) series of video cameras. This system combines a compact, lightweight, and easy-to-operate camera and recorder, making it a single-person operation.
Function Description
The BVV-5PS achieves high-quality picture and sound, owing to the "Betacam SP" format, which boasts wider frequency response and a higher signal-to-noise ratio. It supports both metal tape and oxide tape. When using metal tape, it permits high-quality recording of the "Betacam SP" format. The unit automatically distinguishes whether the tape is metal or oxide.
The device offers 4-channel audio recording/playback. When a metal tape is used, two channels of frequency modulated sound (AFM) can be recorded on a chrominance track with frequency multiplexed in addition to the conventional 2-channel audio recording on longitudinal tracks (LNG). With the AFM recording, wide dynamic range can be obtained, which makes it possible to get high quality sound under severe conditions. The conventional recording on longitudinal track also improves the frequency characteristics and reduces distortion using a metal tape.
Playback on the conventional units is supported, allowing the BVV-5PS to play back on conventional units. However, the conventional unit cannot show the special quality of a tape recorded on the BVV-5PS. Video and audio confidence playback can be monitored through the viewfinder. The two CTDM chrominance signals can also be monitored separately, which is useful for confirming if the recording has been made correctly.
The recording review function allows the last few seconds of the recorded scene to be rewound and then played back to check the previous recording. The built-in time code generator/reader supports both LTC (Longitudinal Time Code) and VITC (Vertical Interval Time Code). Both can be recorded, and the LTC can be played back. The real time (time of the day) can be recorded on the VITC user's bit. The built-in time code generator can be locked to an external time code generator for time code slave-lock.
Audio level adjustment on the camera is possible. When the BVV-5PS is used with a "Betacam" system camera, it features an audio level adjustment control, and the recording level of audio channel 1 can be adjusted and monitored on the camera. The Dolby NR (noise reduction) C-type system is employed for improved S/N ratio and wider dynamic range.
Important Technical Specifications
- Power Requirements: DC 12 V, 3 V. It can be powered by a battery pack NP-1 or NP-1A (Ni-Cd, 1.5 Ah), or an optional AC-500CE (Europe)/500 (USA and Canada) AC power adapter.
- Power Consumption: 14 W (with metal tape, 12 V) in record mode, 5 W in save mode.
- Operating Temperature: 0°C to 40°C (32°F to 104°F).
- Operating Humidity: Less than 85% (relative humidity).
- Storage Temperature: -20°C to +60°C (-4°F to +140°F).
- Weight: Approximately 4.5 kg (9 lbs 14 oz) for the unit itself. Battery packs add to the weight: NP-1/NP-1A: 0.7 kg (1 lb 8 oz), BP-90: 1.5 kg (3 lbs 5 oz), BP-90A: 1.6 kg (3 lbs 8 oz).
- Dimensions: Approximately 116 × 220 × 220 mm (w/h/d) (4⅝ × 8⅝ × 8⅝ inches).
- Video Cassette: ¼-inch cassette for Betacam. It supports metal tape (BCT-5M/10M/20M/30M or equivalent) and oxide tape (BCT-5/10/20/30G or equivalent).
- Tape Speed: 101.5 mm/sec.
- Recording/Playback Time: 36 min. (with BCT-30M).
- Fast Forward Time: Less than 5.5 min. (with BCT-30M).
- Rewind Time: Less than 3.5 min. (with BCT-30M).
- Video (with standard playback machine) Bandwidth:
- Luminance (50%): Metal tape: 25 Hz to 5.5 MHz ±3 dB; Oxide tape: 25 Hz to 4.0 MHz ±3 dB.
- Colour difference (50%): Metal tape: 25 Hz to 1.5 MHz ±3 dB; Oxide tape: 25 Hz to 1.5 MHz ±3 dB.
- Signal-to-noise ratio:
- Luminance: Metal tape: More than 48 dB; Oxide tape: More than 46 dB.
- Colour difference: Metal tape: More than 48 dB; Oxide tape: More than 45 dB.
- K-factor (2T Pulse): Metal tape: Less than 2%; Oxide tape: Less than 3%.
- Y/C Delay: Metal tape: Less than 20 nsec; Oxide tape: Less than 20 nsec.
- Low frequency non-linearity: Metal tape: Less than 3%; Oxide tape: Less than 4%.
- Audio (with standard playback machine) Frequency Response (20 dB below peak level):
- AFM: 20 Hz to 20 kHz ±1 dB.
- LNG: 50 Hz to 15 kHz ±3 dB.
- Oxide tape LNG: 50 Hz to 15 kHz ±3.0 dB.
- Signal to noise ratio:
- AFM: More than 68 dB.
- LNG: More than 62 dB.
- Oxide tape LNG: More than 58 dB.
- Distortion (at 1 kHz) at peak level:
- AFM: Less than 3%.
- LNG: Less than 3%.
- Oxide tape LNG: Less than 3%.
- Distortion (at 1 kHz) at 0 VU level:
- AFM: Less than 0.6%.
- LNG: Less than 1.5%.
- Oxide tape LNG: Less than 2%.
- Crosstalk (at 1 kHz): Less than -65 dB.
- Wow and flutter (DIN45507): Less than 0.15%.
- Depth of erasure (at 1 kHz): More than 65 dB.
- Input Signals:
- Video (from the camera head, 50-pin): 100% color bars.
- Luminance: 1.0 Vp-p, 75 ohms.
- Chrominance: R-Y: 0.7 Vp-p, 75 ohms; B-Y: 0.7 Vp-p, 75 ohms.
- AUDIO IN CH-1/CH-2/CH-3/CH-4 (XLR 3-pin): -60 dB/-4 dB selectable, high impedance, balanced.
- GENLOCK VIDEO IN (BNC): 1.0 Vp-p, 75 ohms.
- TC IN (BNC): 0.5 V-18 Vp-p, 10 kohms.
- Signal Outputs:
- ENCODE VIDEO OUT (BNC): 1.0 Vp-p, 75 ohms.
- TC OUT (BNC): 1.0 Vp-p, 75 ohms.
- EARPHONE (mini jack): 8 ohms, -∞ to -20 dB variable.
- PB ADAPTOR (20-pin): (Not specified further, implies connection to playback adaptor).
- Supplied Accessories: Shoulder strap (1), 50-pin cap (1), Battery case (1), 4-pin cap (2), Screws (M4) (2).
Usage Features
The BVV-5PS is designed for ease of use in various recording scenarios.
- Assembly: The VTR unit can be assembled with compatible cameras (BVP-1P, BVP-3P, BVP-3AP, BVP-5P, BVP-30P, etc.) by removing a 50-pin cap and connecting the two units.
- Grip Position: The grip position can be changed for easier carrying by loosening screws with a coin or similar item, removing the grip, and then re-tightening the screws in the desired position.
- Shoulder Strap: A shoulder strap can be attached for portability.
- Power Sources: The unit can be operated with rechargeable battery packs (NP-1, NP-1A, BP-90, BP-90A) or an AC power adapter (AC-500CE/500).
- Battery Installation: Battery packs are inserted into the battery case. For BP-90/90A, an optional DC-500 battery case can be installed by removing screws, attaching the case, and tightening new screws.
- Battery Usage Notes: If both an installed battery pack and an external battery are connected, the unit can seamlessly switch power sources if one becomes low. It's recommended to replace the external battery first if it's low, then the internal battery, to avoid operation interruption.
- Connections:
- External Microphones: Up to 4 microphones can be connected to the AUDIO IN CH-1 to CH-4 connectors. If the CH-1 + 48 V switch is set to ON, the unit supplies power to the microphone. The AUDIO IN switch should be set to MIC.
- Wireless Microphone: A WRR-27 UHF portable tuner, WRT-27 transmitter, WRT-57 wireless microphone, etc., can be used. The WRR-27 portable tuner can be attached to the unit in its case BTA-27 (optional). The AUDIO IN switch should be set to MIC.
- External Equipment: Audio sources can be connected to the AUDIO IN CH-1 to CH-4 connectors. The AUDIO IN switch should be set to LINE.
- VA-5P VTR Composite/Component Adaptor: This adaptor can be attached to the unit by removing caps and tightening screws.
- Operation Panel Controls: The unit features various controls on its operation panel, including:
- EJECT button, REW, F FWD, PLAY, STOP buttons.
- Speaker, Volume control, CTDM PB button, POWER switch.
- WARNING lamp, CH-1 PEAK/CH-2 PEAK lamps, Level meters, BATT CHECK button.
- MONITOR SELECT switches (LNG/AFM for CH-1/CH-3 and CH-2/CH-4), AUDIO SELECT switches (AUTO/MAN), BREAKER button, PB ADAPTOR connector.
- DISPLAY window, RESET button, DISPLAY HOLD button, ALARM switch, MONITOR switch, LIGHT switch, EARPHONE jack, SHIFT button, ADVANCE button, HOURS METER.
- VITC controls, REAL TIME switch, F-RUN/R-RUN switch.
- Time Data Setting:
- Time Code Setting: The time code can be set by adjusting the DISPLAY switch to TC, F-RUN/R-RUN switch to SET, REAL TIME switch to ON or OFF, and using the ADVANCE and SHIFT buttons. The F-RUN/R-RUN switch can be set to F-RUN to generate time code regardless of VTR mode, or R-RUN for time code only in record mode.
- User's Bit Setting: The user's bit can be set by adjusting the DISPLAY switch to U-BIT, F-RUN/R-RUN switch to SET, REAL TIME switch to OFF, and using the ADVANCE and SHIFT buttons. The F-RUN/R-RUN switch can be set to F-RUN or R-RUN.
- Time Code Slave-Lock: The BVV-5PS can be locked to an external time code generator or to a master VTR for synchronized recording.
- Operation Check and Adjustment:
- Preparation: Insert a fully-charged battery pack, set POWER to ON, check that the HUMID indicator is off, check battery level with the BATT CHECK button, and insert a cassette tape.
- Checking the VTR: Set F-RUN/R-RUN to R-RUN, DISPLAY to CTL, press VTR START to check tape rotation, display changes, and REC lamp. Press VTR START again to confirm tape stops and REC lamp goes off. Press VTR button again to check tape rotation, figures on display, REC lamp, RF and SERVO indicators. Press RESET button to reset counter. Set LIGHT switch to ON to illuminate display and level meters.
- Checking the Time Data: Set user's bit, then time code, then F-RUN/R-RUN to R-RUN, press VTR START, press VTR START again, set F-RUN/R-RUN to F-RUN, set DISPLAY to U-BIT to check user's bit.
- Audio Recording Level Adjustment:
- Automatic: Set AUDIO SELECT CH-1 and CH-2 to AUTO, AUDIO IN CH-1 and CH-2 to CAM, MONITOR SELECT LNG/AFM to LNG, and point microphone to audio source.
- Manual: Set AUDIO IN CH-1 to CH-4 to CAM, AUDIO SELECT CH-1 and CH-2 to MAN, turn AUDIO LEVEL CH-1 and CH-2 controls clockwise, set MONITOR SELECT LNG/AFM to AFM, and turn AUDIO LEVEL CH-3 and CH-4 controls clockwise.
- External Microphones: Connect microphones to AUDIO IN CH-1 to CH-4, set AUDIO IN CH-1 to CH-4 to MIC, point microphones to sound source, set MONITOR SELECT LNG/AFM to LNG (for CH-1 and CH-2) or AFM (for CH-3 and CH-4).
- Checking Earphone and Speaker: Set CAMERA/VTR to VTR STBY, MONITOR to EE, turn LEVEL control. Connect earphone to EARPHONE jack, turn LEVEL control.
- Checking Audio Confidence Function: Set MONITOR to PB, AUDIO IN CH-1 to CAM (CH-2 to other position), press VTR START. Repeat for CH-2 to CAM (CH-1 to other position).
- Recording: Turn power on, insert cassette tape, set switches (AUDIO IN CH-1/CH-2 to AUTO, ZOOM-SERVO, OUTPUT-CAM, GAIN-Q), point camera at subject and adjust focus and zoom. Press VTR START or VTR button to begin recording. Check luminance and chrominance signals during recording.
- Recording Review: Press RET button on the lens to review the last two seconds of recording.
- Frame-Accurate Backspace Editing: This feature allows precise editing as long as the cassette is not ejected. Set CAMERA/VTR switch to VTR STBY. Find the desired editing point, stop the tape, press RET button, then press VTR or VTR START button to begin editing.
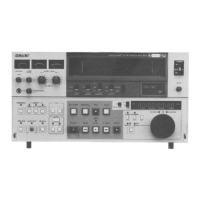
- Playback: Turn power on, insert cassette tape, press PLAY button. To stop, press STOP. To advance, press F FWD. To rewind, press REW. Playback can be monitored through the viewfinder or a TV/color monitor with a PB ADAPTOR.
- Warning System: The unit has a warning system with indicators in the viewfinder and on the display window. These indicators blink or light up to signal various issues such as recording circuit problems, drum servo not locked, contaminated heads, tape slack, tape end, or low battery.
- Alarm Sound Level Adjustment: The alarm volume can be adjusted using the volume control. To cut off the alarm sound only, set the ALARM switch to OFF.
Maintenance Features
- Moisture Condensation: If the unit is moved from a cold to a warm location, moisture may condense on the drum assembly. To prevent damage, set CAMERA/VTR switch to VTR SAVE, turn the unit on, and check the HUMID indicator. If it lights up, wait until it goes off before inserting a cassette. If moisture is present with a cassette inserted, eject the cassette and wait.
- Cleaning the Heads: Use the BCT-5CLN cleaning cassette to clean the heads. Refer to the instruction manual furnished with the BCT-5CLN. Excessive or incorrect use of the cleaning cassette may shorten the head life.
- General Operation Notes:
- Do not use the unit in extremely hot or cold locations or in places with high humidity.
- Avoid sudden temperature changes, particularly from an extremely cold location to a warm one, as this can cause condensation on the head drum assembly.
- Do not subject the unit to unnecessary vibration when carrying it.
- If the unit is not used for an extended period, remove the battery pack.
- Battery Maintenance: The charging period for battery packs is approximately 1 hour at normal temperatures. Refer to the instruction manual of the BC-1WACE charger for details.
- Time Code Backup: The backup battery holds the time code when the battery is removed. The backup time is about 60 hours (if the serial number of your unit is 11596 or less, the backup time is about 18 minutes).