EasyManua.ls Logo

Sony CCD-TRV318 User Manual

Sony CCD-TRV318
268 pages
To Next Page IconTo Next Page
Page #1 background imageLoading...
Page #1 background image
Digital
Video Camera Recorder [ )
Video Camera Recorder H| []
Operating Instructions
Before operating the unit, please read tiffs manual tboroughly,
and retain it for future reforence.
Owner's Record
The model and serial numbers are located on the bottom. Record the
serial number in tbe space provided below. Refer to tbese numbers
whenever you call upon your Sony dealer regarding tbis product.
Model No. -TRV Model No. AC-
SelialNo SelialNo
DCR-TRV350
IIililI_IHandycam
HandycamVi_i®_.
Digital 8
DCR- TRV150/TRV250/TRV350/TRV351 [)
videoHi8
CCD-TRV118/TRV318/TRV418 Hi []
@2003 Sony Corporation

Table of Contents

Other manuals for Sony CCD-TRV318

Question and Answer IconNeed help?

Do you have a question about the Sony CCD-TRV318 and is the answer not in the manual?

Sony CCD-TRV318 Specifications

General IconGeneral
Optical Zoom20x
Image SensorCCD
FocusAuto/Manual
ViewfinderColor
MicrophoneStereo
TypeCamcorder
Recording MediaHi8
LCD Screen Size2.5-inch

Summary

Operating Instructions

Owner's Record

Section to record model and serial numbers for dealer reference.

WARNING

For the customers in the U.S.A.

Specific safety warnings for customers in the USA.

Regulatory Information

Declaration of Conformity

Details on FCC compliance and operational conditions.

CAUTION

Main Features

Other uses

Covers additional functions like exposure adjustment and image effects.

Checking supplied accessories

Quick Start Guide - Recording on a tape

Quick Start Guide - Recording on a "Memory Stick"

Getting Started

Using this manual

Guidance on how to effectively use the manual.

Using this manual

On the POWER switch

Explanation of the POWER switch modes and their functions.

Using this manual

Precautions on camcorder care

Guidelines for maintaining the camcorder's condition.

Step 1 Preparing the power supply

Installing the battery pack

Instructions for inserting and removing the battery pack.

Step 1 Preparing the power supply

Charging the battery pack

Procedure for charging the rechargeable battery pack.

Step 2 Setting the date and time

Step 3 Inserting a cassette

Recording - Basics

Recording a picture

Basic steps for capturing video footage.

Recording a picture

Shooting in the dark - NightShot

Enables shooting in low-light conditions.

Checking recordings - END SEARCH

EDITSEARCH

Function to search for the next recording start point.

Rec Review

Function to check the last recorded section.

Playback - Basics

Playing back a tape

Instructions for playing recorded tapes.

Viewing recordings on TV

Advanced Recording Operations

Recording still images on a "Memory Stick" while recording on a tape

Capturing still images to Memory Stick during tape recording.

Using the wide mode

Using the fader function

Using special effects - Picture effect

Using special effects - Digital effect

Using the PROGRAM AE function

Adjusting the exposure manually

Focusing manually

Interval recording

Superimposing a title

Making your own titles

Using the built-in light

CAUTION

Warning about handling the hot lighting section.

DANGER

Safety warning regarding intense heat and light.

Advanced Playback Operations

Playing back a tape with picture effects

Applying picture effects during tape playback.

Playing back a tape with digital effects

Enlarging recorded images - Tape PB ZOOM

Quickly locating a scene - ZERO SET MEMORY

Searching for a recording by date - DATE SEARCH

Searching for a photo - PHOTO SEARCH/PHOTO SCAN

Editing

Dubbing a tape

Instructions for dubbing tapes using A/V or i.LINK connections.

Dubbing a tape easily - Easy Dubbing

Dubbing only desired scenes - Digital program editing (on tapes)

Recording video or TV programs

Inserting a scene from a VCR - Insert Editing

"Memory Stick" Operations - Recording

Using a "Memory Stick" - Introduction

Overview of Memory Stick functions and compatibility.

Recording still images on a "Memory Stick" - Memory Photo recording

Recording images from a tape as still images

Superimposing a still image in the "Memory Stick" on an image - MEMORY MIX

Recording moving pictures on a "Memory Stick" - MPEG movie recording

Recording pictures from a tape as a moving picture

Interval Photo recording

Recording edited pictures as a moving picture - Digital program editing (on a "Memory Stick" )

Setting up a folder

"Memory Stick" Operations - Playback

Viewing still images - Memory Photo playback

Playback of still images stored on Memory Stick.

Viewing moving pictures - MPEG movie playback

Selecting a folder to view

Copying images recorded on a "Memory Stick" to a tape

Enlarging still images recorded on a "Memory Stick" - Memory PB ZOOM

Playing back images continuously - SLIDE SHOW

Preventing accidental erasure - Image protection

Deleting images - DELETE

Writing a print mark - PRINT MARK

Viewing Images on Your Computer

Viewing images on your computer - Introduction

Overview of connecting camcorder to computer for image viewing.

Connecting your camcorder to your computer using the USB cable (Windows)

System requirements

Minimum system requirements for USB connection.

Connecting your camcorder to your computer using the USB cable (Windows)

Installing the USB driver

Step-by-step guide to install the USB driver.

Connecting your camcorder to your computer using the USB cable (Windows)

Installing ImageMixer

Guide to installing the ImageMixer software.

Connecting your camcorder to your computer using the USB cable (Windows)

Making the computer recognize the camcorder

Steps to ensure the computer detects the camcorder.

Viewing pictures recorded on a tape or live from your camcorder on your computer - USB Streaming (Windows)

Capturing images with ImageMixer

Process for capturing images using ImageMixer.

Viewing pictures recorded on a tape or live from your camcorder on your computer - USB Streaming (Windows)

Capturing still images

Steps for capturing still images.

Viewing pictures recorded on a tape or live from your camcorder on your computer - USB Streaming (Windows)

Capturing moving pictures

Steps for capturing moving pictures.

Viewing images recorded on a "Memory Stick" on your computer (Windows)

Viewing images with Image Transfer

Automated transfer of Memory Stick images to PC.

Viewing images recorded on a "Memory Stick" on your computer (Windows)

Viewing images without Image Transfer

Viewing images directly from Memory Stick.

Connecting your camcorder to your computer using the USB cable (Macintosh)

System requirements

Minimum system requirements for Mac OS.

Connecting your camcorder to your computer using the USB cable (Macintosh)

Installing the USB Driver

Guide to installing the USB driver for Mac OS.

Viewing images recorded on a "Memory Stick" on your computer (Macintosh)

Viewing images

Steps for viewing images on Mac.

Capturing images from an analog video unit on your computer - Signal convert function

Customizing Your Camcorder

Changing the menu settings

Guide to modifying camcorder settings via menus.

Changing the menu settings

Selecting the mode setting of each item

Details on available modes for each menu item.

Changing the menu settings

Changing the menu settings

Notes on formatting

Important notes regarding Memory Stick formatting.

Troubleshooting

Types of trouble and how to correct trouble

Guide to diagnosing and fixing common issues.

In the recording mode

Troubleshooting specific to recording mode problems.

Self-diagnosis display

5-digit display

Interpreting diagnostic codes.

Warning indicators and messages

Warning indicators

List and explanation of visual warning symbols.

Tape/Battery pack warning indicator

Indicators related to tape and battery status.

Warning indicators and messages

You need to eject the cassette

Warning for cassette ejection issues.

Additional Information

About video cassette

Information on video cassette types and systems.

Usable cassette tapes and Recording / Playback systems

Details on compatible tape types and systems.

About the "Memory Stick"

"Memory Stick" Recording/Playback

Overview of Memory Stick compatibility and functions.

About the "InfoLITHIUM" battery pack

Charging the battery pack

Instructions for charging the battery pack.

Effective use of the battery pack

Tips for maximizing battery life and performance.

About i.LINK

What is "i.LINK" ?

Explanation of the i.LINK interface standard.

Using your camcorder abroad

Using your camcorder abroad

Guidelines for using the camcorder internationally.

Maintenance information and precautions

Moisture condensation

Information and steps for handling moisture condensation.

If moisture condensation has occurred

Actions to take if condensation occurs.

Maintenance information and precautions

Cleaning the video heads

Procedure for cleaning video heads.

Cleaning the LCD screen

Instructions for cleaning the LCD screen.

Maintenance information and precautions

Charging the built-in rechargeable battery:

How to charge the internal battery.

Camcorder operation

General guidelines for operating the camcorder.

Specifications

Video camera recorder

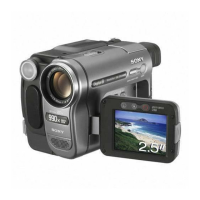
Technical specifications for the camcorder.

Quick Reference

Identifying parts and controls

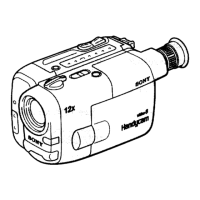
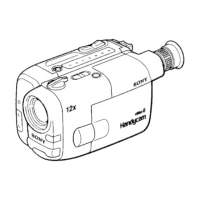
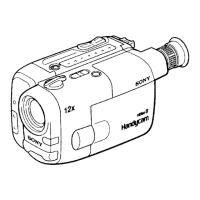
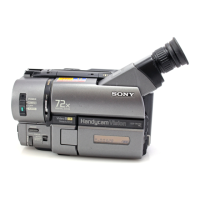
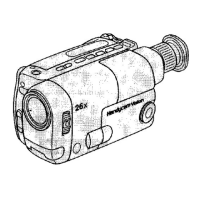
Diagrams and labels for camcorder parts.

Camcorder

Identification of camcorder components.

Identifying parts and controls

Remote Commander

Identification and usage of the remote commander.

Identifying parts and controls

LCD screen and Viewfinder

Identification of screen and viewfinder elements.

Identifying parts and controls

Operation indicators

Explanation of various operational indicators.

Related product manuals