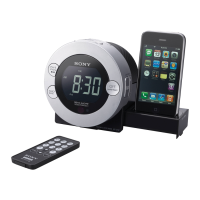
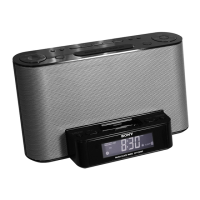
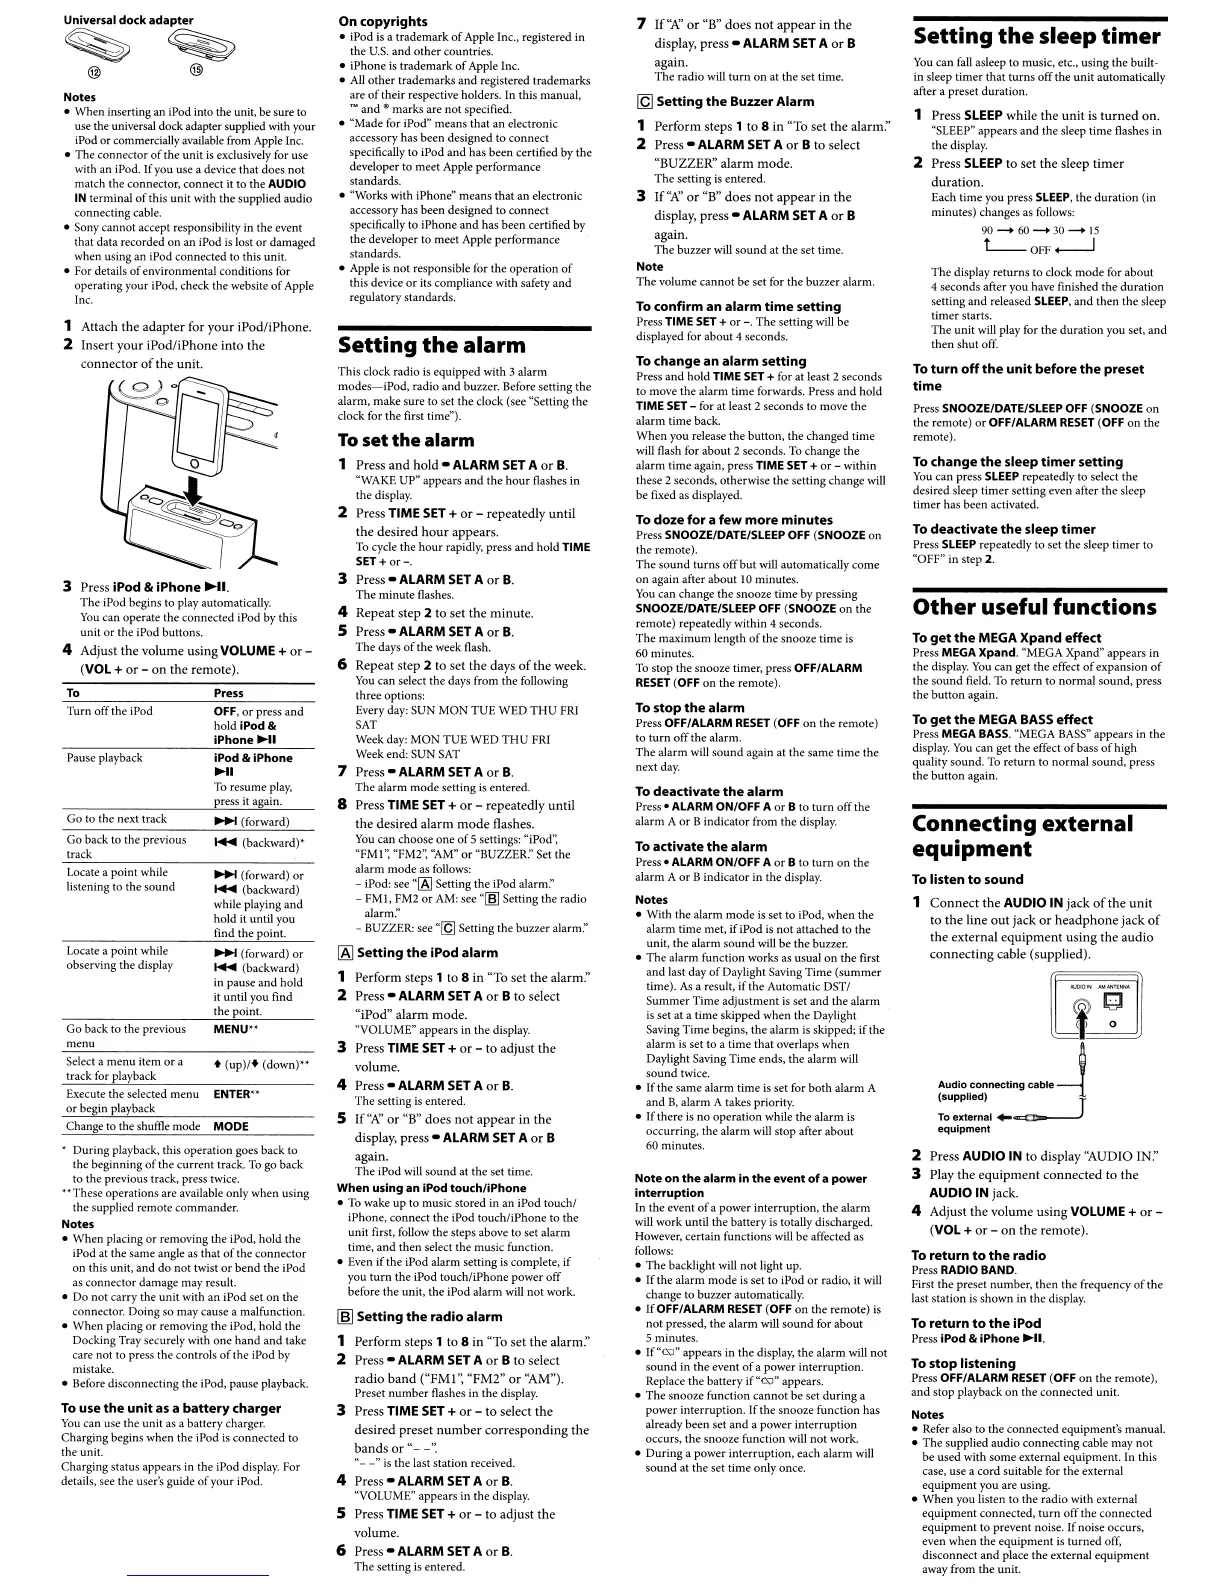
1 Attach the
adapter
for
your
iPod/iPhone.
2 Insert
your
iPod/iPhone
into
the
connector
of
the
unit.
Universal
dock
adapter
~~
@ @
3 Press
iPod
&
iPhone
~II.
The
iPod
begins to play automatically.
You
can
operate
the
connected
iPod by
this
unit
or
the
iPod buttons.
4 Adjust the
volume
using VOLUME +
or
-
(VOL +
or
-
on
the
remote).
To
stop
listening
Press
OFF/ALARM
RESET
(OFF
on the remote),
and
stop
playback
on
the
connected
unit.
Notes
• Refer also to the
connected
equipment's
manual.
•
The
supplied
audio
connecting
cable may
not
be
used with
some
external
equipment.
In this
case, use a
cord
suitable for
the
external
equipment
you
are using.
•
When
you
listen
to
the
radio
with external
equipment
connected,
turn
off
the
connected
equipment
to
prevent noise.
If
noise occurs,
even
when
the
equipment
is
turned
off,
disconnect
and
place
the
external
equipment
away from the unit.
To
return
to
the
iPod
Press iPod &
iPhone
~II.
To
turn
off
the
unit
before
the
preset
time
Press
SNOOZE/DATE/SLEEP
OFF
(SNOOZE
on
the remote) or
OFF/ALARM
RESET
(OFF
on the
remote).
To
change
the
sleep
timer
setting
You
can
press
SLEEP
repeatedly
to
select
the
desired sleep
timer
setting
even after
the
sleep
timer
has
been
activated.
2 Press AUDIO
IN
to
display ''AUDIO
IN:'
3 Play
the
equipment
connected
to
the
AUDIO
IN
jack.
4 Adjust
the
volume using VOLUME +
or-
(VOL +
or
-
on
the remote).
To
return
to
the
radio
Press
RADIO
BAND.
First
the
preset
number,
then
the
frequency
of
the
last
station
is
shown
in
the
display.
To
deactivate
the
sleep
timer
Press
SLEEP
repeatedly to set
the
sleep
timer
to
"OFF"
in
step 2.
1 Press SLEEP while the
unit
is
turned
on.
"SLEEP"
appears
and
the
sleep
time
flashes in
the
display.
2 Press SLEEP
to
set
the
sleep
timer
duration.
Each
time
you press
SLEEP,
the
duration
(in
minutes) changes as follows:
90-+60-+30-+15
L-OFF..-J
Other
useful
functions
To
listen
to
sound
1
Connect
the
AUDIO
IN
jack
of
the
unit
to
the
line
out
jack
or
headphone
jack
of
the
external
equipment
using
the
audio
connecting
cable (supplied).
Setting
the
sleep
timer
To
get
the
MEGA
Xpand
effect
Press
MEGA
Xpand.
"MEGA
Xpand" appears
in
the display.
You
can
get
the
effect
of
expansion
of
the
sound
field. To
return
to
normal
sound,
press
the
button
again.
You
can
fall asleep to music, etc.,
using
the
built-
in sleep
timer
that
turns
off
the
unit
automatically
after a preset duration.
The
display
returns
to
clock
mode
for
about
4
seconds
after
you have finished the
duration
setting
and
released
SLEEP,
and
then
the
sleep
timer
starts.
The
unit
will play for the
duration
you set.
and
then shut
off.
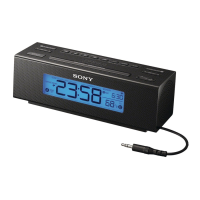
Connecting
external
equipment
C;wfrl
, 0
Audio
connecting cable
~
(supplied) T
To
external
~«'T""'fl
equipment
To
get
the
MEGA BASS
effect
Press
MEGA
BASS.
"MEGA
BASS"
appears
in
the
display.
You
can
get
the
effect
of
bass
of
high
quality
sound.
To
return
to
normal
sound,
press
the
button
again.
7
If
"1\'
or
"B"
does
not
appear
in
the
display, press - ALARM SET A
or
B
again.
The
radio
will
turn
on
at the set time.
To
confirm
an
alarm
time
setting
Press
TIME
SET
+
or
-.
The setting will
be
displayed for
about
4 seconds.
[Q
Setting
the
Buzzer
Alarm
1
Perform
steps 1
to
8
in
"To set
the
alarm:'
2 Press - ALARM SET A
or
B
to
select
"BUZZER"
alarm
mode.
The
setting
is
entered.
3
If
"K
or
"B"
does
not
appear
in
the
display,
press·
ALARM SET A
or
B
again.
The
buzzer
will
sound
at
the
set time.
Note
The
volume
cannot
be set for
the
buzzer
alarm.
To
change
an
alarm
setting
Press
and
hold
TIME
SET
+ for
at
least 2
seconds
to
move
the
alarm
time
forwards. Press
and
hold
TIME
SET
- for at least 2
seconds
to move
the
alarm
time
back.
When
you
release
the
button,
the
changed
time
will flash for
about
2 seconds.
To
change
the
alarm
time
again, press
TIME
SET
+
or
-
within
these 2 seconds,
otherwise
the
setting
change
will
be
fixed
as
displayed.
To
doze
for
a
few
more
minutes
Press
SNOOZE/DATE/SLEEP
OFF
(SNOOZE
on
the remote).
The
sound
turns
off
but
will automatically
come
on
again after
about
10 minutes.
You
can
change
the
snooze
time
by
pressing
SNOOZE/DATE/SLEEP
OFF
(SNOOZE
on
the
remote)
repeatedly
within
4 seconds.
The
maximum
length
of
the
snooze
time
is
60 minutes.
To
stop
the
snooze
timer, press OFF/ALARM
RESET
(OFF
on
the remote).
To
activate
the
alarm
Press·
ALARM
ON/OFF Aor Bto turn
on
the
alarm
A
or
B
indicator
in
the
display.
Notes
•
With
the
alarm
mode
is set
to
iPod,
when
the
alarm
time met, if
iPod
is
not
attached to
the
unit,
the
alarm
sound
will
be
the
buzzer.
•
The
alarm function works as usual
on
the
first
and
last day
of
Daylight Saving
Time
(summer
time). As a result,
if
the
Automatic DSTI
Summer
Time
adjustment
is set
and
the
alarm
is set at a
time skipped
when
the Daylight
Saving
Time
begins,
the
alarm
is skipped;
if
the
alarm
is
set
to
a
time
that overlaps
when
Daylight Saving
Time
ends,
the
alarm
will
sound
twice.
•
If
the
same
alarm
time
is set for
both
alarm
A
and
B,
alarm
A takes priority.
•
If
there
is
no
operation
while
the
alarm
is
occurring,
the
alarm
will
stop
after
about
60 minutes.
To
stop
the
alarm
Press
OFF/ALARM
RESET
(OFF
on
the remote)
to
turn
off
the
alarm.
The
alarm
will
sound
again at the
same
time
the
next day.
To
deactivate
the
alarm
Press·
ALARM
ON/OFF Aor B
to
turn off the
alarm
A
or
B
indicator
from the display.
Note
on
the
alarm
in
the
event
of
a
power
interruption
In
the
event
of
a
power
interruption,
the
alarm
will
work
until the
battery
is totally discharged.
However,
certain
functions will be affected as
follows:
• The backlight
will
not light
up.
•
If
the
alarm
mode
is set
to
iPod
or
radio, it will
change
to
buzzer
automatically.
•
JfOFF/ALARM
RESET
(OFF
on the remote)
is
not
pressed,
the
alarm
will
sound
for
about
5 minutes.
•
If"~"
appears
in
the
display,
the
alarm
will
not
sound
in
the
event
of
a
power
interruption.
Replace
the
battery
if
"c...'\)"
appears.
•
The
snooze
function
cannot
be
set
during
a
power
interruption.
If
the
snooze
function
has
already
been
set
and
a
power
interruption
occurs,
the
snooze
function
will
not
work.
•
During
a
power
interruption,
each
alarm
will
sound
at
the
set
time
only once.
IAJ
Setting
the
iPod
alarm
1
Perform
steps 1 to 8 in "To set the
alarm:'
2 Press - ALARM SET A
or
B to select
''iPod''
alarm
mode.
"VOLUME"
appears
in
the display.
3 Press TIME SET +
or
-
to
adjust
the
volume.
4
Press.
ALARM SET A
or
B.
The
setting is entered.
S
Jf"K
or
"B"
does
not
appear
in the
display,
press·
ALARM SET A
or
B
again.
The
iPod
will
sound
at
the
set time.
When using
an
iPod
touch/iPhone
• To wake
up
to music stored in
an
iPod
touchI
iPhone,
connect
the iPod
touchliPhone
to
the
unit
first, follow
the
steps above to set
alarm
time,
and
then
select the music function.
• Even
if
the
iPod alarm setting is complete,
if
you
turn
the
iPod
touch/iPhone
power
off
before the unit,
the
iPod
alarm
will
not
work.
On
copyrights
• iPod is a
trademark
of
Apple Inc., registered in
the
u.s.
and
other
countries.
•
iPhone
is
trademark
of
Apple Inc.
• All
other
trademarks and
registered
trademarks
are
of
their
respective holders. In this
manual,
1'M
and
~
marks
are
not
specified.
•
"Made
for iPod"
means
that
an
electronic
accessory has been designed
to
connect
specifically to iPod
and
has
been certified by
the
developer to
meet
Apple
performance
standards.
• "Works with iPhone"
means
that
an
electronic
accessory
has
been
designed to
connect
specifically to
iPhone
and
has
been
certified by
the developer
to
meet
Apple
performance
standards.
• Apple
is
not
responsible for
the
operation
of
this device
or
its compliance with safety
and
regulatory standards.
To
set
the
alarm
1 Press
and
hold·
ALARM SET A
or
B.
"WAKE
UP"
appears
and
the
hour
flashes in
the
display.
2 Press TIME SET +
or
- repeatedly until
the
desired
hour
appears.
To
cycle
the hour rapidly, press and hold
TIME
SET
+
or-.
3 Press - ALARM SET A
or
B.
The
minute
flashes.
4 Repeat step 2
to
set
the
minute.
S
Press.
ALARM SET A
or
B.
The
days
ofthe
week
flash.
6 Repeat step 2 to set
the
days
of
the week.
You
can
select
the
days from
the
following
three options:
Every
day:
SUN
MON
TUE
WED
THU
FRI
SAT
Week
day:
MON
TUE
WED
THU
FRJ
Week
end:
SUN
SAT
7 Press - ALARM SET A
or
B.
The
alarm
mode
setting
is
entered.
8 Press TIME SET +
or
- repeatedly until
the
desired
alarm
mode
flashes.
You
can
choose
one
of
5 settings: "iPod':
"FM
I
';
"FM2':
"AM"
or "BUZZER:'
Set
the
alarm
mode
as follows:
- iPod: see
"[AI
Setting
the
iPod
alarm:'
-
FM
I,
FM2
or
AM:
see"~
Setting the radio
alarm:'
- BUZZER: see
"[Q]
Setting
the
buzzer
alarm:'
Setting
the
alarm
This
clock radio is
equipped
with 3
alarm
modes-iPod,
radio
and
buzzer. Before
setting
the
alarm,
make
sure to set
the
clock (see "Setting
the
clock for
the
first time").
~
Setting
the
radio
alarm
1
Perform
steps 1 to 8 in "To set the alarm:'
2 Press - ALARM SET A
or
B
to
select
radio
band
("FMr:
"FM2"
or
"AM").
Preset
number
flashes in
the
display.
3 Press TIME SET +
or
-
to
select
the
desired preset
number
corresponding
the
bands
or"
- -".
"-
-"
is
the
last station received.
4 Press - ALARM SET A
or
B.
"VOLUME"
appears
in
the
display.
S Press TIME SET +
or
-
to
adjust
the
volume.
6 Press - ALARM SET A
or
B.
The
setting
is entered.
~
(backward)'
iPod &
iPhone
~II
To
resume
play,
press it again.
MENU"
OFF,
or
press
and
hold iPod &
iPhone
~II
_ (forward) or
~
(backward)
while playing and
hold
it until you
find the point.
Press
...
(forward)
or
~
(backward)
in pause
and
hold
it until
you
find
the
point.
ENTER"
MODE
•
(up)/.
(down)"
_(forward)
To
Locate a
point
while
observing the display
Go
back to
the
previous
track
Pause playback
Turn
off
the iPod
Go
back
to
the previous
menu
Locate a
point
while
listening to the
sound
Go
to
the
next track
Execute
the
selected
menu
or
begin playback
Change
to
the
shuffle
mode
Select a
menu
item
or
a
track
for playback
Notes
• When inserting an iPod into the unit, be sure to
use the universal dock adapter supplied with your
iPod
or
commercially available from Apple Inc.
•
The
connector
of
the
unit
is
exclusively for
use
with an iPod. If
you
use a device
that
does
not
match
the
connector.
connect
it
to
the
AUDIO
IN
terminal
of
this unit with
the
supplied
audio
connecting
cable.
• Sony
cannot
accept responsibility
in
the event
that
data
recorded
on
an iPod
is
lost
or
damaged
when
using an iPod
connected
to
this unit.
• For details
of
environmental
conditions for
operating your iPod, check the website
of
Apple
Inc.
"
During
playback, this
operation
goes back to
the
beginning
of
the
current
track.
To
go back
to
the
previous track, press twice.
*"These operations are available
only
when
using
the
supplied
remote
commander.
Notes
•
When
placing
or
removing the iPod,
hold
the
iPod at the
same
angle as
that
of
the
connector
on
this unit,
and
do
not
twist
or
bend
the
iPod
as
connector
damage
may result.
• Do not
carry
the
unit with
an
iPod set
on
the
connector.
Doing
so
may cause a malfunction.
•
When
placing
or
removing
the
iPod, hold the
Docking Tray securely with
one
hand
and
take
care not
to
press the controls
of
the
iPod by
mistake.
• Before
disconnecting
the iPod, pause playback.
To
use
the
unit
as
a
battery
charger
You
can use the unit as a battery charger.
Charging
begins
when
the
iPod is
connected
to
the
unit.
Charging status appears in
the
iPod display. For
details, see the user's guide
of
your iPod.
 Loading...