Quick Start Guide US
Guide de prise en main FR
Guía de inicio rápido ES
© 2014 Sony Corporation
Printed in China
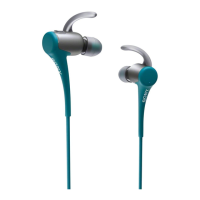
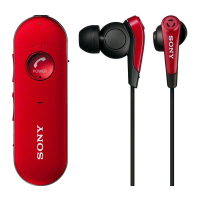
MDR-AS800BT
Wireless
Stereo Headset
Casque
stéréo sans fil
Auriculares
estéreo
inalámbricos
4-542-123-13(1)
Charging the unit/
Chargement de l’appareil/
Cargar la unidad
Connect the unit and the booted computer using the micro-USB
cable supplied.
When the unit and the computer are connected, charging starts and the
indicator (red) lights up. Charging is completed in about 2hours at most and the
indicator (red) goes off automatically.
Notes
ˎ Use the micro-USB cable supplied. You may not be able to charge the unit with other
cables.
ˎ An iPhone, iPad, or iPod touch (iOS 5.0 or later) will show an icon that indicates the
remaining battery charge of the headset on the screen. For details, refer to the Help
Guide (See the backside).
Connectez l’appareil à l’ordinateur allumé à l’aide du câble micro-
USB fourni.
Lorsque l’appareil et l’ordinateur sont connectés, le chargement commence et
le témoin (rouge) s’allume. Le chargement dure environ 2heures au maximum
et le témoin (rouge) s’éteint automatiquement.
Remarques
ˎ Utilisez le câble micro-USB fourni. Il pourra s’avérer impossible de charger l’appareil
avec d’autres câbles.
ˎ Les iPhone, iPad ou iPod touch (iOS 5.0 ou ultérieur) affichent une icône qui indique
la charge restante de la batterie du casque sur l’écran. Pour plus de détails, consultez
le Manuel d’aide (voir le côté droit).
Conecte la unidad y la computadora iniciada usando el cable
micro-USB proporcionado.
Cuando la unidad y la computadora están conectadas, comienza la carga y el
indicador (rojo) se enciende. La carga finaliza en aproximadamente 2horas
como máximo y el indicador (rojo) se apaga automáticamente.
Notas
ˎ Use el cable micro-USB proporcionado. Puede que la unidad no se cargue si utiliza
otros cables.
ˎ Un iPhone, iPad o iPod touch (iOS 5.0 o superior) mostrará un icono con el tiempo
de batería restante de los auriculares en la pantalla. Para obtener más información,
consulte la Guía de ayuda (mire el lado derecho).
A
One-touch connection with a smartphone (NFC)/
Connexion une touche avec un smartphone (NFC)/
Conéctate con un solo toque con un teléfono inteligente (NFC)
NFC Easy Connect/
Connexion NFC facile/
Conexión fácil NFC
B
Pairing and connecting with a BLUETOOTH device/
Pairage et connexion avec un périphérique BLUETOOTH/
Emparejar y conectar con un dispositivo BLUETOOTH
Multi-function button/
Bouton multifonction/
Botón multifunción
Blue/
Bleu/
Azul
Red/
Rouge/
Rojo
1 Place the BLUETOOTH device within 1 meter (3 feet) of this unit.
2 Enter pairing mode on this unit.
Press and hold the multi-function button for about 7 seconds.
Make sure that the indicator flashes blue and red alternately after you release
the button.
3 Perform the pairing procedure on the BLUETOOTH device to
detect this unit.
When the list of detected devices appears on the display of the BLUETOOTH
device, select “MDR-AS800BT.”
If passkey input is required on the display of the BLUETOOTH device, input
“0000.”
4 Make the BLUETOOTH connection from the BLUETOOTH device.
1 Placez le périphérique BLUETOOTH dans un rayon de 1mètre
(3pieds) par rapport à l’appareil.
2 Entrez en mode de pairage sur l’appareil.
Maintenez le bouton multifonction enfoncé pendant environ 7 secondes.
Vérifiez que le témoin clignote alternativement en bleu et en rouge lorsque
vous relâchez le bouton.
3 Effectuez la procédure de pairage sur le périphérique BLUETOOTH
pour détecter l’appareil.
Lorsque la liste des périphériques détectés apparaît sur l’écran du périphérique
BLUETOOTH, sélectionnez «MDR-AS800BT».
Si un code est demandé sur l’écran du périphérique BLUETOOTH, saisissez
«0000».
4 Effectuez la connexion BLUETOOTH sur le périphérique
BLUETOOTH.
1 Coloque el dispositivo BLUETOOTH a una distancia dentro de
1metro de esta unidad.
2 Ingrese al modo de emparejamiento de esta unidad.
Mantenga presionado el botón multifunción durante aproximadamente
7segundos.
Asegúrese de que el indicador parpadee en azul y rojo de manera alternada
después de soltar el botón.
3 Realice el procedimiento de emparejamiento en el dispositivo
BLUETOOTH para detectar esta unidad.
Cuando aparezca la lista de dispositivos detectados en la pantalla del
dispositivo BLUETOOTH, seleccione “MDR-AS800BT”.
Si le exigen ingresar una clave de acceso en la pantalla del dispositivo
BLUETOOTH, ingrese “0000”.
4 Establezca la conexión BLUETOOTH desde el dispositivo
BLUETOOTH.
Connecting with the device paired in /
Connexion au périphérique apparié en
/
Conectar con el dispositivo emparejado en
Multi-function button/
Bouton multifonction/
Botón multifunción
Blue/
Bleu/
Azul
1 Turn on the unit.
Press and hold the multi-function button for about 2seconds while this unit is
turned off.
Make sure that the indicator flashes blue after you release the button.
2 Make the BLUETOOTH connection from the BLUETOOTH device.
1 Mettez l’appareil sous tension.
Appuyez sur le bouton multifonction et maintenez-le enfoncé environ
2 secondes lorsque l’appareil est hors tension.
Vérifiez que le témoin clignote en bleu lorsque vous relâchez le bouton.
2 Effectuez la connexion BLUETOOTH sur le périphérique
BLUETOOTH.
1 Encienda la unidad.
Mantenga presionado el botón multifunción durante aproximadamente
2segundos mientras esta unidad se apaga.
Asegúrese de que el indicador parpadee en azul después de que suelte el
botón.
2 Establezca la conexión BLUETOOTH desde el dispositivo
BLUETOOTH.
By touching the unit with a smartphone, the unit is turned on automatically and
proceeds to pair and connect via BLUETOOTH.
Compatible smartphones
NFC-compatible smartphones with Androidː 2.3.3 or later installed.
On the connection with other BLUETOOTH devices, see “
Pairing and Connecting
with a BLUETOOTH device.”
NFC
NFC (Near Field Communication) is a technology enabling short-range wireless
communication between various devices, such as smartphones and IC tags.
Thanks to the NFC function, data communication - for example, BLUETOOTH
pairing - can be achieved easily by simply touching NFC compatible devices
together (i.e., at the N-Mark symbol or location designated on each device).
1 Set the NFC function of the smartphone to on.
For details, refer to the operating instructions supplied with the smartphone.
ˎ If your smartphone OS is Android 2.3.3 or later, and less than Android 4.1:
proceed to step 2.
ˎ If your smartphone OS is Android 4.1 or later: proceed to step 4.
2 Download and install the app “NFC Easy Connect.”
“NFC Easy Connect” is a free Android app you can download from Google
Playː.
Download the app by searching for “NFC Easy Connect” or access it by using
the two-dimensional code. Fees may be charged for downloading the app.
Note
The App may not be available in some countries and/or regions.
3 Start the app “NFC Easy Connect” on the smartphone.
Make sure that the application screen is displayed.
4 Touch this unit with the smartphone.
Unlock the screen of the smartphone beforehand.
Touch the smartphone on the N marked part of this unit.
Keep touching the unit with the smartphone until the smartphone reacts.
Follow the on-screen instructions to complete the pairing and connection.
To disconnect, touch the smartphone again.
You can select the sound from other NFC compatible BLUETOOTH devices. For
details, refer to the Help Guide.
To connect the unit with the paired smartphone, perform step 4. (When you
are using the app “NFC Easy Connect,” perform steps 3 and 4.)
En mettant l’appareil en contact avec un smartphone, l’appareil est
automatiquement mis sous tension, puis procède au pairage et à la connexion via
BLUETOOTH.
Smartphones compatibles
Les smartphones compatibles NFC sur lesquels Androidː2.3.3 ou ultérieur est
installé.
Pour voir des informations sur la connexion à d’autres périphériques BLUETOOTH,
consultez «
Pairage et connexion avec un périphérique BLUETOOTH».
NFC
NFC (Near Field Communication) est une technologie permettant d’établir une
communication sans fil à courte portée entre divers périphériques, tels que
des smartphones et des étiquettes électroniques. Grâce à la fonction NFC, il
est possible de communiquer des données facilement (par exemple pairage
BLUETOOTH) en mettant en contact des périphériques compatibles NFC entre eux
(sur le symbole N-Mark ou à l’emplacement conçu sur chaque périphérique).
1 Activez la fonction NFC du smartphone.
Pour plus de détails, consultez le mode d’emploi fourni avec le smartphone.
ˎ Si l’OS de votre smartphone est Android2.3.3 ou ultérieur, et inférieur à
Android4.1: passez à l’étape2.
ˎ Si l’OS de votre smartphone est Android4.1 ou ultérieur: passez à l’étape4.
2 Téléchargez et installez l’application «Connexion NFC facile».
«Connexion NFC facile» est une application Android gratuite que vous pouvez
télécharger sur Google Playː.
Téléchargez l’application en recherchant «Connexion NFC facile» ou accédez-y
en utilisant le code 2D. Le téléchargement de l’application peut être payant.
Remarque
Il est possible que l’application ne soit pas disponible dans certains pays et/ou dans
certaines régions.
3 Démarrez l’application «Connexion NFC facile» sur le
smartphone.
Vérifiez que l’écran de l’application s’affiche.
4 Mettez l’appareil en contact avec le smartphone.
Déverrouillez l’écran du smartphone au préalable.
Placez le smartphone sur la partie marquée d’un N de l’appareil.
Maintenez le contact entre l’appareil et le smartphone jusqu’à ce que ce
dernier réagisse.
Suivez les instructions à l’écran pour terminer le pairage et la connexion.
Pour déconnecter, mettez de nouveau le smartphone en contact avec l’appareil.
Vous pouvez sélectionner le son d’autres périphériques BLUETOOTH compatibles
avec NFC. Pour plus de détails, consultez le Manuel d’aide.
Pour connecter l’appareil et le smartphone apparié, effectuez l’étape4.
(Lorsque vous utilisez l'application « Connexion NFC facile », effectuez les
étapes 3 et 4.)
Al tocar la unidad con un teléfono inteligente, la unidad se enciende
automáticamente y luego procede con el emparejamiento y la conexión a través
de BLUETOOTH.
Teléfonos inteligentes compatibles
Teléfonos inteligentes compatibles con la tecnología NFC que tengan instalado
Androidː 2.3.3 o posterior.
Si desea obtener más información sobre la conexión con otros dispositivos
BLUETOOTH, consulte el apartado “
Emparejar y conectar con un dispositivo
BLUETOOTH”.
NFC
NFC (Near Field Communication) es una tecnología que permite la comunicación
de rango corto inalámbrica entre varios dispositivos, como teléfonos inteligentes
y etiquetas IC. Gracias a la función NFC, la comunicación de datos, como el
emparejamiento mediante BLUETOOTH, resulta sencilla, ya que simplemente
es necesario tocar un dispositivo compatible con la tecnología NFC con otro
(por ejemplo, en el símbolo de N-Mark o en la ubicación designada en cada
dispositivo).
1 Encienda la función NFC del teléfono inteligente.
Para obtener más información, consulte las instrucciones de funcionamiento
incluidas con su teléfono inteligente.
ˎ Si el teléfono inteligente dispone del sistema operativo Android 2.3.3 o
posterior, e inferior a Android 4.1, continúe con el paso 2.
ˎ Si el teléfono inteligente dispone del sistema operativo Android 4.1 o
posterior, continúe con el paso 4.
2 Descargue e instale la aplicación “Conexión fácil NFC”.
La aplicación “Conexión fácil NFC” es una aplicación gratuita para Android que
se puede descargar en Google Playː.
Para descargar la aplicación, busque “Conexión fácil NFC” o acceda a la
misma mediante el código bidimensional. La descarga de la aplicación puede
conllevar cargos.
Nota
Puede que esta aplicación no esté disponible para ser descargada en algunos países
o regiones.
3 Inicie la aplicación “Conexión fácil NFC” en el teléfono inteligente.
Asegúrese de que la pantalla de la aplicación esté visible.
4 Toque esta unidad con el teléfono inteligente.
Desbloquee la pantalla del teléfono inteligente previamente.
Toque con el teléfono inteligente la parte marcada con N de esta unidad.
Siga tocando la unidad con el teléfono inteligente hasta que éste reaccione.
Siga las instrucciones en pantalla para completar el emparejamiento y la
conexión.
Para desconectar, toque de nuevo el teléfono inteligente.
Puede seleccionar el sonido de otros dispositivos BLUETOOTH compatibles con
NFC. Para obtener más información, consulte la Guía de ayuda.
Para conectar la unidad con el teléfono inteligente emparejado, realice el
paso 4. (Cuando utilice la aplicación “Conexión fácil NFC”, realice los pasos 3
y 4.)