MANUAL AUDIO CONTROL SETUP
1. Set the POWER switch to CAMERA
2. Press MENU to display the menu.
3. Turn the SEL/PUSH EXEC dial to
select
TAPE SET >
AUDIO SET >
AGC CH1 - OFF
AGC CH 2 - OFF
MAN GAIN - SEPARATED
[MENU]: END
Switches the recording level
adjustment of the channel1 from
automatic (ON) and manual (OFF).
Switches the recording level
adjustment of the channel1 from
automatic (ON) and manual (OFF).
Switches the recording level
adjustment of the channel 2 from
automatic (ON) and manual (OFF).
Switches the recording level
adjustment of the channel 2 from
automatic (ON) and manual (OFF).
Sets the recording levels of channel
1 and channel 2 linked (LINKED) or
separated (SEPARATED).
Sets the recording levels of channel
1 and channel 2 linked (LINKED) or
separated (SEPARATED).
AGC 2 + LINKED MAN GAIN ONLY WORKS
WHEN USING THE SECOND MIC INPUT
AGC 2 + LINKED MAN GAIN ONLY WORKS
WHEN USING THE SECOND MIC INPUT
AGC 2 + LINKED MAN GAIN ONLY WORKS
WHEN USING THE SECOND MIC INPUT
53
Advanced Recording Operations
Adjusting the recording level manually
– Sound recording level
You can adjust the recording sound level. Use headphones to monitor the sound when
you adjust it. You can adjust the channel 1 and channel 2 separately.
Selecting the channel to be adjusted manually
(1) Set the POWER switch to CAMERA or VCR.
(2) Press MENU to display the menu.
(3) Turn the SEL/PUSH EXEC dial to select
, then press the dial.
(4) Turn the SEL/PUSH EXEC dial to select AUDIO SET, then press the dial.
(5) Turn the SEL/PUSH EXEC dial to select the desired item, then press the dial.
(6) Turn the SEL/PUSH EXEC dial to select the setting of the item, then press the
dial.
(7) Press MENU to erase the menu display.
Items to be adjusted
Item
AGC CH1
AGC CH2
a)
MAN GAIN
a)b)
a) This is only available when connecting the external microphone to the INPUT2
connector.
b) LINKED is only available when both AGC CH1 and AGC CH2 are set to OFF.
Meaning
Switches the recording level adjustment of the
channel 1 from automatic (ON) and manual (OFF).
Switches the recording level adjustment of the
channel 2 from automatic (ON) and manual (OFF).
Sets the recording levels of channel 1 and channel 2
linked (LINKED) or separated (SEPARATED).
Setting
ON
OFF
ON
OFF
SEPARATED
LINKED
5,6
TAPE SET
AUD
I
O SET
AGC CH1
AGC CH2
MAN GA
I
N
RETURN
ON
OFF
[
MENU
]
:
END
[
MENU
]
:
END
TAPE SET
AUD
I
O SET
AGC CH1
AGC CH2
MAN GA
I
N
RETURN
OFF
[
MENU
]
:
END
1
2,7
3,4
POWER
OFF
(CHG)
CAMERA
MEMORY
VCR
TAPE SET
REC MODE
AUD
I
O MODE
REMA
I
N
M
I
C NR
AUD
I
O SET
[
MENU
]
:
END
[
MENU
]
:
END
TAPE SET
AUD
I
O SET
AGC CH1
AGC CH2
MAN GA
I
N
RETURN
ON
[
MENU
]
:
END
MENU
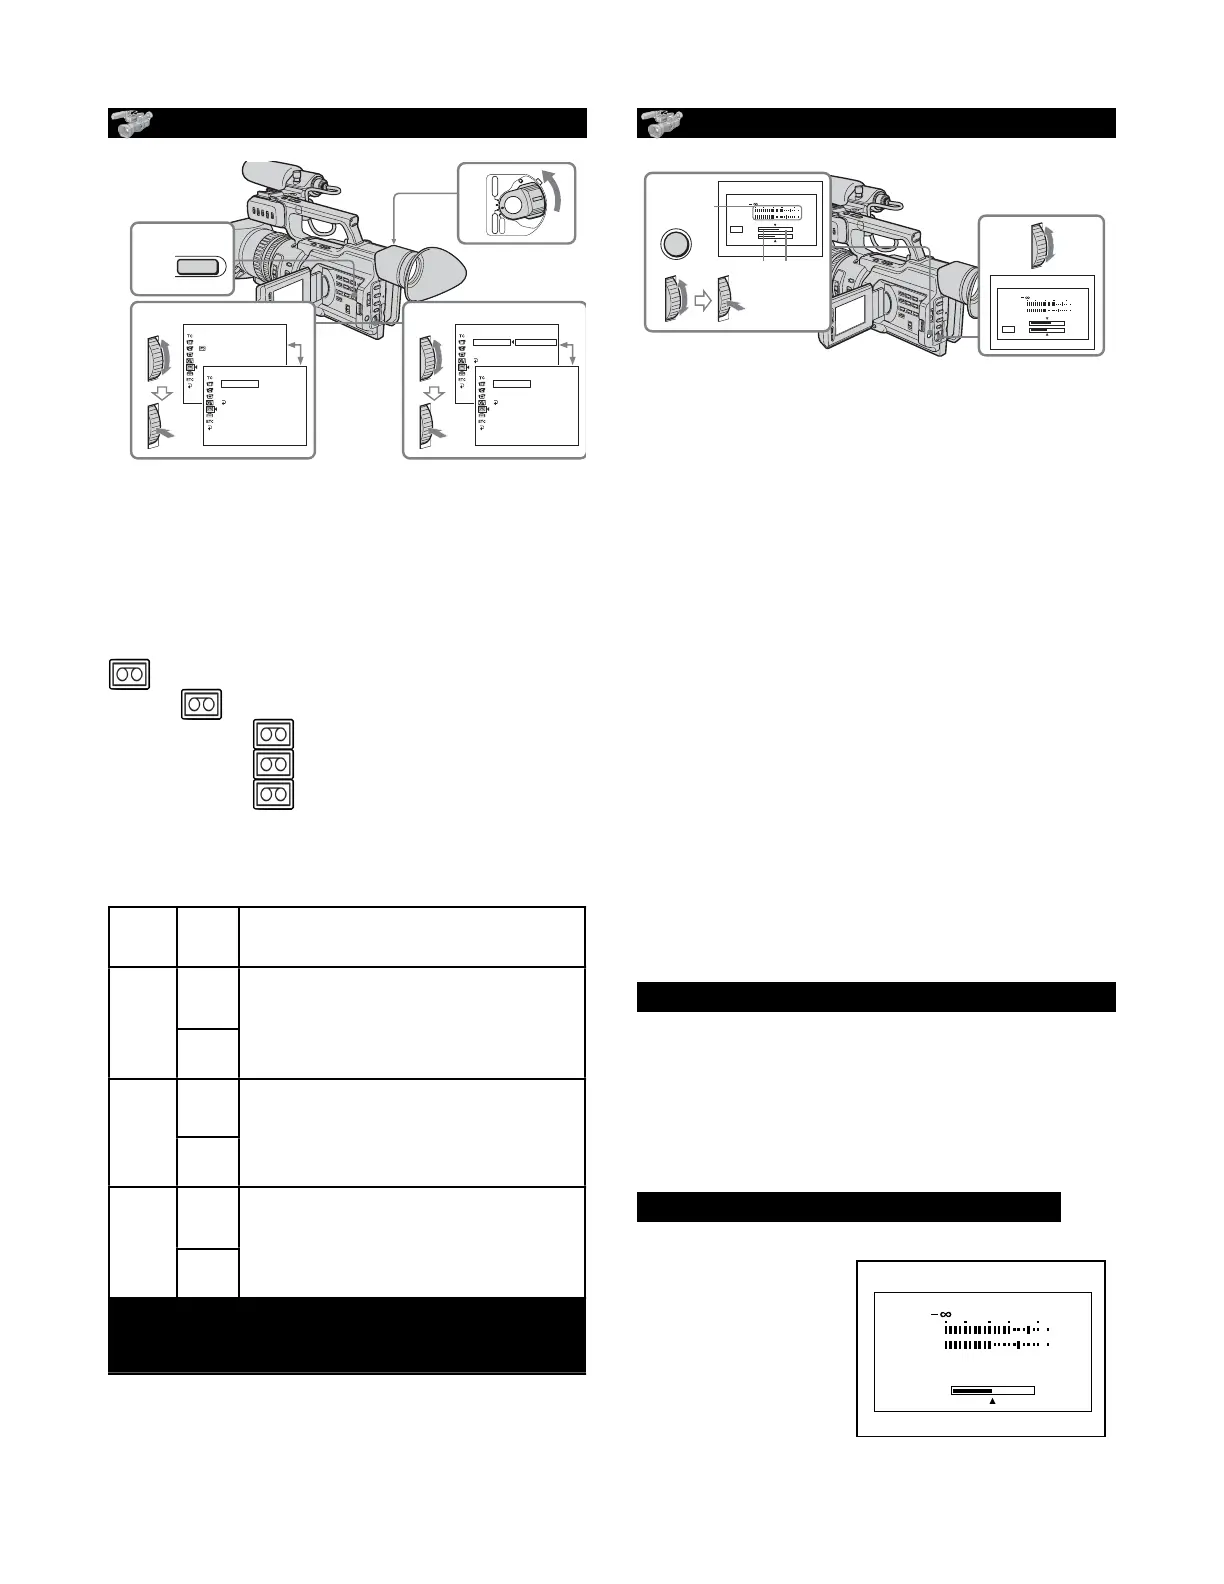
ADJUSTING RECORDING LEVELS
[a] Recording level meter
[b] Decreases the recording level
[c] Increases the recording level
1. Press the silver AUDIO LEVEL button to
display the recording level adjustment
display in standby or recording mode.
2.Turn the SEL/PUSH EXEC dial to adjust
the recording level of the channel 1, then
press the dial. The cursor moves to “CH2,”
and you can adjust the recording level of
the channel 2.
3.Turn the SEL/PUSH EXEC dial to adjust
the recording level of the channel 2.
To clear the recording level adjustment
display, press AUDIO LEVEL again.
when AGC CH1 or AGC CH2 is set to ON
You can see the recording level adjustment
display, however, you cannot adjust the
recording level of the channel that the item
above is set to ON.
When MAN GAIN is set to LINKED
The recording level
adjustment display
is changed like so:
54
Adjusting the recording level manually– Sound recording level
To adjust the recording level automatically
Set AGC CH1 to ON when you automatically adjust the recording level of the channel 1. And
set AGC CH2 to ON when you automatically adjust the recording level of the channel 2.
When the recording level is adjusted manually
The recording level indicator appears at the lower-right on the LCD screen or in the
viewfinder.
The sound input through the AUDIO CH1/CH2 jacks or DV Interface
You cannot adjust the recording level.
Adjusting the recording level
(1) Press AUDIO LEVEL to display the recording level adjustment display in
standby or recording mode.
(2) Turn the SEL/PUSH EXEC dial to adjust the recording level of the channel 1,
then press the dial. The cursor moves to “CH2,” and you can adjust the
recording level of the channel 2.
(3) Turn the SEL/PUSH EXEC dial to adjust the recording level of the channel 2.
[a] Recording level meter
[b] Decreases the recording level
[c] Increases the recording level
To clear the recording level adjustment display
Press AUDIO LEVEL again.
When AGC CH1 or AGC CH2 is set to ON
You can see the recording level adjustment display, however, you cannot adjust the
recording level of the channel that the item above is set to ON.
When MAN GAIN is set to LINKED
The recording level adjustment display is changed as follows.
3
1,2
[a]
[b] [c]
AUDIO
LEVEL
30 20 12 0 dB
CH1
CH2
CH1
CH2
30 20 12 0 dB
CH1
CH2
CH1
CH2
30 20 12 0 dB
CH1
CH2
CH1,2
PD 170 Orientation
 Loading...