Do you have a question about the Sony RMT-P1BT and is the answer not in the manual?
Explains the location of the built-in Bluetooth antenna and how to avoid connection failures.
Provides important information regarding battery disposal, handling fluid leaks, and battery lifespan.
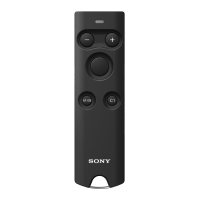
The Sony RMT-P1BT Remote Commander is a versatile wireless remote control designed to enhance your photography and videography experience with compatible Sony cameras featuring Bluetooth functionality. This device allows for remote operation of various camera functions, providing greater flexibility and convenience, especially for self-portraits, group shots, long exposures, or situations where minimizing camera shake is crucial.
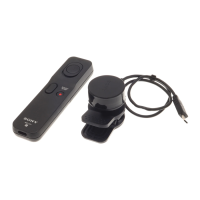
At its core, the Remote Commander serves as an extension of your camera, enabling you to trigger the shutter, start/stop video recording, adjust focus, and control zoom from a distance. It connects to your camera via Bluetooth, offering a reliable wireless connection without the need for line-of-sight, unlike traditional infrared remotes.
The primary functions are easily accessible through dedicated buttons and switches. The Shutter-release/REC button is central to capturing moments, allowing you to shoot still images or initiate video recording. For still images, a half-press of this button typically engages the camera's autofocus, and a full press captures the photo. When set to video mode, a press starts recording, and another press stops it. An indicator light on the remote illuminates when the camera comes into focus, when a still image is shot, or when video recording begins, providing visual feedback on the camera's state.
Focus and zoom adjustments are handled by the Focus/Zoom button, which can be toggled between "ZOOM" and "FOCUS" modes using a dedicated switch. In "ZOOM" mode, pressing the +/- buttons on the remote allows you to zoom in or out, provided your camera or lens supports electronic power zoom. The zoom speed can vary depending on the specific camera or lens being used. If the camera's digital zoom function is enabled, the remote will control digital zooming. In "FOCUS" mode, these same +/- buttons enable you to adjust the camera's focus, which is particularly useful when the camera is set to manual focus mode.
Beyond these basic controls, the Remote Commander also features an AF-ON button and a C1 button. These buttons are designed to activate functions that you have assigned to the AF-ON or C1 buttons on your camera. This customization allows you to tailor the remote's functionality to your specific shooting style and frequently used camera settings, making it a powerful tool for advanced users. For instance, you might assign a specific autofocus mode or a custom white balance setting to the C1 button on your camera, and then trigger that function directly from the remote.
The Remote Commander is designed for ease of use and portability. Its compact form factor makes it easy to carry alongside your camera gear.
To begin using the remote, you first need to pair it with a compatible Sony camera. This involves a simple pairing process where you navigate through your camera's network settings to enable Bluetooth and initiate pairing, while simultaneously pressing and holding specific buttons on the Remote Commander for several seconds. Once paired, the remote and camera establish a wireless connection, indicated by the remote's light. If pairing fails, the remote's indicator will flash rapidly, prompting you to retry the process. It's important to note that if you use the remote with a different camera, or if your camera's network settings are reset, you will need to re-pair the devices. Also, if the remote is not used for a period during a Bluetooth connection, the camera may display a "no Bluetooth connection" message, requiring re-pairing.
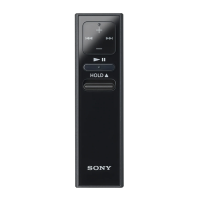
A key feature for practical use is the LOCK switch. This switch allows you to disable all buttons on the Remote Commander, preventing unintentional operations when you're carrying it in a bag or pocket. By sliding the switch to the "LOCK" position, you can ensure that your camera doesn't accidentally trigger or change settings. To re-enable the buttons, simply slide the switch to the opposite position.
The remote's indicator light provides crucial feedback during operation. It lights up when the camera achieves autofocus, when a still image is captured, or when video recording starts. It also lights up when pairing is successful and when the camera receives focus/zoom signals from the remote. During pairing, the light flashes, and it flashes rapidly if pairing fails or if the camera fails to receive operation signals. This visual feedback helps you confirm that your commands are being received and executed by the camera.
The built-in Bluetooth antenna is strategically placed to ensure optimal connection. When operating the remote, it's advisable to keep your hand away from the antenna section to prevent any potential interference that could lead to a Bluetooth connection failure.
Maintaining the Remote Commander primarily involves proper battery handling and general care. The device is powered by a lithium coin cell battery (CR2032), which is typically supplied with the unit.
Inserting the battery is a straightforward process. You'll need to use a coin or a similar object to turn the battery cover on the back of the remote to the "OPEN" position. After removing the cover, insert the new CR2032 battery, making sure the "+" terminal is facing upward, as indicated in the battery chamber. Once the battery is in place, turn the cover back to the "CLOSE" position.
Regarding battery disposal, it's important to ensure the battery is worn out before discarding it. To prevent short circuits, insulate the battery contacts with an adhesive strip before disposal. If the battery fluid leaks, carefully wipe away any fluid from the battery chamber before inserting a new battery. Should battery fluid come into contact with your body or clothing, thoroughly rinse the affected area with water. It's also worth noting that even a new battery might have a shorter life depending on the length of its post-production period.
General care for the Remote Commander involves being mindful of its operating environment. When using the unit in an aircraft or a hospital, it's crucial to follow the instructions provided by the airline company or hospital. This is to avoid any possible interference with instruments or medical devices that could be caused by radio waves emitted from the remote.
In case the Remote Commander fails to work, a few troubleshooting steps can be taken. First, check the LOCK switch to ensure it's not in the "LOCK" position, which would disable all buttons. If the issue persists, it's possible that the pairing with the camera has been lost, in which case you would need to re-pair the remote and camera. Finally, if the battery is depleted, replacing it with a new one should resolve the problem.
| Connectivity | Bluetooth |
|---|---|
| Type | Wireless Remote Commander |
| Battery Type | CR2032 |
| Operating Distance | Approx. 10 m |
| Compatibility | Compatible with select Sony cameras |