II
PJ!
9
;!
~
illlf9
9
*i'!fii
!lllcil(
'J
§!l!
r AJ
'.rf;
btt15
(:,
;t
-
I-
74'
'!
::Z'E- f'
lci;P
!,
1J:i7;;t:¢<:B!l15;!'.riJ!lllllc
·'"
*'
·
* to
,ll<
'!
'!
/-1
'
'.<1"19
2:
C c ',
J\';l<i'.<F14
~
F16
1C
7
= " rMJilllll
c'
'"*'·
7:1
=.
::t
1'
J~
-c:~•UJIII9
i>
i:J:i7!JIM'E-
f'*toi~A'E-
f'
'OJti:fmc·, i&'J ')
/':f
'.<@I
l
"'C,
11\.'l!OJ!i!l
'!
ii!!
(Fii!!)
IC
f;btt
15
.
<C;IJ;J
~••
• •
~•
~ ~
"
~
'«•
n'
"c
'"
~•~~"
-j/''J '! 'Y
?i;lJ
~;:z
-{
~
'f
'<:
r
OFF
JIC l
"'C
<
t;:'
" C
\,
(4'
7::Z
1-
lil-a
l
.
~&
')
'!
:;,')
'? ') 'Y?
i;lJ~
;:z
-{
'Y
'fiJIOf
f
(/)
(:
'"
~
~
-Ill
i'Fl>tJ'flillnt*'
·
r!lh
•
till~i!ll
l
151'!
')
/ ? '? '!
•
y
'J
i;lJ
~;:z
-{
•y
'f'<; rON
JI
C
lt
o* *
~h•
lii~i
cr
lc
!t
'!
'<:
lt
l!'9"
c, ll!i'Fl>IJ>om
;!
tt *
'·
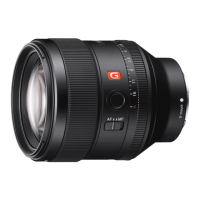
Jm~~
FE
85mm
Fl
4 GM
(11!%)
(SEL85F14GM)
ltJi.ilelill
(mm)
BS
•RtQ"'''j..-iJ*'
',
(mm) riT:s
-:,;:-q
[..,
::..-:::tBf-{2:
8-11
·~1*2
2
~"
iiiPI2
*
2
•ll!•!ljlf!•
"'l
m)
ot
·
-
t-':l,.,_
n::zot
~···
o.a
!>
r
~=:J.7Jt.:7~~n::z
..
..
o
.a
lllt~
il::ki!Ef!!'l' (
f!!l
0.12
•
Jj\~~)
? I
7 <
JL$'
-1¥. (mm) 77
9HI~Vll!(·:k~X
f-:!
l
•
S9.S
~~
ofs
(II'J
' 'mm) - - •
a=rf-1
:
gl
a2o
'!' :;i
C1il:iEIII!l;
t.;
G
'' 1
11!
®
,.
-i'
IJIAPS-C
+:t
-1'
O<:
ffi!lj
(l)
L-
:;,
7
3Zii!
i1:
7'
>'
9
JL
:IJ
:i
7
lliu•(l)
35m
m¥'
ilil!
l1-
11!
1d<L
*9
.
''
.l'l1
1~
3
Smm¥
1J
:IJ
:i
7 ,
i0i i'l
2
1
~
AP
S
-
C
+t-f'
7ffi
!lj(l)j
~
®
*1'-l'
ffirll
Jc
L-
::.-
:<
xiii!
i\:
7'
>'9
JL
:IJ
:i
7 c
·(l)
l1!
-I'
'&
L* 9 .
·•
liBl
i
llilE
ielllll: 11,
lll
®,_-i'
iili!J•'O
lt!
'l'
ita'c·
(l)
iellll
-1'
'&L * 9 .
•
L-
/
;(
'
(l)
@j~
IC
J:
co
<:
11,
J;
~5
ie
il!(I)
Jt
{
ti
C
#co
<:
lt
,\ii
~~
1J\
J[f
l::
9
~
~
~fJ\
.15
~
)
a;
9 .
g
[:Jt1(J)
~
;
;$;
ih'§
~
l
j:
tJi
Ji!
j
IE
illl
iJ'
!!il
llll
il!
c(I)
Jl'
fiic·9
.
fi'll!ll1o/l(
(
)I'J(I)t)(
'"'
l
~il!lt)(
)
L-/7(
1)
,
L-/7:
70
/ 1-ofv
·y:f
(1),
L-/
7'
!-~'
*"
'Y
7(1
),
c.:;,
7:7
- f'
(1
l.
L-
/77-
::Z
(1
),
E
D
~
J1o/J
-
It
i±i'f
<ISJ:lf
l'Hil!l
~
.
'll(Jl!(l)
to
!O'H
rtJ <
ltl!'9'"
c:
1:
1J
\
if5~)
a::91J
i,
L:
'7
:it<
t2-;'!:
\,\Q
a
;f;J:lf
Cil
l~:
c
-
I*It:ftt±Olimtl'c9
,
c;mmjl
I This instruction manual explains
how
to
u
se
I
len
ses. Preca
ut
ions comm
on
to
all lenses such
as notes
on
use are fo
und
in
the
se
parat
e
i
~
Pr
eca
ut
io
ns
before
using" Be sure
to
read
both
documents
befo
re usi
ng
your
lens.
This lens is
designe
d for Sony a camera system
E-mount
cameras. You cann
ot
u
se
it
on
A-mount
cameras.
The
FE
85mm
F1.4
GM is
compat
ible
with
th
e r
ange
of
a
35
mm
fo
rmat
im
age
se
nsor.
A
camera
equipped
wit
h a 35mm f
orma
t
imag
e
sensor can also be set to shoot at
APS-e
size.
For
de
tails
on
how
to
set
your
camera, refer to its
i
nstruction
manual.
Fo
r
further
i
nformation
on
compat
ibility
, vis
it
the
web site
of
Sony in your area,
or
consult
your
dealer
of
Sony or local a
uth
orized servi
ce
facility of Sony.
Notes
on
Use
•
When
ca
r
ry
i
ng
a camera with the
le
ns
attached,
always firmly hold both t
he
camera and the lens.
•
Th
is
lens
is
not water-proof,
al
though designed with
dust-proofne
ss
and splash-proofness in mind. If using
in the rain etc., keep
wa
ter drops away from the lens.
Precautions
on
using
a flash
•
When
using a fl
ash,
always remove the lens hood and
shoot at
leas
t 1 m
(3
.3 feet) away f
ro
m your subject.
With
ce
rta
in
combinations
of
le
ns
and flash, the
le
ns
may partially block the light
of
the fl
ash
, resulting in a
shadow at the bottom
of
the pictu
re
.
Vignetting
•
When
using the lens, t
he
corners
of
the screen
become darker than the center. To reduce this
phenomena
(called vignetting), close the aperture
by
1 to 2 stops.
fi.1
Identifying
the
Parts
Lens hood index
Focusing ri
ng
Aperture index
Aperture
scale
Aperture ring
Mounti
ng
inde
x
Focus
mo
de switch
Foc
us hold
button
Lens
hood
10
Hood
re
lease b
utto
n
11 Aperture
click switch
12
Lens contact
s*
13
Lens
mount
r
ubber
ri
ng
* Do
not
touch
th
e lens con
ta
cts.
G)
Attaching
and
Detaching
the
lens
To
attach
the
lens
{See
illustration
I!J-liJ.)
1 Remove
the
rear and
front
lens caps and
the
camera
body
cap.
•
You
can
attach/detach the front lens
ca
p in two
ways, (1) a
nd
(2).
Wh
en you attach/detach
th
e
lens
cap
with the lens hood attached, use method
(2),
2 Align
the
white
index on
the
lens barrel
with
the
white
index on
the
camera
(mounting
index), then insert
the
lens
into
the camera
mount
and rotate
it
clockwise until
it
locks.
• Do not press the lens rel
ease
button on the
came
ra
when mounting the lens.
•
Do
not mount the
le
ns at
an
angle.
To remove
the
lens
{See
illustration
GJ-[2].)
While holding
down
the
lens release
button
on
the
camera, rotate the lens
counterclockwise
until
it
stops, then detach
the
lens.
E!J
Attaching
the
lens
Hood
It
is
recommended
that
you
use a lens
hoo
d
to
reduce flare a
nd
en
su
re
max
imum
image
quality.
Align the red line on
the
lens hood
with
the
red line on
the
lens (lens hood index), then
insert
the
lens
hood
into
the
lens
mount
and
rotate
it
clockwise until
it
clicks
into
place.
•
Whe
n using a built-in camera flash or an external
f
la
sh attached to the camera,
re
move the l
ens
hood to
avoid
blocking the f
lash
li
ght.
•
Wh
en
storing, fit the lens hood onto the lens
backwards.
To remove
the
lens
hood
While holding
down
the
hood
release
button
on
the
lens hood, rotate
the
lens hood
counterclockwise.
[!J
Focusing
There are
thr
ee ways to focus.
•Auto
focus
The
ca
mer
a focuses automatically.
• DMF {Direct
manual
focus)
Aft
er
the
camera focuses in
auto
focus, you can
make a fine adj
ustme
nt manually.
• Manual focus
You focus manually.
Fo
r details on m
ode
se
tt
ings,
ref
er to the inst
ru
ction
manual s
uppli
ed
with
the camera.
With some camera
models,
AF
does
not
function
during
movie
recording.
For
further
info
r
mati
on on compatibility, visit
the
web
si
te
of
Sony in your area, or consult
your
dealer
of
So
ny
or local authorized service facility
of
Sony.
To switch
AF
(auto focus)/
MF
(manual focus)
The focus
mode
can be sw
it
ched
between
AF
and
MF
on
th
e lens.
For
AF
p
hot
o
gr
aphy, b
ot
h
the
camera and lens
should
be
se
t
to
AF.
Fo
r MF
photography
,
either
or
b
ot
h
the
camera
or
lens should be
se
t
to
MF.
To set
the
focus
mode
on
the
lens
Slide
the
focus mode switch
to
the
appropriate mode.
AF
or
MF
(1)
.
•
Re
fer to the
ca
me
ra
man
ua
ls
to set the focus mode
of
the
ca
me
ra.
•
In
MF
, turn
th
e focusing
ri
ng
to
adjust
th
e focus
(2)
while look
in
g through the v
ie
wf
inder, etc.
To use a camera
equipped
with
an AF/MF
control
button
•
By
pr
essi
ng the AF/MF control button during
AF
operation, you
can
temporarily
sw
itch
to
MF
.
• Pressing the AF/MF
con
trol button during MF
operation
lets you temporar
il
y switch to
AF
if the lens
is
se
t
to
AF
and the camera to
MF
.
Cl
Using
the
Focus
Hold
Buttons
• The focus hold button
of
th
is
lens does
no
t function
with some camera models.
For
further information on compatibility, visit the
we
b
site
of
Sony
in your
area
, or consult your dealer
of
Sony or local authorized service fac
il
ity of Sony.
Press t
he
foc
us
hold
button
in
AF
to cancel
AF.
Th
e focus
is
fixed and you
ca
n relea
se
th
e sh
utt
er
on
th
e fixed focus. Release t
he
focus hold b
utt
on
wh
ile pressing the s
hutte
r bu
tto
n ha
lfway
to
start
AF
again.
Cl
Adjusting
the
Exposure
When
you
align
NAn
on
the
aperture scale
to
the
aperture ind
ex,
the
ca
mera
is
se
t
to
auto
iris mode
and t
he
exposure
is
set
by
the
camera. A
nd
you
can
adjust
the
amount
of
li
ght
be
tween
f/1.4 and f/16
by
rotating
the
aperture
ring.
Adjust
the
amount
of
light
manually
Rotate
the
aperture ring
to
the
desired
exposure (f-stop)
when
the
camera is set to
theM
mode
or
A
mode
.
Notes
Se
t
the
aperture click sw
it
ch to
OFF
when
s
hooting
movie
s.
(See illus
tration
IJ-a
)
When
the
aperture click
sw
itch
is
set
to
OFF,
the
sound
of
the apertu
re
ring
is
reduced. (For
movie
recording)
If
you change
th
e aperture value
while
shooting
a
movie
w
it
h the aperture click sw
it
ch
se
t to
ON,
th
e
so
und
of
the
apert
ur
e ring will be recorded.
Specifications
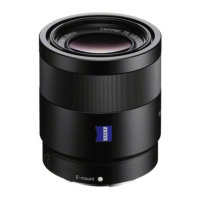
Product name
FE
85mm
F1
4
GM
(Model name)
(SEL85F14GM)
Focal
length (mm)
85
~~
mm
oij~valent:oc.a
i
_,+.J
:tz7
,s
~r>
'"'~"'~r.:f!m
'
le
~J.gJ!l
~
.L'i'!'T
=F~F
•
ll·
..
,
.~
+ ·ri=:;ttett
:t
Lens groups-elements 8-11
Mg
t
ei
~r
[ :
,..._!l!£
!f
t:·"i~-k-
~
Z!11Jl
Angle
of
v
ie
w 2*
2
19
°
i
ilmlmlfm~
3
~
't
·•
I
'
4
AUto;.fo
cus
!'
-.
ManU.!I
tcicts
M
;
ximu~
magnification (
X)
0.
12
~
lii
r!i
~~
ipert
ure
~~;;;:~
rJI~
%
;!~~!ttt~i
Filter diameter (mm) 77
PJmensions
(n1~XJrDP
~
""~f
:'d
iameter x
he
ig
ht
) +
~
~
{app
rox
:;iiim
(io:))
Mas
s (approx
.,
g (oz))
shak
&
~iatktl
*'~*'
tt
~~g
io
A
!:
::
;T~:"
*
1
T
his
is the equi
va
lent focal length in
3Smm
format
when mounted on an
Interchangeable
Lens
Digital
Ca
m
era
equipped with
an
APS-e
si
ze
d image sensor.
*
2
Ang
le
of v
ie
w 1 is the
va
lu
e for
3Smm
ca
m
eras
,
and
angle
of
view 2
is
the value for Interchangeable
Lens
Digital Cameras equipped with
an
APS-C
si
zed
image
sensor.
H Minimum focus
is
the distance from the image
sensor to the subject.
• Depending on the l
ens
mechanism, the focal length
may
cha
nge with
any
change in shooting di
sta
n
ce
.
The
focal lengths gi
ven
above assume the lens
is
focused at
in
finity .
Included
it
ems
(The
number
in parentheses indica
te
s
the
n
umber
of
pieces.)
Le
ns (
1)
, Front lens cap (
1),
Rear lens cap
(1),
Le
ns
hood
(1
),
Lens case
(1),
Set
of
pri
nted
doc
um
entation
Design and specifications are s
ub
ject
to
change
w
it
hout
no
tice.
a and
1!1
are trademarks of Sony Cor
por
ation.
 Loading...