English
(Continued from the front side.)
When using the HDR-SR8/SR7/SR5 (See illustration C-5-A)
1 Open the jack cover.
2 Connect the plug.
3 After installing the video camera into the sports pack, arrange the cable on
the grip belt side of the video camera.
When using the HDR-CX7/CX6 (See illustration C-5-B)
1 Open the jack cover.
2 Connect the plug.
3 Put the cable on the camera mounting shoe and install the video camera
into the sports pack.
4 After installing the video camera into the sports pack, arrange the cable so
that it will not fall out of the camera mounting shoe. Set the cable on the
grip belt side of the video camera.
When using the HDR-UX7/UX5/UX3 or DCR-DVD908/DVD808/
DVD508/DVD506/DVD408/DVD406 (See illustration C-5-C)
(If you completed the following 1 and 2 in step C-4, start from
3.)
1 Connect the plug.
2 Attach the camera mounting shoe to the video camera.
3 After installing the video camera into the sports pack, arrange the cable on
the grip belt side of the video camera.
When using the HDR-HC7/HC5 (See illustration C-5-D)
1 Open the jack cover.
2 Connect the plug.
3 After installing the video camera into the sports pack, arrange the cable on
the grip belt side of the video camera.
When using HDR-HC3 (See illustration C-5-E)
1 Shift the jack cover outward.
2 Connect the plug.
3 After installing the video camera into the sports pack, adjust the cable.
(Hook the cable into the cable holder.)
When using the DCR-SR300/SR290/SR200/SR190/SR82/SR72/SR62/
SR52/SR42/SR33/SR32 (See illustration C-5-F)
1 Open the jack cover.
2 Connect the plug.
3 After installing the video camera into the sports pack, adjust the cable.
(Hook the cable at the cable holder.)
When using DCR-SR100/SR90 (See illustration C-5-G)
1 Connect the plug.
2 Fold back the jack cover and hook it to the projecting part of the camera
mounting shoe.
3 Install the video camera so that the cable is not pulled taut.
4 After installing the video camera into the sports pack, adjust the cable.
(Hook the cable at the cable holder.)
When using DCR-DVD905/DVD505 (See illustration C-5-H)
1 Connect the plug.
2 Fold back the jack cover and hook it to the projecting part of the camera
mounting shoe.
3 Set the cable into the groove of the camera mounting shoe.
4 When installing the video camera, be careful that the cable does not catch
on the guide parts of the sports pack.
When using DCR-DVD805/DVD405/DVD404 (See illustration C-5-I)
1 Connect the plug.
2 After installing the video camera into the sports pack, set the cable into the
groove of the camera mounting shoe.
3 When installing the video camera, be careful that the cable does not catch
on the guide parts of the sports pack.
When using the DCR-DVD803/DVD703/DVD653/DVD602/DVD403/
DVD203/DVD202/DVD103/DVD92 (See illustration C-5-J)
1 Connect the plug.
2 Insert the jack cover under the bottom of the Audio/Remote plug.
When using DCR-DVD755/DVD705/DVD605/DVD305/DVD304/
DVD205/DVD105 (See illustration C-5-K)
1 Connect the plug.
2 After installing the video camera into the sports pack, adjust the cable.
(Hook the cable into the cable holder.)
When using the DCR-DVD708/DVD608/DVD308/DVD306/DVD109/
DVD108/DVD106 (See illustration C-5-L)
1 Open the jack cover.
2 Connect the plug.
3 After installing the video camera into the sports pack, adjust the cable.
(See illustration)
When using DCR-HC96/HC94/HC46/HC44/HC36/HC35/HC28/HC27/
HC26/HC24/HC23 (See illustration C-5-M)
1 Connect the plug.
2 After installing the video camera into the sports pack, adjust the cable.
(Hook the cable into the cable holder.)
When using DCR-HC90 (See illustration C-5-N)
1 Connect the plug.
2 After installing the video camera into the sports pack, adjust the cable.
(Hook the cable into the cable holder.)
When using the DCR-HC48/HC47/HC45/HC38/HC37 (See illustration
C-5-O)
1 Open the jack cover.
2 Connect the plug.
3 After installing the video camera into the sports pack, adjust the cable.
(Hook the cable at the cable holder.)
When using DCR-HC43/HC42/HC41/HC39/HC33/HC32/HC22/HC21/
HC19/HC17 (See illustration C-5-P)
1 Connect the plug.
2 Turn the cable over the plug as illustrated.
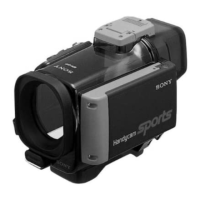
6 Close the rear body.
Press the rear body shut, and fasten the buckles until they click in place.
Notes
• Be careful not to pinch the cables when closing the rear body.
• Although the center of the lens of some video camera models may be out of
line with the center of the front glass of the sports pack when installed, this
will not cause any problems when recording.
Français
Préparation
Remarque
Il est possible que les modèles de caméscopes décrits ci-dessous ne soient pas
disponibles dans tous les pays/régions.
Préparation du caméscope
Pour plus d’informations, reportez-vous au mode d’emploi fourni avec le
caméscope.
1 Retirez le filtre, le convertisseur, le capuchon d’objectif et la
bandoulière du caméscope.
Lors de l’utilisation d’un caméscope doté d’un obturateur d’objectif manuel,
ouvrez ce dernier.
2 Installez la batterie.
Placez une batterie entièrement rechargée.
3 Introduisez le support.
Insérez un support compatible avec votre caméscope.
Pour plus d’informations, reportez-vous au mode d’emploi fourni avec le
caméscope.
Remarques
Déverrouillez le taquet de sécurité du « Memory Stick Duo » et de la cassette
pour permettre l’enregistrement d’images.
Assurez-vous que l’espace sur la cassette, le « Memory Stick Duo » et le disque
dur est suffisant pour l’enregistrement.
Vérifiez que le disque n’est pas finalisé.
4 Fixez la bague antireflet sur le filetage du filtre du caméscope.
La bague antireflet évite que la lumière extérieure ne soit réfléchie dans le
caisson et ne pénètre dans l’objectif.
5 Retournez le panneau de l’écran LCD et rabattez-le contre le
caméscope avec l’écran LCD tourné vers l’extérieur.
6 Réglez les fonctions telles que la mise au point et l’éclairage sur
AUTO.
A Sélection du sabot de montage du caméscope
1 Choisissez le sabot de montage et le numéro en vous reportant
au tableau suivant.
2 Alignez la plaque de fixation avec le numéro choisi sur le sabot,
puis exercez une pression jusqu’à ce qu’elle s’encliquette dans
son logement.
En usine, la plaque de fixation est en position numéro 1, sur le sabot A.
B Préparation du caisson
1 Réglez la sangle.
Tenez le caisson de telle sorte que le bout de vos doigts puisse facilement
atteindre les touches START/STOP, Télé, Grand angle et PHOTO, puis réglez
la longueur de la sangle.
2 Fixez la bandoulière.
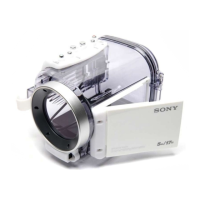
C Installation du caméscope
Mettez le commutateur POWER du caméscope en position « OFF (CHG) » et
laissez le commutateur d’alimentation du caisson sur « OFF ».
1 Relâchez les boucles.
1 Maintenez le bouton de déverrouillage 1 dans le sens de la flèche, tirez sur
le fermoir 2 et relâchez la boucle.
2 Ouvrez la partie arrière du caisson.
2 Appliquez du liquide anti-buée sur le verre avant du caisson.
Appliquez 2 ou 3 gouttes de liquide anti-buée fourni sur la face interne du
verre avant du caisson. Afin d’augmenter l’effet anti-buée, utilisez le dessicatif
fourni. Pour plus de détails, reportez-vous à la section « Dessicatif » dans
mode d’emploi fourni.
3 Enlevez les matières étrangères, telles que la poussière, le sable
ou les cheveux, du joint torique, de la rainure et de toute surface
en contact. Graissez uniformément le joint torique.
Si vous fermez le caisson sans ce nettoyage préalable, ces éléments risquent
d’être endommagés et de laisser l’eau s’infiltrer.
Pour plus d’informations sur l’entretien du joint torique, reportez-vous à la
section « Entretien du joint torique » du mode d’emploi.
4 Fixez le sabot de montage du caméscope.
Alignez le logement à vis du sabot avec la vis du trépied située sous le
caméscope.
Lors de l’utilisation des modèles HDR-HC3, DCR-SR100/SR90 ou DCR-
DVD905/DVD805/DVD505/DVD405/DVD404, ouvrez le cache de la prise
avant de fixer le sabot de montage.
Lors de l’utilisation des modèles HDR-UX7/UX5/UX3 ou DCR-DVD908/
DVD808/DVD508/DVD506/DVD408/DVD406 (*), ouvrez le cache de la prise
et insérez fermement la fiche Audio/Télécommande dans la prise A/V ou la
prise A/V OUT avant de fixer le sabot de montage.
Utilisez les pièces métalliques de la bandoulière comme indiqué dans
l’illustration.
5 Raccordez la fiche et installez le caméscope.
Insérez fermement la fiche audio/de la télécommande dans la prise A/V ou
A/V OUT, selon votre caméscope. (à l’exception des modèles repérés par * à
l’étape 4)
Lorsque vous installez le caméscope dans le caisson, alignez le sabot du
caméscope avec le guide se trouvant dans la partie avant du caisson, puis
poussez l’arrière du sabot jusqu’à ce qu’il s’encliquette.
Remarque
Veillez à tenir le caisson à l’horizontale lorsque vous installez le sabot de
montage.
Si vous installez le sabot de montage à la verticale, le sabot de montage et la
partie avant du caisson risquent d’être endommagés. Veillez à ne pas masquer
l’objectif, l’écran LCD, le viseur, le levier du zoom ou la touche photo avec le
câble.
Lors de l’utilisation des modèles HDR-SR8/SR7/SR5 (voir l’illustration
C-5-A)
1 Ouvrez le cache de la prise.
2 Raccordez la fiche.
3 Après avoir installé le caméscope dans le caisson, rangez le câble du côté
de la poignée du caméscope.
Lors de l’utilisation des modèles HDR-CX7/CX6 (voir l’illustration C-
5-B)
1 Ouvrez le cache de la prise.
2 Raccordez la fiche.
3 Placez le câble sur le sabot de montage du caméscope et installez le
caméscope dans le caisson.
4 Après avoir installé le caméscope dans le caisson, ajustez le câble afin qu’il
ne tombe pas du sabot de montage du caméscope. Rangez le câble du côté
de la poignée du caméscope.
Lors de l’utilisation des modèles HDR-UX7/UX5/UX3 ou DCR-DVD908/
DVD808/DVD508/DVD506/DVD408/DVD406 (voir l’illustration C-5-C)
(Si vous avez terminé les opérations 1 et 2 de l’étape C-4,
commencez à partir de l’opération 3)
1 Raccordez la fiche.
2 Fixez le sabot de montage sur le caméscope.
3 Après avoir installé le caméscope dans le caisson, rangez le câble du côté
de la poignée du caméscope.
Lors de l’utilisation des modèles HDR-HC7/HC5 (voir l’illustration C-
5-D)
1 Ouvrez le cache de la prise.
2 Raccordez la fiche.
3 Après avoir installé le caméscope dans le caisson, rangez le câble du côté
de la poignée du caméscope.
Lors de l’utilisation du modèle HDR-HC3 (Voir l’illustration C-5-E)
1 Poussez le cache de la prise vers l’extérieur.
2 Raccordez la fiche.
3 Après avoir installé le caméscope dans le caisson, ajustez le câble.
(Accrochez le câble dans le support de câble.)
Lors de l’utilisation des modèles DCR-SR300/SR290/SR200/SR190/
SR82/SR72/SR62/SR52/SR42/SR33/SR32 (voir l’illustration C-5-F)
1 Ouvrez le cache de la prise.
2 Raccordez la fiche.
3 Après avoir installé le caméscope dans le caisson, ajustez le câble.
(Accrochez le câble dans le support de câble.)
Lors de l’utilisation des modèles DCR-SR100/SR90 (Voir l’illustration
C-5-G)
1 Raccordez la fiche.
2 Repliez le cache prise et accrochez-le sur la saillie du sabot de montage.
3 Installez le caméscope de sorte que le câble ne soit pas tendu.
4 Après avoir installé le caméscope dans le caisson, ajustez le câble.
(Accrochez le câble dans le support de câble.)
Lors de l’utilisation des modèles DCR-DVD905/DVD505 (Voir
l’illustration C-5-H)
1 Raccordez la fiche.
2 Repliez le cache de la prise et accrochez-le sur la partie saillante du sabot
de montage.
3 Passez le câble dans la rainure du sabot de montage.
4 Lorsque vous installez le caméscope, veillez à ce que le câble ne se coince
pas dans les guides du caisson.
Lors de l’utilisation des modèles DCR-DVD805/DVD405/DVD404 (Voir
l’illustration C-5-I)
1 Raccordez la fiche.
2 Après avoir installé le caméscope dans le caisson, placez le câble dans la
rainure du sabot de montage.
3 Lorsque vous installez le caméscope, veillez à ce que le câble ne se coince
pas dans les guides du caisson.
Lors de l’utilisation des modèles DCR-DVD803/DVD703/DVD653/
DVD602/DVD403/DVD203/DVD202/DVD103/DVD92 (Voir l’illustration
C-5-J)
1 Raccordez la fiche.
2 Insérez le cache de la prise sous la fiche Audio/Remote.
Lors de l’utilisation des modèles DCR-DVD755/DVD705/DVD605/
DVD305/DVD304/DVD205/DVD105 (Voir l’illustration C-5-K)
1 Raccordez la fiche.
2 Après avoir installé le caméscope dans le caisson, ajustez le câble.
(Accrochez le câble dans le support de câble.)
Lors de l’utilisation des modèles DCR-DVD708/DVD608/DVD308/
DVD306/DVD109/DVD108/DVD106 (voir l’illustration C-5-L)
1 Ouvrez le cache de la prise.
2 Raccordez la fiche.
3 Après avoir installé le caméscope dans le caisson, ajustez le câble. (voir
l’illustration)
Lors de l’utilisation des modèles DCR-HC96/HC94/HC46/HC44/HC36/
HC35/HC28/HC27/HC26/HC24/HC23 (voir l’illustration C-5-M)
1 Raccordez la fiche.
2 Après avoir installé le caméscope dans le caisson, ajustez le câble.
(Accrochez le câble dans le support de câble.)
Lors de l’utilisation du modèle DCR-HC90 (Voir l’illustration C-5-N)
1 Raccordez la fiche.
2 Après avoir installé le caméscope dans le caisson, ajustez le câble.
(Accrochez le câble dans le support de câble.)
Lors de l’utilisation des modèles DCR-HC48/HC47/HC45/HC38/HC37
(voir l’illustration C-5-O)
1 Ouvrez le cache de la prise.
2 Raccordez la fiche.
3 Après avoir installé le caméscope dans le caisson, ajustez le câble.
(Accrochez le câble dans le support de câble.)
Lors de l’utilisation des modèles DCR-HC43/HC42/HC41/HC39/HC33/
HC32/HC22/HC21/HC19/HC17 (voir l’illustration C-5-P)
1 Raccordez la fiche.
2 Faites passer la prise par dessus la fiche, comme illustré.
6 Fermez la partie arrière du caisson.
Appuyez sur la partie arrière du caisson pour le refermer et serrez les boucles
jusqu’à ce qu’elles s’encliquettent.
Remarques
• Veillez à ne pas coincer les câbles lorsque vous fermez la partie arrière du
caisson.
• Lorsque le caméscope est dans le caisson, l’objectif peut être décentré par
rapport à la vitre avant du caisson. L’enregistrement s’effectue toutefois sans
problème.
Bague antireflet
Bague antireflet
(ø 25)
Bague antireflet
(M30 × ø 62)
Bague antireflet
(M30 × ø 43)
Bague antireflet
(M37 × ø 55)
Caméscope
DCR-DVD755/DVD705/DVD605/DVD305/
DVD304/DVD205/DVD105,
DCR-HC46/HC44/HC43/HC42/HC41/HC39/
HC36/HC35/HC33/HC32/HC28/HC27/HC26/
HC24/HC23/HC22/HC21/HC19/HC17
HDR-HC3, DCR-SR100/SR90/SR82/SR72/SR62/
SR52/SR42/SR33/SR32,
DCR-DVD905/DVD805/DVD505/DVD405/DVD404
DCR-DVD803/DVD708/DVD703/DVD653/
DVD608/DVD602/DVD403/DVD308/DVD306/
DVD203/DVD202/DVD109/DVD108/DVD106/
DVD103/DVD92,
DCR-HC96/HC94/HC90/HC48/HC47/HC45/
HC38/HC37
HDR-SR8/SR7/SR5, HDR-CX7/CX6,
HDR-UX7/UX5/UX3, HDR-HC7/HC5,
DCR-SR300/SR290/SR200/SR190,
DCR-DVD908/DVD808/DVD508/DVD506/
DVD408/DVD406
Sabot Numéro Caméscope
DCR-DVD905/DVD805/DVD755/DVD705/
1 DVD605/DVD505/DVD405/DVD404/DVD305/
A
DVD304/DVD205/DVD105
2 DCR-HC90
3
DCR-HC43/HC42/HC41/HC39/HC33/HC32/
HC22/HC21/HC19/HC17
HDR-UX7/UX5/UX3,
DCR-DVD908/DVD808/DVD803/DVD703/
1 DVD653/DVD602/DVD508/DVD506/DVD408/
B
DVD406/DVD403/DVD203/DVD202/DVD103/
DVD92
2
DCR-HC96/HC94/HC46/HC44/HC36/HC35/
HC28/HC27/HC26/HC24/HC23
3 HDR-HC3
C–DCR-SR100/SR90
HDR-HC7/HC5,
D
1 DCR-DVD708/DVD608/DVD308/DVD306/
DVD109/DVD108/DVD106
2 DCR-HC48/HC47/HC45/HC38/HC37
E
1 DCR-SR300/SR290/SR200/SR190
2 DCR-SR82/SR72/SR62/SR52/SR42/SR33/SR32
F
1 HDR-CX7/CX6
2 HDR-SR8/SR7/SR5
準備工作
註︰
並非所有國家 / 地區均有下述攝影機型號銷售。
準備攝影機
有關詳情,請參閱攝影機附帶的操作說明書。
1 從攝影機上拆下濾鏡、轉換鏡頭、鏡頭蓋或肩帶。
當使用帶有手動鏡頭快門的攝影機時,請打開鏡頭快門。
2 安裝電池組。
請安裝完全充滿電的電池。
3 插入介質。
請插入與攝影機相容的介質。
有關詳情,請參閱攝影機附帶的操作說明書。
註︰
解開“Memory Stick Duo”和磁帶上的安全小翼,使其能夠錄製影像。
請確保磁帶、“Memory Stick Duo”、光盤和硬盤有足夠的空間來錄製影像。
請確認該光盤沒有被終結。
中文(繁)
4 把防反射環安裝到攝影機的濾鏡固定螺絲上。
防反射環可以防止外部光線在戶外包內被反射並進入鏡頭。
5 請反轉液晶顯示器面板使其背向攝影機,而使液晶顯示屏面朝外。
6 把調焦和閃光等功能設定於 AUTO(自動)。
A 選擇攝影機安裝極履
1 根據下表來選擇極履和號碼。
2 把三角架螺旋盤和安裝極履上所選的號碼對齊,按壓三角架旋盤,直至
聽到“哢嗒”就位聲。
出廠時,三角架螺旋盤已經被安裝好,並且和安裝極履 A 上 1 號位置對齊。
B 準備戶外包
1 調整腕帶。
握住戶外包以便指尖能觸到 START/STOP 按鈕、 Telephoto(遠攝)按鈕、 Wide
(廣角)按鈕和 PHOTO 按鈕,調節其長度。
2 裝上肩帶。
C 安裝攝影機
將攝影機的 POWER(電源)開關轉到“OFF(CHG)”,並關閉戶外包的電源。
1 解開扣環。
1 滑動解鎖按鈕
1
按照箭頭方向滑動打開的滑塊
2
解開扣環。
2 打開後包體。
2 用鏡頭防霧液塗抹前玻璃窗。
在戶外包前玻璃內表面滴上2到3 滴附帶的鏡頭防霧液。使用附帶的乾燥劑可提
高防霧效果。有關詳情,請參閱附帶的操作說明書中“乾燥劑”部分。
3 清除外來雜物,像防水密封墊上面、槽溝和任何結合面上粘附的塵埃、
沙粒或毛髮。然後在防水密封墊上均勻塗上一層潤滑脂。
如果讓機身夾有雜物關上,便可能損壞該處併發生漏水。
有關使用防水密封墊的詳情,請參閱操作說明書的“防水密封墊使用須知”。
4 安裝攝影機的安裝極履。
把安裝極履的螺絲位置和攝影機底部的三角架螺絲對齊。
當使用HDR-HC3、DCR-SR100/SR90或DCR-DVD905/DVD805/DVD505/DVD405/DVD404
型號時,請打開插孔蓋,然後安裝極履。
當使用HDR-UX7/UX5/UX3或DCR-DVD908/DVD808/DVD508/DVD506/DVD408/DVD406
(*)型號時,請打開插孔蓋,並把音頻 / 遙控器插頭牢牢地插入 A/V 插孔或 A/V
OUT 插孔,然後安裝攝影機安裝極履。
如圖所示,請使用肩帶上的金屬部件。
5 將插頭連接到攝影機的各個插孔。
根據您的攝影機,按下圖所示,把音頻 / 遙控器插頭牢固地插入 A/V 插孔或 A/V
OUT 插孔。(步驟 4 中標有 * 的型號除外)
當把攝影機裝進戶外包時,請把攝影機安裝極履和戶外包的前包體內側對齊,然
後推攝影機安裝極履的後部,直到聽到“哢嗒”就位聲。
註︰
安裝攝影機的安裝極履時,請確保戶外包保持水平狀態。
如果垂直狀態下安裝攝影機的安裝極履,可能會損壞攝影機的安裝極履和前
包體。確保導線不要遮蓋鏡頭、液晶顯示屏、取景器、變焦杆或 PHOTO 按鈕。
當使用 HDR-SR8/SR7/SR5 型號時(如圖 C-5-A 所示)
1 打開插孔蓋。
2 連接插頭。
3 把攝影機裝進戶外包後,調整攝影機腕帶側的導線。
當使用 HDR-CX7/CX6 型號時(如圖 C-5-B 所示)
1 打開插孔蓋。
2 連接插頭。
3 把導線置於攝影機安裝極履上,然後把攝影機裝進戶外包。
4 把攝影機裝進戶外包後,調整導線,使其不會從攝影機安裝極履跌落。把導線
固定到攝影機的腕帶上。
當使用 HDR-UX7/UX5/UX3 或 DCR-DVD908/DVD808/DVD508/DVD506/DVD408/
DVD406 型號時(如圖 C-5-C 所示)
(如果以下 1 和 2 已經在步驟 C-4 中完成,則從 3 開始執行。)
1 連接插頭。
2 把攝影機安裝極履安裝到攝影機。
3 把攝影機裝進戶外包後,調整攝影機腕帶側的導線。
當使用 HDR-HC7/HC5 型號時(如圖 C-5-D 所示)
1 打開插孔蓋。
2 連接插頭。
3 把攝影機裝進戶外包後,調整攝影機腕帶側的導線。
當使用 HDR-HC3 型號時(如圖 C-5-E 所示)
1 打開插孔外蓋。
2 連接插頭。
3 把攝影機裝進戶外包後,調整導線。(把導線固定到線夾上。)
當使用DCR-SR300/SR290/SR200/SR190/SR82/SR72/SR62/SR52/SR42/SR33/
SR32 型號時(如圖 C-5-F 所示)
1 打開插孔蓋。
2 連接插頭。
3 把攝影機裝進戶外包後,調整導線。(把導線固定到線夾上。)
當使用 DCR-SR100/SR90 型號時(如圖 C-5-G 所示)
1 連接插頭。
2 把插孔蓋向後折,並把它固定到攝影機安裝極履上的突出部分。
3 安裝攝影機時,導線不要拉的太緊。
4 把攝影機裝進戶外包後,調整導線。(把導線固定到線夾上。)
當使用 DCR-DVD905/DVD505 型號時(如圖 C-5-H 所示)
1 連接插頭。
2 把插孔蓋向後折,並把它固定到攝影機安裝極履上的突出部分。
3 把導線放置到攝影機安裝極履的凹槽中。
4 當裝攝影機時,注意導線不要接觸戶外包的導軌部分。
當使用 DCR-DVD805/DVD405/DVD404 型號時(如圖 C-5-I 所示)
1 連接插頭。
2 把攝影機裝進戶外包後,請把導線放置到攝影機安裝極履的凹槽中。
3 當裝攝影機時,注意導線不要接觸戶外包的導軌部分。
當使用DCR-DVD803/DVD703/DVD653/DVD602/DVD403/DVD203/DVD202/DVD103/
DVD92 型號時(如圖 C-5-J 所示)
1 連接插頭。
2 把插孔蓋插入音頻 / 遙控器插頭的底部。
當使用DCR-DVD755/DVD705/DVD605/DVD305/DVD304/DVD205/DVD105型號時
(如圖 C-5-K 所示)
1 連接插頭。
2 把攝影機裝進戶外包後,調整導線。(把導線固定到線夾上。)
當使用DCR-DVD708/DVD608/DVD308/DVD306/DVD109/DVD108/DVD106型號時
(如圖 C-5-L 所示)
1 打開插孔蓋。
2 連接插頭。
3 把攝影機裝進戶外包後,調整導線。(如圖所示。)
當使用DCR-HC96/HC94/HC46/HC44/HC36/HC35/HC28/HC27/HC26/HC24/HC23
型號時(如圖 C-5-M 所示)
1 連接插頭。
2 把攝影機裝進戶外包後,調整導線。(把導線固定到線夾上。)
當使用 DCR-HC90 型號時(如圖 C-5-N 所示)
1 連接插頭。
2 把攝影機裝進戶外包後,調節導線。(把導線固定到線夾上。)
當使用 DCR-HC48/HC47/HC45/HC38/HC37 型號時(如圖 C-5-O 所示)
1 打開插孔蓋。
2 連接插頭。
3 把攝影機裝進戶外包後,調整導線。(把導線固定到線夾上。)
當使用 DCR-HC43/HC42/HC41/HC39/HC33/HC32/HC22/HC21/HC19/HC17 型號
時(如圖 C-5-P 所示)
1 連接插頭。
2 如圖所示將導線置於插頭上方。
6 關上後包體
關緊後包體,並扣緊扣環直至聽到“哢嗒”就位聲。
註
• 關後包體時,小心不要夾住導線。
• 某些型號的攝像機的鏡頭中心在安裝時可能會相對戶外包的前玻璃窗的中心發
生位移。但這在攝像時不會產生任何問題。
防反射環
防反射環(ø 25)
防反射環
(M30 × ø 62)
防反射環
(M30 × ø 43)
防反射環
(M37 × ø 55)
攝影機型號
DCR-DVD755/DVD705/DVD605/DVD305/DVD304/DVD205/DVD105,
DCR-HC46/HC44/HC43/HC42/HC41/HC39/HC36/HC35/HC33/
HC32/HC28/HC27/HC26/HC24/HC23/HC22/HC21/HC19/HC17
HDR-HC3, DCR-SR100/SR90/SR82/SR72/SR62/SR52/SR42/SR33/
SR32,DCR-DVD905/DVD805/DVD505/DVD405/DVD404
DCR-DVD803/DVD708/DVD703/DVD653/DVD608/DVD602/
DVD403/DVD308/DVD306/DVD203/DVD202/DVD109/DVD108/
DVD106/DVD103/DVD92,
DCR-HC96/HC94/HC90/HC48/HC47/HC45/HC38/HC37
HDR-SR8/SR7/SR5,
HDR-CX7/CX6,
HDR-UX7/UX5/UX3, HDR-HC7/HC5,
DCR-SR300/SR290/SR200/SR190,
DCR-DVD908/DVD808/DVD508/DVD506/DVD408/DVD406
安裝極履 號碼 攝影機型號
DCR-DVD905/DVD805/DVD755/DVD705/
1 DVD605/DVD505/DVD405/DVD404/DVD305/
A
DVD304/DVD205/DVD105
2 DCR-HC90
3
DCR-HC43/HC42/HC41/HC39/HC33/HC32/
HC22/HC21/HC19/HC17
HDR-UX7/UX5/UX3,
DCR-DVD908/DVD808/DVD803/DVD703/DVD653/DVD602/
1
DVD508/DVD506/DVD408/DVD406/DVD403/DVD203/
B DVD202/DVD103/DVD92
2
DCR-HC96/HC94/HC46/HC44/HC36/HC35/
HC28/HC27/HC26/HC24/HC23
3 HDR-HC3
C – DCR-SR100/SR90
HDR-HC7/HC5,
D
1 DCR-DVD708/DVD608/DVD308/DVD306/
DVD109/DVD108/DVD106
2 DCR-HC48/HC47/HC45/HC38/HC37
E
1 DCR-SR300/SR290/SR200/SR190
2 DCR-SR82/SR72/SR62/SR52/SR42/SR33/SR32
F
1 HDR-CX7/CX6
2 HDR-SR8/SR7/SR5
준비하기
주의점
다음에 나타낸 비디오 카메라 모델은 일부 나라/지역에서는 시판되지 않습니다.
비디오 카메라 준비하기
자세한 내용은 사용 중인 비디오 카메라에 부속된 사용설명서를 참조하여 주십시오.
1 비디오 카메라에서 필터, 컨버전 렌즈, 렌즈 캡, 어깨 끈을 분리합니다.
수동 렌즈 셔터를 사용해서 비디오 카메라를 사용하는 경우에는 렌즈 셔터를 열어 주십시오.
2 배터리팩을 장착합니다.
만충전한 배터리팩을 장착하여 주십시오.
한국어
3 미디어를 넣습니다.
사용 중인 비디오 카메라에 대응하는 미디어를 넣어 주십시오.
자세한 내용은 비디오 카메라에 부속된 사용설명서를 참조하여 주십시오.
주의점
“Memory Stick Duo”와 비디오 테이프의 쓰기금지 탭 잠금을 해제해서 이미지를 기록할 수 있
는 상태로 해 놓습니다.
테이프, “Memory Stick Duo”, 디스크, 하드디스크에 이미지를 기록할 수 있는 충분한 용량이
있는지 확인하여 주십시오.
디스크가 파이널라이즈 되지 않았음을 확인하여 주십시오.
4 반사 방지 링을 비디오 카메라의 필터 장착 나사에 장착합니다.
반사 방지 링은 외부의 빛이 스포츠팩 내부로 반사되어 렌즈로 들어오는 것을 방지합니다.
5 LCD 패널을 반대로 돌려서 LCD 화면이 바깥쪽을 향하도록 비디오 카메라 쪽에 되
돌려 놓습니다.
6 초점이나 조명 등의 기능을 AUTO로 설정합니다.
A 카메라 마운팅 슈 선택하기
1 다음 표에서 마운팅 슈와 번호를 선택합니다.
2 삼각대 나사 플레이트를 마운팅 슈의 선택한 번호에 맞추고, 들어가는 소리가 날 때
까지 삼각대 나사 플레이트를 누릅니다.
공장 출하 시에는 마운팅 슈 A의 번호 1 위치에 삼각대 나사 플레이트가 장착되어 있습니다.
B 스포츠팩 준비하기
1 그립 스트랩을 조절합니다.
START/STOP 버튼, Telephoto 버튼, Wide 버튼, PHOTO 버튼을 손가락으로 조작하기 쉽
도록 스포츠팩을 잡고, 그립 스트랩의 길이를 조절하여 주십시오.
2 어깨 끈을 장착합니다.
C 비디오 카메라 장착하기
비디오 카메라의 POWER 스위치를 “OFF(CHG)”로 돌리고 스포츠팩의 전원을 꺼 놓습니다.
1 버클을 풉니다.
1 잠금 해제 버튼 1을 화살표 방향으로 민 채 오픈 슬라이더 2를 밀어서 버클을 풉니다.
2 뒷면 본체를 엽니다.
2 앞 유리에 습기 방지 렌즈 용액을 바릅니다.
부속된 습기 방지 렌즈 용액 2, 3방울을 스포츠팩의 앞 유리 안쪽에 바릅니다. 습기 방지 효과를
높일 수 있도록 부속된 건조제를 사용하여 주십시오. 자세한 내용은 부속된 사용설명서의 “건조
제”를 참조하여 주십시오.
3 O링이나 홈 및 그 밖의 접촉면에서 먼지나 모래, 머리카락 등의 이물질을 제거합니
다. 그리고 O링에 그리스를 고르게 펴 바릅니다.
이물질을 제거하지 않고 본체를 닫으면 그 부분이 손상되고 물이 샐 염려가 있습니다.
O링의 자세한 취급에 관해서는 사용설명서 “O링의 취급”을 참조하여 주십시오.
4 카메라 마운팅 슈를 장착합니다.
비디오 카메라 밑면의 삼각대 나사 홀에 마운팅 슈의 나사 위치를 맞추어 주십시오.
HDR-HC3, DCR-SR100/SR90 또는 DCR-DVD905/DVD805/DVD505/DVD405/
DVD404를 사용할 때에는 단자 커버를 열고 마운팅 슈를 장착합니다.
HDR-UX7/UX5/UX3 또는 DCR-DVD908/DVD808/DVD508/DVD506/DVD408/
DVD406(*)을 사용하는 경우는 단자 커버를 열고 오디오/리모컨 플러그를 A/V 단자 또는
A/V OUT 단자에 단단히 삽입한 후 카메라 마운팅 슈에 장착하여 주십시오.
그림과 같이 어깨 끈의 금속 부분을 사용하여 주십시오.
5 플러그를 연결하고 비디오 카메라를 장착합니다.
사용 중인 비디오 카메라에 따라 오디오/리모컨 플러그를 A/V 단자 또는 A/V OUT 단자에 단
단히 삽입합니다.(순서 4에 마크*가 있는 모델은 제외)
스포츠팩에 비디오 카메라를 장착할 때에는 카메라 마운팅 슈를 스포츠팩 앞 부분 안쪽의 가이드
에 맞춘 다음, 고정되는 소리가 날 때까지 카메라 마운팅 슈의 뒷부분을 눌러 넣습니다.
주의점
카메라 마운팅 슈를 장착할 때에는 스포츠팩을 수평으로 잡아 주십시오.
카메라 마운팅 슈를 세로 방향으로 장착하면 카메라 마운팅 슈와 앞쪽 본체가 손상될 염려가 있
습니다. 렌즈, LCD 화면, 뷰파인더, 줌 레버, 사진 버튼에 케이블이 걸리지 않도록 주의하십시오.
HDR-SR8/SR7/SR5를 사용하는 경우(그림 C-5-A 참조)
1 단자 커버를 엽니다.
2 플러그를 연결합니다.
3 비디오 카메라를 스포츠팩에 설치한 후 케이블을 비디오 카메라 그립 벨트 쪽으로 해 놓습니다.
HDR-CX7/CX6을 사용하는 경우(그림 C-5-B 참조)
1 단자 커버를 엽니다.
2 플러그를 연결합니다.
3 케이블을 카메라 마운팅 슈 위에 올려놓고 비디오 카메라를 스포츠팩에 장착합니다.
4 비디오 카메라를 스포츠팩에 장착한 후에는 케이블을 카메라 마운팅 슈에서 빠지지 않도록 정
리해 놓습니다. 비디오 카메라 그립 벨트 쪽으로 정리해 놓습니다.
HDR-UX7/UX5/UX3 또는 DCR-DVD908/DVD808/DVD508/DVD506/DVD408/
DVD406을 사용하는 경우(그림 C-5-C 참조)
(순서 C-4에서 다음의 1과 2가 끝났을 때에는 3부터 시작하여 주십시오).
1 플러그를 연결합니다.
2 카메라 마운팅 슈를 비디오 카메라에 장착합니다.
3 비디오 카메라를 스포츠팩에 설치한 후 케이블을 비디오 카메라 그립 벨트 쪽으로 해 놓습니다.
HDR-HC7/HC5를 사용하는 경우(그림 C-5-D 참조)
1 단자 커버를 엽니다.
2 플러그를 연결합니다.
3 비디오 카메라를 스포츠팩에 설치한 후 케이블을 비디오 카메라 그립 벨트 쪽으로 해 놓습니다.
HDR-HC3을 사용하는 경우(그림 C-5-E 참조)
1 단자 커버를 바깥쪽으로 이동해 놓습니다.
2 플러그를 연결합니다.
3 비디오 카메라를 스포츠팩에 설치한 후 케이블을 조절합니다.
(케이블은 케이블 홀더에 걸어 놓습니다).
DCR-SR300/SR290/SR200/SR190/SR82/SR72/SR62/SR52/SR42/SR33/
SR32를 사용하는 경우(그림 C-5-F 참조)
1 단자 커버를 엽니다.
2 플러그를 연결합니다.
3 비디오 카메라를 스포츠팩에 설치한 후 케이블을 조절합니다.
(케이블은 케이블 홀더에 걸어 놓습니다).
DCR-SR100/SR90을 사용하는 경우(그림 C-5-G 참조)
1 플러그를 연결합니다.
2 단자 커버를 카메라 마운팅 슈의 돌출부분에 걸어 놓습니다.
3 케이블이 당겨지지 않도록 비디오 카메라를 장착합니다.
4 비디오 카메라를 스포츠팩에 설치한 후 케이블을 조절합니다.
(케이블은 케이블 홀더에 걸어 놓습니다).
DCR-DVD905/DVD505를 사용하는 경우(그림 C-5-H 참조)
1 플러그를 연결합니다.
2 단자 커버를 카메라 마운팅 슈의 돌출부분에 걸어 놓습니다.
3 케이블을 카메라 마운팅 슈의 홈에 끼웁니다.
4 비디오 카메라를 장착할 때에는 케이블이 스포츠팩 가이드부에 끼지 않도록 주의합니다.
DCR-DVD805/DVD405/DVD404를 사용하는 경우(그림 C-5-I 참조)
1 플러그를 연결합니다.
2 비디오 카메라를 스포츠팩에 장착한 후에는 케이블을 카메라 마운팅 슈의 홈에 끼웁니다.
3 비디오 카메라를 장착할 때에는 케이블이 스포츠팩 가이드부에 끼지 않도록 주의합니다.
DCR-DVD803/DVD703/DVD653/DVD602/DVD403/DVD203/DVD202/
DVD103/DVD92를 사용하는 경우(그림 C-5-J 참조)
1 플러그를 연결합니다.
2 단자 커버를 오디오/리모컨 플러그 밑면 아래로 삽입합니다.
DCR-DVD755/DVD705/DVD605/DVD305/DVD304/DVD205/DVD105를 사용
하는 경우(그림 C-5-K 참조)
1 플러그를 연결합니다.
2 비디오 카메라를 스포츠팩에 설치한 후 케이블을 조절합니다.
(케이블은 케이블 홀더에 걸어 놓습니다).
DCR-DVD708/DVD608/DVD308/DVD306/DVD109/DVD108/DVD106을 사용
하는 경우(그림 C-5-L 참조)
1 단자 커버를 엽니다.
2 플러그를 연결합니다.
3 비디오 카메라를 스포츠팩에 설치한 후 케이블을 조절합니다.(그림 참조)
DCR-HC96/HC94/HC46/HC44/HC36/HC35/HC28/HC27/HC26/HC24/HC23
을 사용하는 경우(그림 C-5-M 참조)
1 플러그를 연결합니다.
2 비디오 카메라를 스포츠팩에 설치한 후 케이블을 조절합니다.
(케이블은 케이블 홀더에 걸어 놓습니다).
DCR-HC90을 사용하는 경우(그림 C-5-N 참조)
1 플러그를 연결합니다.
2 비디오 카메라를 스포츠팩에 설치한 후 케이블을 조절합니다.
(케이블은 케이블 홀더에 걸어 놓습니다).
DCR-HC48/HC47/HC45/HC38/HC37을 사용하는 경우(그림 C-5-O 참조)
1 단자 커버를 엽니다.
2 플러그를 연결합니다.
3 비디오 카메라를 스포츠팩에 설치한 후 케이블을 조절합니다.
(케이블은 케이블 홀더에 걸어 놓습니다).
DCR-HC43/HC42/HC41/HC39/HC33/HC32/HC22/HC21/HC19/HC17을 사용
하는 경우(그림 C-5-P 참조)
1 플러그를 연결합니다.
2 그림과 같이 케이블을 플러그 위에 돌려 놓습니다.
6 뒷면 본체를 닫습니다.
뒷면 본체를 눌러서 닫고 잠기는 소리가 날 때까지 버클을 잠급니다.
주의점
• 뒷면 본체를 닫을 때에는 케이블이 끼지 않도록 주의하십시오.
• 비디오 카메라의 일부 기종은 스포츠팩에 수납할 때 렌즈의 중심이 스포츠팩의 앞 유리 중심과
일치하지 않는 경우가 있지만 촬영에는 문제 없습니다.
반사 방지 링
반사 방지 링(ø25)
반사 방지 링(M30 × ø62)
반사 방지 링(M30 × ø43)
반사 방지 링(M37 × ø55)
비디오 카메라
DCR-DVD755/DVD705/DVD605/DVD305/DVD304/DVD205/
DVD105,
DCR-HC46/HC44/HC43/HC42/HC41/HC39/HC36/
HC35/HC33/HC32/HC28/HC27/HC26/HC24/HC23/HC22/
HC21/HC19/HC17
HDR-HC3, DCR-SR100/SR90/SR82/SR72/SR62/SR52/SR42/
SR33/SR32,
DCR-DVD905/DVD805/DVD505/DVD405/DVD404
DCR-DVD803/DVD708/DVD703/DVD653/DVD608/DVD602/
DVD403/DVD308/DVD306/DVD203/DVD202/DVD109/
DVD108/DVD106/DVD103/DVD92,
DCR-HC96/HC94/HC90/HC48/HC47/HC45/HC38/HC37
HDR-SR8/SR7/SR5,
HDR-CX7/CX6,
HDR-UX7/UX5/UX3, HDR-HC7/HC5,
DCR-SR300/SR290/SR200/SR190,
DCR-DVD908/DVD808/DVD508/DVD506/DVD408/DVD406
마운팅 슈 번호 비디오 카메라
DCR-DVD905/DVD805/DVD755/DVD705/
1 DVD605/DVD505/DVD405/DVD404/DVD305/
A
DVD304/DVD205/DVD105
2 DCR-HC90
3
DCR-HC43/HC42/HC41/HC39/HC33/HC32/
HC22/HC21/HC19/HC17
HDR-UX7/UX5/UX3,
DCR-DVD908/DVD808/DVD803/DVD703/
1
DVD653/DVD602/DVD508/DVD506/DVD408/
B
DVD406/DVD403/DVD203/DVD202/DVD103/DVD92
2
DCR-HC96/HC94/HC46/HC44/HC36/HC35/
HC28/HC27/HC26/HC24/HC23
3HDR-HC3
C–DCR-SR100/SR90
HDR-HC7/HC5,
D
1 DCR-DVD708/DVD608/DVD308/DVD306/
DVD109/DVD108/DVD106
2DCR-HC48/HC47/HC45/HC38/HC37
E
1 DCR-SR300/SR290/SR200/SR190
2 DCR-SR82/SR72/SR62/SR52/SR42/SR33/SR32
F
1 HDR-CX7/CX6
2 HDR-SR8/SR7/SR5

 Loading...