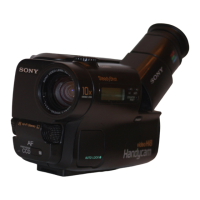
Do you have a question about the Sony Video 8 Handycam CCD-TR7 and is the answer not in the manual?
Details the various power sources available for operating the camcorder.
Step-by-step guide on charging and mounting the rechargeable battery pack.
Instructions for using optional alkaline batteries with the required battery case.
How to connect the camcorder to a wall outlet using the AC power adaptor.
Explains how to power the camcorder using a car battery with a DC pack.
Step-by-step guide to adjust the camcorder's date and time settings.
Instructions for properly loading an 8mm video cassette into the camcorder.
Procedure for safely removing a cassette from the camcorder.
Basic steps for recording video using the camcorder's automatic settings.
Steps for starting a new recording over a specific part of an existing tape.
How to insert new footage into an existing recording without overwriting.
Overview of different methods to connect the camcorder for playback.
Detailed steps for connecting to a TV with standard A/V input jacks.
How to connect using an RFU adaptor for TVs without direct A/V inputs.
Connecting the camcorder through a VCR to a TV.
Initial steps to prepare the TV for camcorder playback.
Procedure for locating specific points on the tape using the counter and ZERO MEM.
How to record external video sources onto the camcorder's tape.
Step-by-step guide to insert new scenes into an existing recording.
Guidance on optimal lighting conditions and use of video lights.
Precautions and procedures for dealing with moisture buildup inside the unit.
Procedures for cleaning video heads to ensure clear playback.
General safety and operational precautions for using the camcorder.
Troubleshooting steps for power-related problems like not turning on or shutting off.
| Recording System | Video 8 |
|---|---|
| Image Sensor | CCD |
| Focus | Auto / Manual |
| Viewfinder | Electronic |
| Microphone | Built-in |
| Type | Camcorder |
| Zoom | 12x digital |
| Battery | NP-77 |