EasyManua.ls Logo

Sony XA 300 User Manual

Sony XA 300
1 page
Page #1 background imageLoading...
Page #1 background image
Quick Start Guide
paration
p
p
p
p
p
p
p
p
p
p
p
p
p
p
p
p
p
p
p
p
p
p
p
p
p
p
p
p
p
p
p
p
p
p
p
p
p
p
p
p
p
p
p
p
p
p
p
p
p
p
p
p
p
p
p
p
p
p
p
p
p
p
p
p
p
p
p
p
p
p
p
p
p
p
p
p
p
p
p
p
p
p
p
p
p
p
p
p
p
p
p
p
p
p
p
p
Prep
p
p
p
p
p
p
p
p
p
p
p
p
p
p
p
p
p
p
p
p
p
p
p
p
p
p
p
p
p
p
p
p
p
p
p
p
p
p
p
p
p
p
p
p
p
p
p
p
p
p
p
p
p
p
p
p
p
p
p
p
p
p
p
p
p
p
p
p
p
p
p
p
p
p
p
p
p
p
p
p
p
p
p
p
p
p
p
p
p
p
p
p
p
p
p
p
p
p
p
p
p
p
p
p
p
p
p
p
p
p
p
p
p
p
p
p
p
p
p
p
p
p
p
p
oting
o
o
o
o
o
o
o
o
o
o
o
o
o
o
o
o
o
o
o
o
o
o
o
o
o
o
o
o
o
o
o
o
o
o
o
o
o
o
o
o
o
o
o
o
o
o
o
o
o
o
o
o
o
o
o
o
o
o
o
o
o
o
o
o
o
o
o
o
o
o
o
o
o
o
o
o
o
o
o
o
o
o
o
o
o
o
o
o
o
o
o
o
o
o
o
o
o
Shoo
o
o
o
o
o
o
o
o
o
o
o
o
o
o
o
o
o
o
o
o
o
o
o
o
o
o
o
o
o
o
o
o
o
o
o
o
o
o
o
o
o
o
o
o
o
o
o
o
o
o
o
o
o
o
o
o
o
o
o
o
o
o
o
o
o
o
o
o
o
o
o
o
o
o
o
o
o
o
o
o
o
o
o
o
o
o
o
o
back
b
b
b
b
b
b
b
b
b
b
b
b
b
b
b
b
b
b
b
b
b
b
b
b
b
b
b
b
b
b
b
b
b
b
b
b
b
b
b
b
b
b
b
b
b
b
b
b
b
b
b
b
b
b
b
b
b
b
b
b
b
b
b
b
b
b
b
b
b
b
b
b
b
b
b
b
b
b
b
b
b
b
b
b
b
b
b
b
b
b
b
b
b
b
b
b
b
b
b
b
b
b
b
Playb
yb
yb
yb
yb
yb
yb
yb
yb
yb
yb
yb
yb
yb
yb
yb
yb
yb
yb
yb
yb
yb
yb
yb
yb
yb
yb
yb
yb
yb
yb
yb
yb
yb
yb
yb
yb
yb
yb
yb
yb
yb
yb
yb
yb
yb
yb
yb
yb
yb
yb
yb
yb
yb
yb
yb
yb
yb
yb
yb
yb
yb
yb
yb
yb
yb
yb
yb
yb
yb
yb
yb
yb
yb
yb
yb
yb
yb
yb
yb
yb
yb
yb
y
y
y
y
y
y
y
y
y
y
y
y
y
y
y
y
y
y
y
y
y
y
y
y
y
y
y
y
y
y
y
y
y
y
y
y
y
y
y
y
y
y
y
y
y
y
y
T
he battery pac
k
1 C
h
arge t
h
e
b
atter
y
pac
k
unti
l
t
h
e
CHARGE lamp li
g
hts o
ff.
2
Insert the battery pack into the camera
.
F
irm
ly
insert t
h
e
b
atter
y
pac
k
a
ll
t
h
e
way while pressing the lock lever with
t
he tip o
f
the battery.
Th
e
l
e
n
s
1 Remove t
h
e caps.
Do not touch inside parts
.
If dust enters the camera, it may
a
ppear on t
h
e p
h
oto ima
g
e. Do not
leave the camera and lens without
t
he caps. When you change the lens,
do it quickl
y
in a location
f
ree
f
rom
dust
.
2
Attac
h
t
h
e
l
ens
.
T
u
rn
t
h
e
l
e
n
s
u
n
t
il i
t
c
li
c
k
s.
The memory car
d
Wh
en inserting a memory car
d
, turn t
h
e
ca
m
e
r
a
off.
For available memory cards, refer to the
Instruction Manual.
D
ate/time setup
1 Turn t
h
e camera on
.
2
Set up the date/time.
Face
s
i
de
wi
th
a
l
a
b
e
l
1 Set t
h
e mo
d
e
d
ia
l
to AUTO
.
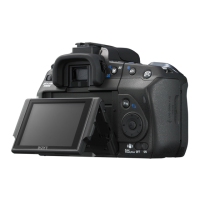
Check that the LIVE VIEW/OVF switch is
set
to
“LIVE VIEW
.
L
IVE VIEW/OVF switc
h
2 C
h
ec
k
t
h
e su
b
ject on t
h
e LCD
mon
i
tor
.
H
old the
g
rip of the
camera.
S
upport the lens
f
rom
b
e
l
ow
.
3
Pr
ess
t
h
e
s
h
utte
r
butto
n
halfwa
y
down to focus
.
Pressing the shutter button hal
f
wa
y
d
own an
d
h
o
ld
ing it activates t
h
e
auto
f
ocus.
d
own to s
h
oot
.
P
ress
.
T
o p
l
a
y
b
ac
k
a previous or next image: press
/
on t
h
e contro
ll
er.
T
o return to the shootin
g
mode:
To
d
e
l
ete t
h
e image
Pr
ess
.
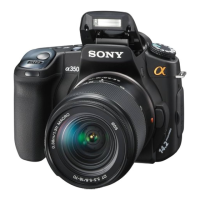
To fully enjoy the features of your single lens reflex
camera, consult the “Instruction Manual.
C
HARGE lam
p
A
l
ign t
h
e mar
k
s
.
Question and Answer IconNeed help?

Do you have a question about the Sony XA 300 and is the answer not in the manual?

Sony XA 300 Specifications

General IconGeneral
BrandSony
ModelXA 300
CategoryDigital Camera
LanguageEnglish

Summary

Preparation

The battery pack

Instructions for charging and inserting the battery pack into the camera, ensuring proper connection.

The lens

Steps for attaching the lens to the camera, including alignment and turning until it clicks.

The memory card

Guidance on inserting a memory card, emphasizing turning the camera off first.

Date/time setup

Instructions for turning the camera on and setting the correct date and time.

Shooting

Set mode dial to AUTO

Set the mode dial to AUTO and check the LIVE VIEW/OVF switch setting.

Check subject on LCD

Verify the subject on the camera's LCD monitor, holding the grip and supporting the lens.

Focus with shutter button

Press the shutter button halfway down to activate autofocus.

Take the photo

Press the shutter button fully down to capture the image.

Playback

Play back images

Instructions to play back previous or next images using the controller buttons.

Delete an image

Guidance on how to delete an image using the designated button.

Related product manuals