EasyManua.ls Logo

Sorane SA-1.2 User Manual

Sorane SA-1.2
5 pages
To Next Page IconTo Next Page
Page #1 background imageLoading...
Page #1 background image
SA-1.2
I N S T R U C T I O N S
Total Length310mm
E󱐯ective Length (Tonearm pivot to cartridge stylus)239mm
Practical Length (Tonearm pivot to spindle)223mm
Overhang16mm
O󱐯set angle22.25°
Horizontal moving sensitivity30mg
Vertical moving sensitivity20mg
Vertical Tracking Force (VTF) range0-4.5g (3+1.5g)
Cartridge plus Headshell weight range15-45g
Antiskating Adjustment0-3g (Equivalent to Stylus VTF)
Vertical BearingMiniature Radial Bearing
Horizontal Bearing Miniature Radial Bearing
Height Adjustment (Plinth to arm-wand centerline)15-55mm
Output plugRCA (XLR as an Option)
Output cableSingle core shielded copper
Tonearm Audio Lead wireHigh Purity Silver (Internal Wiring)
Headshell lead wireSilver with gold plated terminal
HeadshellMachine tooled Aluminum
Tonearm Net Weight755g
Attached standard Headshell Net Weight17g
specifications
Question and Answer IconNeed help?

Do you have a question about the Sorane SA-1.2 and is the answer not in the manual?

Sorane SA-1.2 Specifications

General IconGeneral
BrandSorane
ModelSA-1.2
CategoryTurntable
LanguageEnglish

Summary

Included Accessories

Optional parts

step1 Marking

Marking the plinth for the tonearm base using a template.

step2 Drilling

Drilling holes on the plinth according to the marked template for mounting.

step3 Set up

Finalizing the setup process for the tonearm base on the turntable.

Mount the tonearm base to turntable plinth / Arm Boad

Determine mounting location

Locate and mark the arm base mounting point using the template.

Drill mounting holes

Drill center and screw holes for the tonearm base and armboard.

Attach the cartridge to headshell

Headshell Azimuth Adjustment

Mount SA-1.2 shaft through the Base hole

Secure tonearm shaft

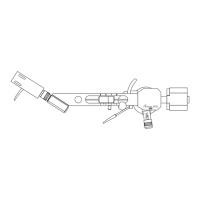
Insert and fasten the tonearm shaft into the base using the set-screw.

Adjust tonearm height (VTA)

Set tonearm height for parallel alignment with the record surface.

Cartridge tracking force adjustment

Initial zero-balance

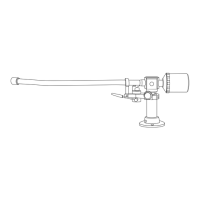
Float the arm with stylus 3-5mm above the record and secure the counterweight.

Apply tracking force

Use sliding counterweight to increase tracking force, up to 3.0 grams.

Use auxiliary weight

Add 1.5g auxiliary weight for forces exceeding 3.0 grams.

Auxiliary counterweight stem

Attach auxiliary stem

Thread the auxiliary stem clockwise into the main stem finger-tight.

Anti-skating (bias) adjustment

Related product manuals