Do you have a question about the Soundking SKD360 and is the answer not in the manual?
Avoid exposing the unit to sunlight, high temperatures, or moving with cables connected.
Use the correct AC adapter and ensure the outlet voltage matches. Turn off power when not in use or during storms.
Avoid excessive force on controls, unplug cables by gripping plugs, and protect from physical shocks.
Clean with a dry soft cloth; a slightly damp cloth for grime. Avoid alcohol, thinner, or vinyl objects.
Digital circuitry may cause interference; move the instrument away from radio/TV receivers if issues occur.
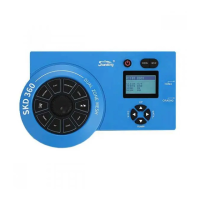
Describes controls and buttons located on the front of the module.
Details the connectors and ports available on the rear of the module.
Connect module output to an audio system or amplifier using appropriate cables.
Connect headphones to the module's stereo headphone connector for private listening.
Connect external audio sources like MP3/CD players via the AUX IN for mixed playback.
Connect the module to a computer via USB for MIDI data transmission and software updates.
Use MIDI IN/OUT ports to connect with computers for MIDI signal exchange.
Connect external MIDI keyboards using MIDI cables to control the drum module.
Learn how to select and switch between preset and user drum kits for different sounds.
Instructions on how to play and navigate through the pre-loaded demo songs.
Connect MIDI devices for audio output and tone control based on drum kit selection.
Connect to sequencers for recording drum performances and playback.
Customize MIDI note assignments for each drum pad for external control.
Control the volume levels for demo song accompaniment and the main drum sound.
Learn how to mute or unmute the drum tracks within the demo songs.
Simple steps to start and stop recording drum performances.
How to play back recorded drum performances and overwrite them.
Configure settings for the rim triggers on tom and snare pads for proper detection.
Adjust parameters for the hi-hat trigger to optimize its response and feel.
Customize metronome settings such as meter, voice, and volume for practice.
Modify individual voice parameters like volume, pan, MIDI key, and reverb.
Set the minimum force required to trigger a pad signal, preventing accidental hits.
Configure crosstalk settings to prevent one pad from triggering another unintentionally.
Modify pad sensitivity for a more dynamic control over volume based on playing strength.
Prevent double triggering by setting the time interval for scanning drum pad triggers.
Adjust high and low frequency gain to shape the overall sound EQ.
This document serves as the owner's guide for the Soundking SKD360 digital drum module, providing comprehensive instructions for its setup, operation, and maintenance. The SKD360 is designed to emulate the feel and playability of an acoustic drum set with enhanced ease of use.
The SKD360 module is the central control unit for a digital drum set, offering a wide array of functions for drummers of all levels. It features a user-friendly interface with a clear LCD display and a combination of rotary knobs and buttons for navigation and parameter adjustment.
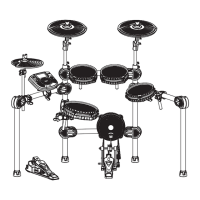
At its core, the module allows users to select from a variety of pre-programmed drum kits or create and save their own custom kits. Each drum kit comprises different voices for various drum and percussion sounds, which can be edited to fine-tune their characteristics. The module supports dual-zone mesh pads, enabling different sounds or articulations depending on where the pad is struck (head or rim). This includes features like rim shots and cross sticks for snare drums, and choke functionality for cymbals, mimicking the expressive capabilities of acoustic drums.
The SKD360 also includes a sequencer for recording performances, allowing drummers to capture their playing. It has a metronome function with adjustable tempo and various meter settings to aid in practice and timing. Users can also play along with pre-recorded demo songs, with adjustable accompaniment and drum volumes, and the ability to mute the drum track for practice.
Connectivity options are extensive, allowing the SKD360 to integrate with external devices. It can be connected to an audio system or amplifier for sound output, headphones for private practice, and MP3/CD players for playing along with external audio sources. MIDI IN/OUT ports facilitate connection to computers or other MIDI devices, enabling the module to act as a trigger device or an audio source for external sequencers and software. A USB port is also available for MIDI communication and system software updates.
Setting up the SKD360 involves assembling the drum stand, attaching the cymbal and pad rods, and then mounting the pads, cymbals, and the module itself. All drum pads are connected to the module's TRIGGERS IN port.
Upon powering on, the module defaults to a drum kit selection screen. Users can easily navigate through preset and user-defined drum kits using the DATA+ and DATA- buttons. The master volume knob controls the overall output level.
Playing the pads is intuitive, as the module responds dynamically to striking force, allowing for expressive performances. The Hi-Hat pedal offers various articulations—open, half-open, closed, and pedal close—depending on the pedal's position and whether the Hi-Hat pad is struck.
For recording, the module enters a waiting state upon pressing the RECORD button, and recording begins once any pad is struck. Playback is initiated by pressing the PLAY button. The metronome can be toggled on/off, and its tempo, voice, and volume are adjustable.
Editing drum kit voices involves selecting a voice, then adjusting parameters such as volume, pan, MIDI key, and reverb. The module also allows for detailed adjustment of pad trigger settings, including velocity curve, threshold, crosstalk, sensitivity, and mask time, to optimize responsiveness and prevent false triggers.
The SKD360 offers various effect settings, including EQ (high/low gain) and reverb, with multiple reverb types, times, and sizes to shape the overall sound. Default settings can be reloaded for individual drum kits, trigger parameters, or all parameters.
System software updates are performed by connecting the module to a computer via USB, selecting the update option in the setup menu, and copying the update file to the module's recognized USB drive.
Proper care and handling are crucial for the longevity of the SKD360. The manual advises against exposing the unit to direct sunlight, high temperatures, or excessive force on controls and connectors. All cables should be unplugged before moving the instrument to prevent damage.
For cleaning, a dry, soft cloth is recommended. A slightly damp cloth can be used for stubborn grime, but harsh cleaners like alcohol or thinner should be avoided. Vinyl objects should not be placed on the unit to prevent sticking and discoloration.
Regarding power supply, it's essential to use the correct AC adaptor and ensure the outlet voltage matches the adaptor's specifications. The power switch should be turned off when the instrument is not in use or during electrical storms. The AC adaptor should be unplugged if the instrument will not be used for an extended period. To prevent electrical interference, the module should not be placed too close to radios or television receivers.
When making connections to other devices, always turn off the power switches of all related equipment before connecting or disconnecting cables to prevent damage. The manual specifically warns that failing to turn off the power switch when connecting pads and the audio source box can destroy the drum kit.
The SKD360's design emphasizes user adjustability for optimal performance and sound. The ability to fine-tune trigger settings and save user drum kits ensures that the module can be customized to individual playing styles and preferences, making it a versatile tool for digital drumming.
| Type | Electronic Drum Kit |
|---|---|
| Display | LCD |
| Connectivity | USB |
| Metronome | Yes |
| Aux Input | Yes |
| Headphone Output | Yes |
| MIDI Output | Yes |
| Power Supply | DC 9V |
| Pads | 5 |
| Kits | 10 |