19
15. L’infortunato può adesso essere sollevato al punto di
sicurezza o abbassato come segue.
16. Per abbassare l’infortunato il soccorritore deve tenere la
corda che esce dal GRIGRI in modo da controllare la
discesa.
17. Con l’altra mano rilascia l’impugnatura nera sul GRIGRI
fino a che la corda può essere rilasciata a una velocità
controllabile. In questo modo l’infortunato viene
abbassato. (Vedere la nota)
NOTA: per poter eseguire un salvataggio il soccorritore
ha bisogno di un’imbracatura da un punto anteriore
dell’attrezzatura per il posizionamento del GRIGRI.
Se il punto di ancoraggio per il kit GOTCHA™ è tale che
l’infortunato deve essere abbassato, la lunghezza della
corda nel kit deve essere pari a quattro volte la distanza
dall’ancoraggio al punto di sicurezza.
Ancoraggio a livello del piede.
Ancoraggio a livello del piede.
1. Accedere al punto di ancoraggio dell’infortunato.
2. Fissare l’imbracatura di ancoraggio a un punto di
ancoraggio adeguato sopra l’infortunato.
3. Il soccorritore utilizzerà le proprie gambe per aiutare a
tirare il cordino. La puleggia singola viene agganciata
all’imbracatura di ancoraggio.
4. Regolare l’asta in base alla lunghezza necessaria.
5. Fissare la clip rossa all’estremità dell’asta e agganciare la
doppia puleggia alla cinghia.
6. Regolare le corde tra le pulegge alla stessa lunghezza
dell’asta.
7. Impostare la clip rossa sulla posizione aperta.
8. Utilizzando l’asta, fissare la clip rossa all’attrezzatura di
imbracatura dell’infortunato.
9. Rimuovere l’asta dalla clip rossa.
10. Attaccare il GRIGRI all’imbracatura dei soccorritori.
11. Tirare la corda allentata attraverso il GRIGRI per tensionare
il sistema e accovacciarsi.
12. Il soccorritore adesso è in piedi e solleva l’infortunato.
13. Con una mano il soccorritore tiene la corda sotto il GRIGRI,
vicino all’imbracatura dell’attrezzatura. Con l’altra mano
tiene la corda allentata mentre è accovacciato.
14. Una volta trasferito il peso dell’infortunato al kit GOTCHA™,
il suo cordino può essere scollegato.
INSTALLATION & USE : INSTRUCTIONS
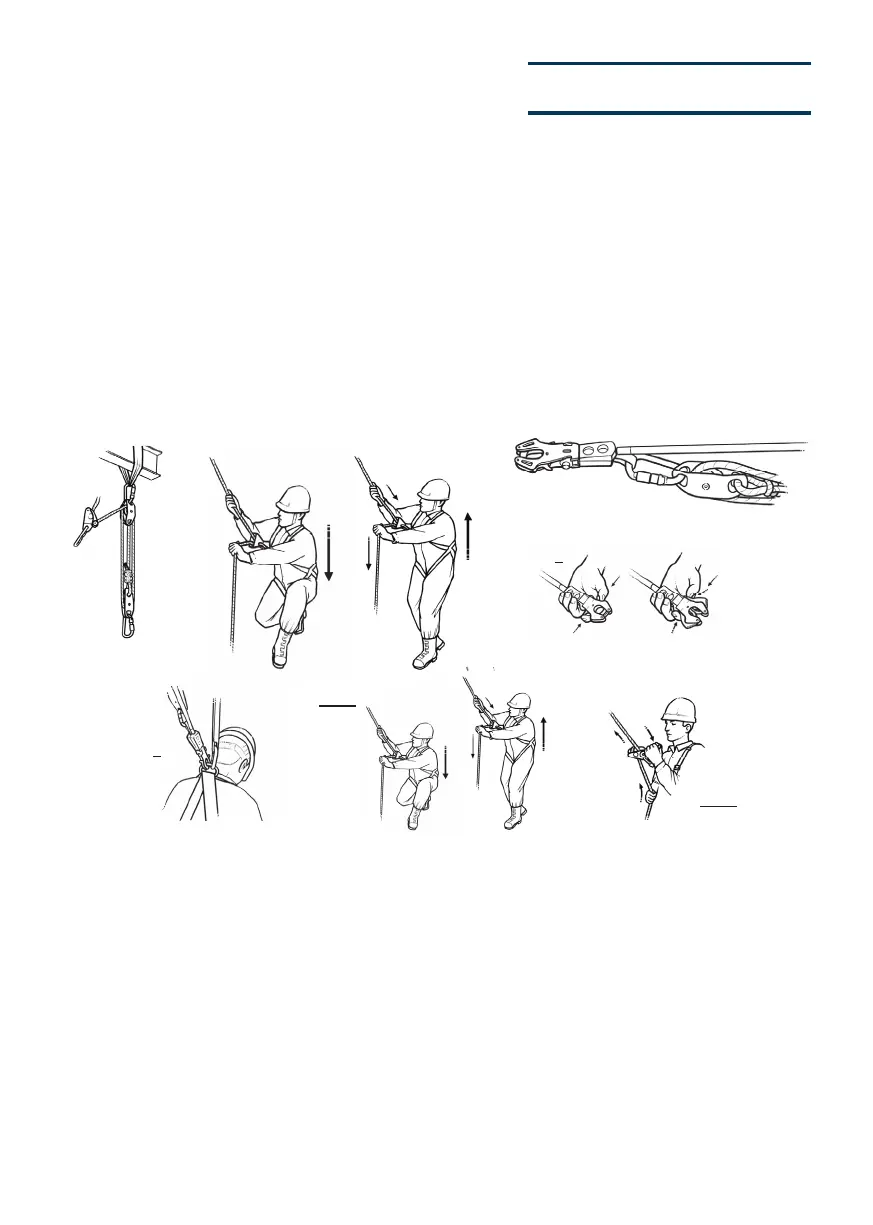
Anchor more than 1.5m above foot level.
1. Access casualty’s anchorage point.
2. Attach the anchor sling to a suitable anchor point
above the casualty.
3. The rescuers weight is used to assist in the operation.
The double pulley is clipped to the anchor sling.
4. Adjust pole to the required length.
5. Attach the red clip to the end of the pole, and clip the
single pulley into the webbing.
6. Adjust ropes in-between the pulleys to the same length
as the pole.
7. Set the red clip to open.
8. Using the pole, attach the red clip to the casualty’s
harness attachment.
9. Remove the pole from the red clip.
10. Attach the GRIGRI to the rescuers harness.
11. Pull the slack rope through the GRIGRI to tension the
system.
12. The rescuer now sits down, thus raising the casualty.
13. With one hand, the rescuer holds the rope above the
GRIGRI, close to the attachment sling. With the othe
hand they take in the slack rope as they stand up.
14. Once the casualty’s weight has been transferred to the
GOTCHA™, then their lanyard can be disconnected.
15. The casualty can now be raised to a point of safety, o
lowered as follows.
16. To lower the casualty the rescuer must take hold of the
rope that exits the GRIGRI, and this is used to control
the descent.
17. With the other hand releases the black handle on the
GRIGRI until the rope can be fed at a controllable
speed. This thus lowers the casualty.(Please see
note)
16-17
5
7
NOTE: In order to carry out a rescue the rescuer requires a harness with a front point of attachment for locating the GRIGRI.
If the anchor point for the GOTCHA™ is such that the casualty must be lowered, then the rope length in the kit must
be four times the distance from the anchorage to the point of safety.
11-13
8
HIGH
ANCHOR
Blue Pulle
INSTALLATION & USE : INSTRUCTIONS
Anchor more than 1.5m above foot level.
1. Access casualty’s anchorage point.
2. Attach the anchor sling to a suitable anchor point
above the casualty.
3. The rescuers weight is used to assist in the operation.
The double pulley is clipped to the anchor sling.
4. Adjust pole to the required length.
5. Attach the red clip to the end of the pole, and clip the
single pulley into the webbing.
6. Adjust ropes in-between the pulleys to the same length
as the pole.
7. Set the red clip to open.
8. Using the pole, attach the red clip to the casualty’s
harness attachment.
9. Remove the pole from the red clip.
10. Attach the GRIGRI to the rescuers harness.
11. Pull the slack rope through the GRIGRI to tension the
system.
12. The rescuer now sits down, thus raising the casualty.
13. With one hand, the rescuer holds the rope above the
GRIGRI, close to the attachment sling. With the othe
hand they take in the slack rope as they stand up.
14. Once the casualty’s weight has been transferred to the
GOTCHA™, then their lanyard can be disconnected.
15. The casualty can now be raised to a point of safety, o
lowered as follows.
16. To lower the casualty the rescuer must take hold of the
rope that exits the GRIGRI, and this is used to control
the descent.
17. With the other hand releases the black handle on the
GRIGRI until the rope can be fed at a controllable
speed. This thus lowers the casualty.(Please see
note)
16-17
5
7
NOTE: In order to carry out a rescue the rescuer requires a harness with a front point of attachment for locating the GRIGRI.
If the anchor point for the GOTCHA™ is such that the casualty must be lowered, then the rope length in the kit must
be four times the distance from the anchorage to the point of safety.
11-13
8
HIGH
ANCHOR
Blue Pulle
Kit di salvataggio
remoto Gotcha
 Loading...