20
Anchorage at foot level.
1. Access casualty’s anchorage point.
2. Attach the anchor sling to a suitable anchor point
above the casualty.
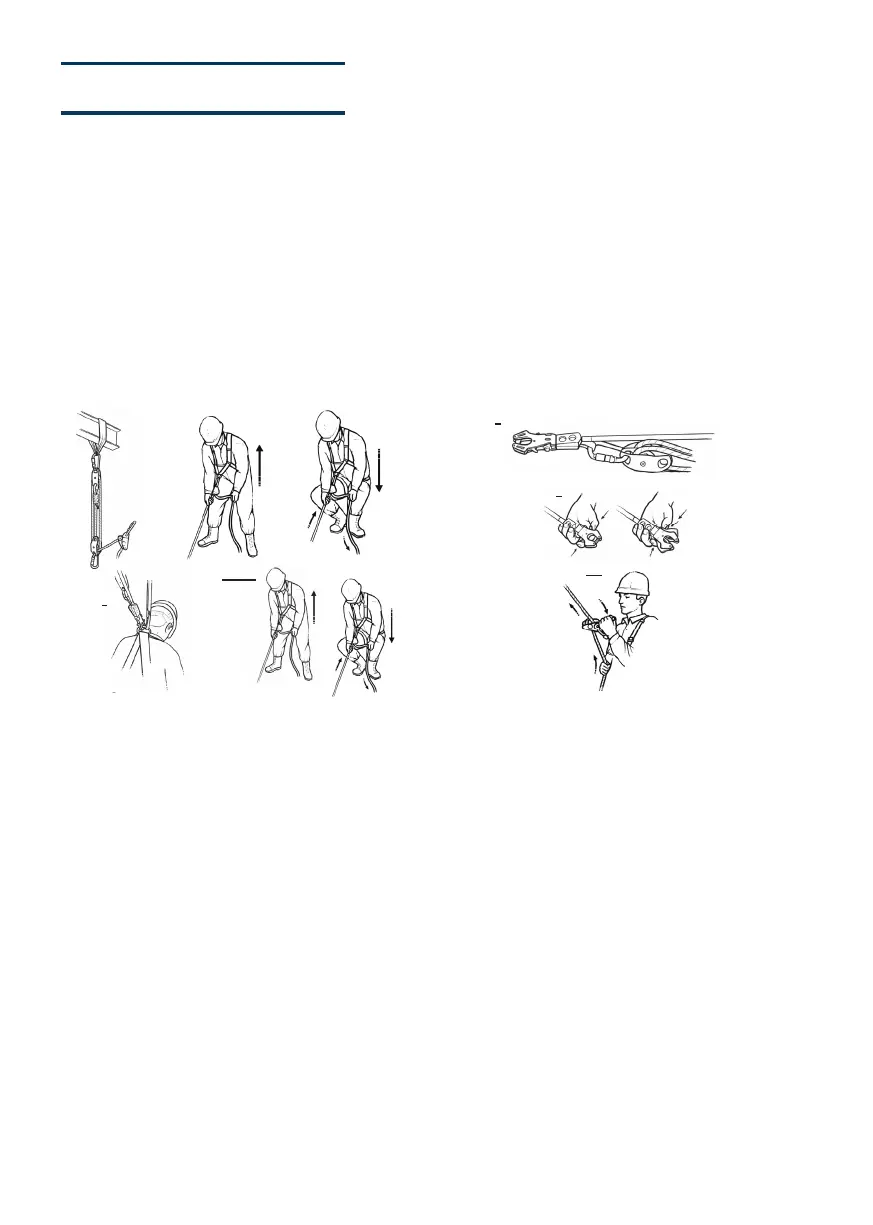
3. The rescuer will use their legs to help pull in the rope.
The single pulley is clipped to the anchor sling.
4. Adjust pole to the required length.
5. Attach the red clip to the end of the pole, and clip the
double pulley into the webbing.
6. Adjust ropes in-between the pulleys to the same
length as the pole.
7. Set the red clip to open.
8. Using the pole, attach the red clip to the casualty’s
harness attachment.
9. Remove the pole from the red clip.
10. Attach the GRIGRI to the rescuers harness.
11. Pull the slack rope through the GRIGRI to tension the
system, and squat down.
12. The rescuer now stands up, thus raising the casualty.
13. With one hand, the rescuer holds the rope below the
GRIGRI, close to the attachment sling. With the
other hand they take in the slack rope as they squat
down.
14. Once the casualty’s weight has been transferred to
the GOTCHA™ then their lanyard can be
disconnected.
15. The casualty can now be lowered as follows.
16. To lower the casualty the rescuer must take hold o
the rope that exits the GRIGRI, and this is used to
control the descent.
17. With the other hand releases the black handle on the
GRIGRI until the rope can be fed at a controllable
speed. This thus lowers the casualty.(Please see
note)
INSTALLATION & USE : INSTRUCTIONS
LOW
ANCHOR
Green Pulley to Anchor Sling
5
7
11-13
8
17
NOTE: In order to carry out a rescue the rescuer requires a harness with a front point of attachment for locating the GRIGRI.
If the anchor point for the GOTCHA™ is such that the casualty must be lowered, then the rope length in the kit must
be four times the distance from the anchorage to the point of safety.
Anchorage at foot level.
1. Access casualty’s anchorage point.
2. Attach the anchor sling to a suitable anchor point
above the casualty.
3. The rescuer will use their legs to help pull in the rope.
The single pulley is clipped to the anchor sling.
4. Adjust pole to the required length.
5. Attach the red clip to the end of the pole, and clip the
double pulley into the webbing.
6. Adjust ropes in-between the pulleys to the same
length as the pole.
7. Set the red clip to open.
8. Using the pole, attach the red clip to the casualty’s
harness attachment.
9. Remove the pole from the red clip.
10. Attach the GRIGRI to the rescuers harness.
11. Pull the slack rope through the GRIGRI to tension the
system, and squat down.
12. The rescuer now stands up, thus raising the casualty.
13. With one hand, the rescuer holds the rope below the
GRIGRI, close to the attachment sling. With the
other hand they take in the slack rope as they squat
down.
14. Once the casualty’s weight has been transferred to
the GOTCHA™ then their lanyard can be
disconnected.
15. The casualty can now be lowered as follows.
16. To lower the casualty the rescuer must take hold o
the rope that exits the GRIGRI, and this is used to
control the descent.
17. With the other hand releases the black handle on the
GRIGRI until the rope can be fed at a controllable
speed. This thus lowers the casualty.(Please see
note)
INSTALLATION & USE : INSTRUCTIONS
LOW
ANCHOR
Green Pulley to Anchor Sling
5
7
11-13
8
17
NOTE: In order to carry out a rescue the rescuer requires a harness with a front point of attachment for locating the GRIGRI.
If the anchor point for the GOTCHA™ is such that the casualty must be lowered, then the rope length in the kit must
be four times the distance from the anchorage to the point of safety.
Kit De Sauvetage
À Distance Gotcha
15. L’infortunato può adesso essere abbassato come segue.
16. Per abbassare l’infortunato il soccorritore deve tenere la
corda che esce dal GRIGRI in modo da controllare la
discesa.
17. Con l’altra mano rilascia l’impugnatura nera sul GRIGRI fino
a che la corda può essere rilasciata a una velocità
controllabile. In questo modo l’infortunato viene abbassato.
(Vedere la nota)
NOTA: per poter eseguire un salvataggio il soccorritore
ha bisogno di un’imbracatura da un punto anteriore
dell’attrezzatura per il posizionamento del GRIGRI.
Se il punto di ancoraggio per il kit GOTCHA™ è tale che
l’infortunato deve essere abbassato, la lunghezza della
corda nel kit deve essere pari a quattro volte la distanza
dall’ancoraggio al punto di sicurezza.
Ispezione E Verifica
Conservare le presenti istruzioni o una copia insieme al kit
GOTCHA™: saranno utili per le future ispezioni e verifiche.
L’attrezzatura deve essere sottoposta a un’ispezione visiva
e tattile quando viene consegnata presso il sito/cantiere e
prima di ogni utilizzo. SpanSet consiglia un’ispezione registrata
effettuata da personale competente ogni 6 mesi.
Prestare particolare attenzione a quanto segue:
Parti in metallo: Ispezionare allo scopo di rilevare
eventuali segni di danni/distorsioni/corrosione e verificare il
funzionamento e il bloccaggio corretto dei connettori.
Corda*: Esaminare allo scopo di rilevare eventuali segni
di usura/abrasione, compresa usura tra fili, scioglimento,
allungamento e fusione.
* Abrasione locale diversa dall’usura generale può essere
provocata dal passaggio della corda sopra sporgenze o punti
acuminati mentre è in tensione e può provocare una grave
perdita di resistenza. Un leggero danno alle fibre esterne e in
qualche punto del filato può essere considerato innocuo, ma
una notevole riduzione del diametro della corda o una serie
distorsione del motivo del rivestimento devono comportarne
lo scarto.
Tutti i DPI devono essere immediatamente rimossi dal
servizio dopo essere stati soggetti a urti o in caso di dubbi
sulle loro condizioni. (Vedere l’elenco in alto). Se necessario,
il kit GOTCHA™ può essere pulito. A tale scopo procedere
come segue. Utilizzare detergente delicato con acqua non
eccessivamente calda, utilizzando un panno o una spugna per
pulire il kit GOTCHA™ ed evitare di bagnarlo eccessivamente.
La procedura deve quindi essere ripetuta con acqua pulita per il
risciacquo; lasciare quindi asciugare in modo naturale lontano
da fonti di calore dirette. Per ulteriori informazioni contattare
SpanSet.
Tutta l’attrezzatura deve essere riposta e trasportata come
segue:
- Evitare il contatto con oggetti acuminati.
- Tenere lontano da sostanze nocive.
- Conservare in un luogo asciutto e fresco al riparo dalla luce
del sole diretta.
 Loading...