Do you have a question about the Spartan 100 and is the answer not in the manual?
Read manual and use safety gear before operating the Spartan Tool product.
Lists essential PPE like goggles, gloves, coveralls, boots, and hearing protection.
Warns about bacteria and infectious materials in drains, advising hygiene precautions.
Informs about lead content and potential health risks as per California law.
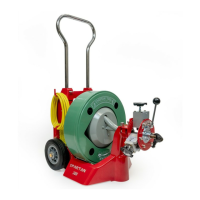
Details the Spartan Model 100's design and the manual's aim for efficient service.
Stresses operator's duty to read and understand the manual and safety precautions.
Notes manual is current at printing; Spartan Tool reserves rights to make changes.
Include machine serial number for all information, service, or parts requests.
Additional copies of the manual are available for free download from the Spartan Tool website.
Provides contact details for Spartan Tool Customer Service for inquiries and support.
Details cable capacity and pipe sizes the machine can clean effectively.
Lists physical and performance specs: weight, height, width, length, drum speed.
Highlights features like heavy-duty motor, independent inner drum, and air foot switch.
Urgent call to read the manual thoroughly for safety, operation, and hazards before use.
Warns of fatal shock risk from electrical equipment in wet or damp environments.
Emphasizes reading the manual to understand machine operation, applications, and limitations.
Details the necessity of proper grounding and methods using adapters for safety.
Provides visual examples (A, B, C) of correct grounding techniques for US circuits.
Dangers of improper extension cord use; specs for approved, three-wire cords.
Instructions on not abusing cords, keeping them from damage, and proper disconnection.
Tips to prevent shock by avoiding contact with grounded surfaces like pipes or radiators.
Precautions against accidental starts and the importance of staying alert.
Advice on clothing, jewelry, hair covering, and protective gloves/boots.
Importance of safety glasses to guard against flying material from the cable.
Guidance on footing, balance, keeping children away, and maintaining a clean area.
Using correct tools, keeping guards, removing wrenches, and avoiding reverse operation.
Maintaining tools, checking parts for damage, and using proper replacements.
Recommendations for storing tools securely and away from children when not in use.
Warnings for handling drain cleaning compounds and using appropriate protective gear.
Identifies key parts of the Model 100 via an illustration with labels.
Emphasizes studying assembly instructions carefully before operating the equipment.
Lists the primary components of the Model 100, some purchased separately.
Explains how to couple cables and leaders using expansion pins and a hammer.
Step-by-step guide for uncoupling cables using a stand and punch.
Detailed instructions and warnings for safely loading cables into the drum.
How to check and correct the drum's rotation direction using a toggle switch.
Precautions on dress, hand placement, and familiarization with safety instructions.
Steps for machine placement, foot switch setup, and drum rotation verification.
Guidance on hand-feeding, pressure application, and using the cable safety guide.
Reacting to obstructions, RPM reduction, and pulling back cable.
Explains causes of cable damage and the importance of keeping blades rotating.
Procedure for releasing tension when a blade is stuck by pulling away.
Detailed steps for using the reverse feature to free an entangled blade.
Instructions for retracting cable while running and proper machine shutdown.
Using the adjusting knob to set cable tension for smooth feeding.
Operating the handle for feeding cable in and out, with speed control.
Using the neutral handle position for precise blade placement.
Explains the Cable Safety Guide's role in preventing operator contact with rotating cable.
Step-by-step guide for replacing motor brushes.
Advice on running new brushes and recommended replacement intervals.
Instructions for rinsing cables and the drum to prevent damage from cleaning compounds.
How to identify worn cables and the benefits of replacement.
Detailed steps for correctly installing the cable into the drum.
Precautions for adjusting cable clamp screws and potential issues.
Guidance on storing equipment, protecting it from weather.
Note on rotating the drum for proper drainage before storage.
Illustrates the components of the Model 100 Drum 13/32" with labels.
Lists parts like Outer Drum & Cover and Clutch Assembly.
Lists parts such as Inner Drum Assembly and Bearing.
Illustrates the components of the Model 100 Drum 1/2" with labels.
Lists parts like Outer Drum & Cover and Clutch Assembly.
Lists parts such as Inner Drum Assembly and Bearing.
Illustrates the components of the Model 100 Drum 5/16" with labels.
Lists parts like Outer Drum & Cover and Clutch Assembly.
Lists parts such as Inner Drum Assembly and Bearing.
Illustrates the components of the Outer Drum with item numbers.
Lists parts like Cable Clamp and Drive Stud.
Lists part number and description for the Drum Hub Assembly.
Illustrates the components of the Inner Drum with item numbers.
Lists parts such as End Bracket Assembly and Mainshaft Assembly.
Illustrates the components of the PM Motor Assembly with item numbers.
Lists parts like Gearcase Complete and Armature.
Lists part number and description for the Brush Kit.
Illustrates the components of the Clutch Assembly 13/32 with item numbers.
Lists parts such as Clutch Hub & Bearing Assy and Plate Drive Mod 100.
Lists parts like Spring Clutch and Shouldered Adjusting Nut.
Illustrates the components of the Clutch Assembly 1/2 with item numbers.
Lists parts such as Clutch Hub & Bearing Assy and Plate Drive Mod 100.
Lists parts like Spring Clutch and Shouldered Adjusting Nut.
Illustrates the components of the Clutch Assembly 5/16 with item numbers.
Lists parts such as Clutch Hub & Bearing Assy and Plate Drive Mod 100.
Lists parts like Spring Clutch and Shouldered Adjusting Nut.
Shows connections for power cord, pressure switch, and forward/reverse switch.
Illustrates wiring for the bridge rectifier and motor leads.
Lists jumper wires and disconnect components used in the diagram.
Illustrates the components of the optional Roll-Aid with item numbers.
Lists parts like Asy, Roll Aid Whl&Supprt.
Lists parts for the Toolbox and Handle.
Illustrates the components of the Wheel & Support Assembly with item numbers.
Lists parts like Wheel and Casting, Machined.
Lists various screws, washers, nuts, and thumb screws for the assembly.
Lists part numbers and descriptions for 5/16" diameter inner-core cables.
Lists part numbers and descriptions for 13/32" diameter inner-core cables.
Lists part numbers and descriptions for 1/2" diameter inner-core cables.
Description of the 5/16" cable's uses and included parts.
Description of the 13/32" cable's uses and included parts.
Details on 1/2" Anchor Cable and Trap Leader, including usage.
Various male, female, and double male couplings, and splicers.
Lists pin punches, drop heads, and expansion pins for cables.
Lists repair hooks, bulbs, and extraction hooks for different cable sizes.
Lists parts for the Outlet Box Cover Assembly, including Switch Toggle and Rubber Boot.
Lists parts for the Air Foot Switch, including Pressure Transmitter and Air Hose.
Illustrates the various components of the Model 100 Power Unit with labels.
Provides a closer look at a specific section labeled "DETAIL A".
Lists part number and description for the Base Assembly Mod 100.
Lists part number and description for the 100 Trunnion Assy.
Lists parts related to motor, switches, and wiring for the power unit.
Illustrates the components of the Base Assembly with item numbers.
Lists part number and description for Base Side Plates.
Lists parts for Bumper Assembly and Base Casting.
Provides an illustration of the Trunnion Assembly parts with item numbers.
Lists parts such as Box Connector and Trunnion Only.
Lists parts including Pawl Bearing, Latch, and Switch Box.
Steps for removing mounting plates and repositioning bolts for manual machines.
Instructions for placing the drum and adjusting the Dial-A-Cable for cable size.
How to slide and lock the Dial-A-Cable power feed unit onto the trunnion.
Details the one-year warranty, service procedures, and repair/replacement options.
Lists limitations like non-transferability and exclusions for misuse or unauthorized repairs.
States that all other warranties, expressed or implied, are disclaimed.
Provides company contact details and notes the right to make product changes.
| Brand | Spartan |
|---|---|
| Model | 100 |
| Category | Cleaning Equipment |
| Language | English |