EasyManua.ls Logo

Speck pumps BADU JET User Manual

Speck pumps BADU JET
16 pages
To Next Page IconTo Next Page
Page #1 background imageLoading...
Page #1 background image
Complies with UL 1563
Swimming Pool Equipment
Listing #E212148
For Swim Jet Use Only - 400 GPM -
Swim Jet Combination Fitting
Life: 10 Years - Wall Only - Badu
®Jet
IMPORTANT SAFETY INSTRUCTIONS
INSTALLATION, OPERATING AND SERVICE MANUAL
Counter Swimming Unit
U.S. Patent No. 3.977.027
OWNER’S MANUAL
All parts are manufactured of corrosion-resistant material and combined in one single housing that can be
installed in pools of any size and shape.
Key to illustration:
BADU
®
JET
READ AND FOLLOW ALL INSTRUCTIONS
Flush mounted Jet Housing, 16” in diameter
Rectangular, Anti-Entrapment Cover (20” x 17”) for
undetectable pump suction. (Optional Round)
Adjustable Water Flow Jet Nozzle
Water volume control knob adjusts force of water leav-
ing jet nozzles
Pneumatic on/off button guarantees complete electri-
cal separation between pool water, pump motor and
control box.
Air regulator adjusts amount of air bubbles in water
ow.
Control box with GFCI with tubing for pneumatic button.
Speck 4 HP self-priming, plastic pump, single phase
with thermal overload (no motor starter required). Op-
tional three phase motor and control box available (Nor-
mal priming pump available for installation below water
level).
Massage Hose with pulsator may be attached to jet noz-
zle.
A
F
H
B
G
C
I
2007
D
E
A.
F.
H.
B.
G.
C.
I.
D.
E.
Question and Answer IconNeed help?

Do you have a question about the Speck pumps BADU JET and is the answer not in the manual?

Speck pumps BADU JET Specifications

General IconGeneral
BrandSpeck pumps
ModelBADU JET
CategoryLighting Equipment
LanguageEnglish

Summary

Important Safety Instructions

Plumbing for BADU ® JET

Concrete or Gunite Installation

Pre-plumb BADUJET housings

Steps for installing PVC couplings and pipe to the jet housing for plumbing.

Mount the protective cover plate

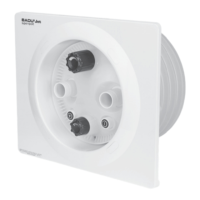
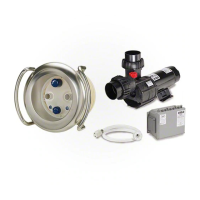
Instructions for mounting the protective cover plate using stud bolts.

Jet housing placement

Guidance on locating the pressure connection and housing depth relative to water level.

Air regulator installation

Details on the correct height and installation of the air regulator.

Installing in Existing Concrete or Gunite Pool

Location selection and cut-out

Guidance on choosing a location and making the initial cut-out.

Layout and drilling for assembly

Instructions for marking and drilling holes for the air regulator and studs.

Compound mixing and finishing

Details on using compatible compound for sealing and finishing the installation.

Liner and/or Fiberglass Pool Installation

Connector alignment requirement

Ensures pressure and suction connectors are aligned vertically for even appearance.

Housing depth for efficiency

Specifies the housing center should be 10" BELOW water level for maximum efficiency.

Removal of Liner

Installation of Nozzle Housing

Nozzle housing and insert preparation

Ensures the nozzle housing and threaded inserts are clean before mounting.

Control disk installation

Steps to unscrew and slide the control disk onto the housing's prongs.

Air tubing connection

Connecting air tubing to the air button and securing with clamps.

Installation of Anti-Entrapment Cover

Installation of the Pump and the Control Box

Electrical wiring by electrician

Wiring should be done by a licensed electrician according to local codes.

Bonding requirements

Pump motor must be electrically bonded to pool structure with No. 8 AWG conductor.

Grounding procedure

Permanently ground pump motor and control box using a No. 10 ground screw.

Operation Instructions

Pump priming

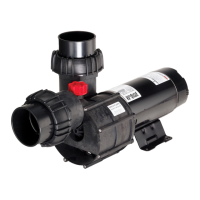
Instructions for filling the pump with water and allowing it to prime.

Volume control knob operation

How to use the volume control knob to adjust water flow.

Nozzle positioning for swimming

Recommended nozzle angle for optimal swimming and breaking water surface.

Nozzle Adjustment Instructions

Recommended nozzle setting

Setting nozzles to intersect 4 feet away and break the surface.

Winterizing

Limited Warranty

Warranty limitations

Outlines conditions that void the warranty, such as improper installation or use.

Exclusion of other warranties

Excludes implied warranties and limits liability for consequential damages.

Related product manuals