Introduction
Thank you for choosing the Spectra Precision® Laser HR320 from the
family of precision products. The HR320 is a battery-operated laser
receiver that detects a rotating laser beam and indicates its position
relative to the beam using LCD symbols.
Before using the receiver, be sure to read this user guide carefully.
Included in it is information about setting up, using, and maintaining the
receiver. Also included in this manual are CAUTIONS and Notes. Each of
these words represents a level
of danger or concern. A CAUTION indicates a hazard or unsafe practice
that could result in minor injury or property damage.
A Note indicates important information unrelated to safety.
Your comments and suggestions are welcome; please contact us at:
Spectra Precision LLC
3265 Logistics Lane, Suite 200
Dayton, Ohio 45377 U.S.A.
Phone: (800) 527-3771
Internet: www.spectraprecision.com
How to Use the Receiver
Installing/Removing the Batteries
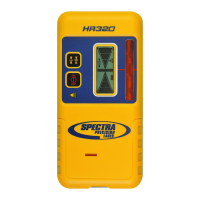
7. Clamp-Tab Recess—the
general-purpose clamp
release tab fits into this area
locking the clamp in place.
8. Clamp Slots—allows the clip-
on general-purpose clamp to
attach to receiver.
9. Battery Housing—holds two
AA alkaline, Ni-MH,
or Ni-Cd batteries.
10. Battery Door—holds the
batteries securely in place.
11. Label—shows the serial
number and manufacturing
date.
Receiver
Features and Functions
1. Power/Audio Button—is a
multi-functional button that is
used to turn on/off the receiver
and adjust the volume.
2. Grade-Sensitivity Button—
allows you to select
the receiver’s on-grade
sensitivities, which include
fine: 2.0 mm (
1
/16 in.) and
coarse: 6.0 mm (
1
/4 in.).
3. Liquid Crystal Display
(LCD)—shows the elevation,
grade sensitivity, audio,
1. Open the battery door using a coin or your thumbnail.
2. Install/Remove the 2 AA batteries noting the positive (+) and negative
(–) diagram inside the housing.
3. Push down on the battery door until it “clicks” into position.
Learning the Receiver Functions
Turning On/Off the Receiver
1. Press the power/audio
button to turn on the
receiver.
Note: When the
receiver is initially
turned on, all LCD
symbols, and the
audio signal are turned
on for one second
(diagnostic mode). After
the diagnostic mode is
complete, the grade sensitivity (fine) and the audio (loud) symbols
appear.
2. Press and hold the power/audio button for one second to turn off the
receiver.
Selecting the Audio Function
The receiver always starts up with the audio mode (loud) active.
1. Press the power/audio button repeatedly to cycle through the audio
levels, which include loud, off, and soft.
Note: If the audio function is on, the receiver beeps quickly when
the receiver is above the laser beam, slowly when below it, and
continuously when centered in the laser beam or on grade.When
audio is off, a single beep indicates laser is detected.
HR320 Receiver
User Guide
•
Selecting the Grade Sensitivity
The receiver always starts up with the on-grade sensitivity (fine) active.
1. Press the grade-sensitivity button repeatedly to select between fine:
2.0 mm (
1
/16 in.) and coarse: 6.0 mm (
1
/4 in.) grade sensitivity.
Using the Receiver with a Laser
1. Press the power/audio button to turn on the receiver.
2. Position the receiver so that its photocell faces the laser.
3. Move the receiver up/down until the LCD show an on-grade reading.
LCD/Audio Information
LCD Readout Function Audio Output
Down arrow High Fast beeping tone
Center bar &
down arrow
Fine-high Fast beeping tone
Center bar On-grade Continuous tone
Center bar &
up arrow
Fine-low Slow beeping tone
Up arrow Low Slow beeping tone
Battery Full battery NA
Battery Low battery N/A
Horn Audio on/soft/loud Single beep
Fine Fine grade sensitivity N/A
Coarse Coarse grade sensitivity N/A
– 5 – – 6 – – 7 – – 8 –
– 2 – – 3 – – 4 –
and battery status.
4. Photocell—detects the laser beam when it strikes the receiver.
5. Marking Notch—align with the on-grade portion of the photocell and
is used to mark elevation readings. The marking notch is 50.0 mm (2
in.) from the top of the receiver.
6. Audio Port—the sound comes out of this opening.
2
1
4
5
3
www.spectraprecision.com
Above Grade
Audio On
On Grade
Battery Status
Below Grade
Grade Sensitivity
7
8
9
10
11
6