NOTICE
Clean the Airbrush IMMEDIATELY after use.
Delayed or inadequate cleaning will permanently clog the Airbrush.
Page 9For technical questions, please call 1-888-866-5797.Item 70130
SAFETYOPERATIONMAINTENANCE INSTALLATION
Changing Parts
1. Parts can be changed on Airbrush to suit workpiece
needs. Only use parts from one size at a time.
a. Use 0.2 mm Nozzle Cap and
0.2 mm Nozzle with 0.2 mm Needle.
b. Use 0.3 mm Nozzle Cap and
0.3 mm Nozzle with 0.3 mm Needle.
Note: Paint Cups are interchangeable
and may be used with either set.
2. Changing Paint Cup
a. Turn Paint Cup counterclockwise
and remove from Airbrush.
b. Place new Paint Cup in place and
turn clockwise to lock into place.
3. Changing Needle
a. Turn Handle counterclockwise and
remove by pulling straight back.
b. Loosen Needle Chucking Nut enough
to remove Needle, but do not remove.
Remove Needle by pulling straight
back. See Figure B on page 11.
c. Slowly insert new Needle. When
Needle is fully inserted, tighten
Needle Chucking Nut and replace Handle.
4. Changing Nozzle and Nozzle Cap
a. Turn Handle counterclockwise and
remove by pulling straight back.
b. Loosen Needle Chucking Nut enough
to remove Needle, but do not remove.
Pull Needle halfway out.
c. Turn Needle Cap counterclockwise and remove.
d. Turn Nozzle Cap counterclockwise and
remove Nozzle Cap and Nozzle.
e. Attach desired Nozzle to corresponding
Air Cap. Insert new Nozzle and Nozzle Cap into
Airbrush Body. Turn clockwise to lock in place.
f. Replace Needle Cap.
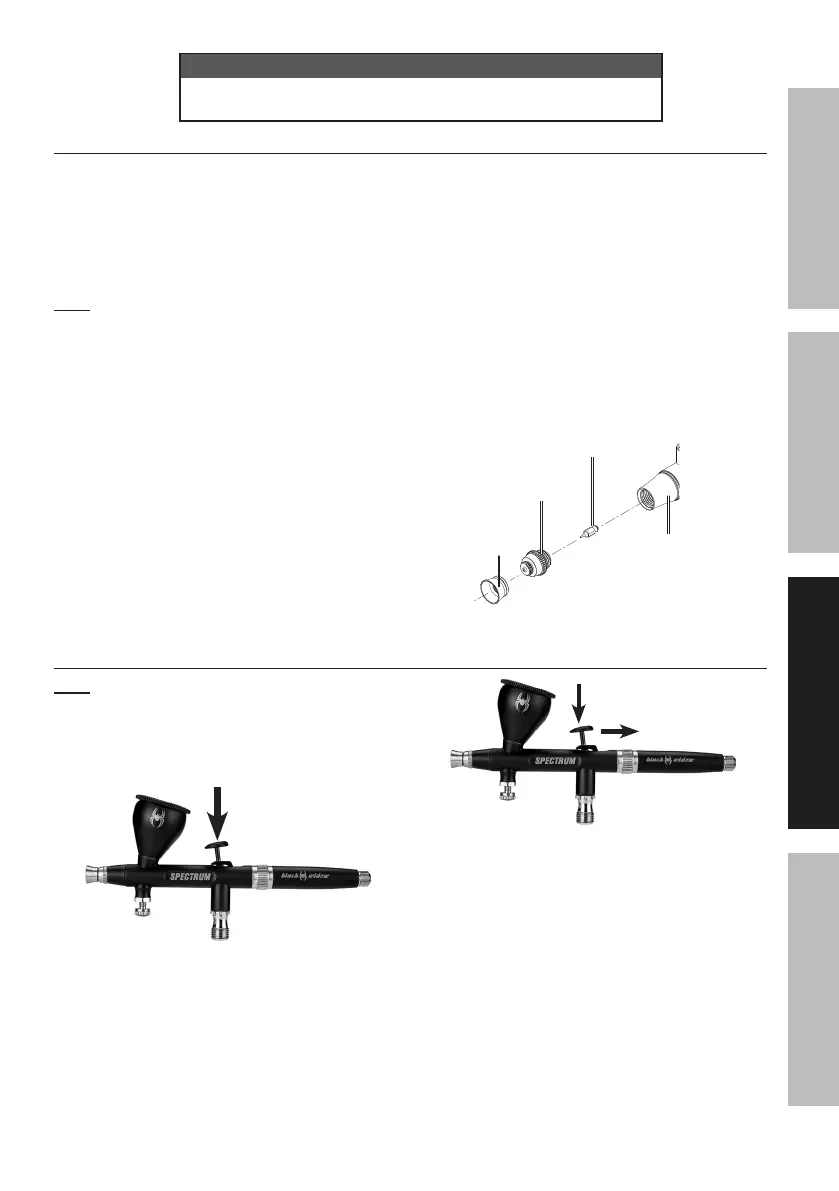
Needle
Cap
Nozzle
Cap
Nozzle
Body
Figure A: Nozzle and Nozzle Cap Assembly
Painting
Note: Practice painting techniques on scrap workpiece.
1. Plug air compressor into grounded 120VAC
outlet. Turn air compressor on.
2. Press Trigger all the way down to start air flow,
then adjust Regulator to approximately 30 PSI.
3. To avoid sputtering, press Trigger all
the way down to start air flow, then pull
Trigger back to start paint flow.
a. Pull Trigger all the way back for
maximum paint flow.
b. Pull Trigger part‑way back for less paint flow.
1. Air
2. Paint
4. To avoid sputtering, when stopping, push
Trigger forward to stop paint flow, then
release Trigger to stop air flow.
5. When changing colors or clearing
clogs, clean Airbrush according to
Clean During Use on page 10.
7. When finished, clean Airbrush according to
Clean After Every Use on page 11.
8. Turn off and unplug air compressor.
9. Bleed air pressure from Airbrush then
disconnect Airbrush from air hose.
10. Store the Airbrush indoors out of children’s reach.


 To Next Page
 Loading...
