This document provides a user manual for a drone, outlining its quick start guide, controller layout, setup steps, troubleshooting, safety protocols, and operational limitations.
Function Description
The device is a drone designed for flight operations, controlled remotely by a dedicated controller. Its primary function is to provide aerial capabilities, likely for various applications such as photography, surveillance, or recreational flight, given the emphasis on flight modes and arming procedures. The drone incorporates a Pixhawk Flight Controller, which is a common open-source autopilot system, indicating advanced flight control capabilities and potentially customizability. A GPS module is integrated to assist with navigation, stability, and potentially autonomous flight features like position hold or waypoint navigation. The drone is propelled by multiple motors and propellers, typical of multirotor designs, allowing for vertical takeoff and landing, hovering, and directional flight. The system is designed to be operated by a licensed drone operator, adhering to local and federal regulations, which suggests it may be used in professional or regulated environments.
Usage Features
The drone's usage involves a clear sequence of steps for setup and operation.
- Battery Connection: The first step is to connect the battery to the drone, ensuring the female connector on the drone is securely plugged into the male connector on the battery. This is a fundamental step to power the drone's systems.
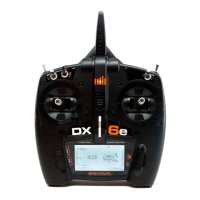
- Controller Power-On: The remote controller, a Spektrum DX6e, is powered on by pressing and holding the power button until its screen illuminates. This initiates the control link between the operator and the drone.
- Binding and Connection Check: After the controller is on, it should automatically bind with the drone's receiver. The user must verify this by checking for a solid orange light on the drone's receiver and confirming "DSMX" is displayed in the top left corner of the controller screen. This ensures a stable communication link for flight control.
- Flight Mode Selection: Before takeoff, the controller must be set to "flight mode 3." This is achieved by ensuring switch "B" on the controller is in position "2." The current flight mode is displayed on the controller screen, allowing the operator to confirm the correct setting for flight.
- GPS Readiness Check: Prior to arming, the drone's GPS module must be ready. This is indicated by a solid or flashing blue light on the GPS module. A ready GPS signal is crucial for stable flight and accurate positioning.
- Arming the Drone: To arm the drone, switch "A" on the controller must be moved to position "0." This action activates the motors and propellers, making the drone ready for flight. A critical warning is provided that the motor and propellers will spin immediately upon arming, emphasizing the need for caution.
- Controller Layout: The controller features several key components:
- Arming Switch (A): Used to arm and disarm the drone.
- Flight Mode Select Switch (B): Allows the operator to choose different flight modes, such as "flight mode 3" for takeoff.
- Throttle/Yaw Stick (C): Controls the drone's vertical thrust (throttle) and rotational movement around its vertical axis (yaw).
- Power Button (D): Turns the controller on and off.
- Display (E): Provides visual feedback on the controller's status, flight mode, battery level, and other important information.
- Pitch/Roll Stick (F): Controls the drone's forward/backward movement (pitch) and left/right movement (roll).
Maintenance Features
While the manual doesn't explicitly detail routine maintenance, it does provide troubleshooting steps that can be considered part of maintaining operational readiness:
- Binding Issues: If the drone fails to bind with the controller, the solution involves a specific power cycling sequence: unplug the drone, turn off the controller, then plug the drone back in and turn on the controller while holding down the bind button. This procedure helps re-establish the communication link.
- GPS Signal Acquisition: If the LED on the compass (GPS module) is not blue, indicating a lack of GPS signal, the user is instructed to wait 2 minutes for the GPS to acquire a signal. This is a common step to ensure the drone has sufficient satellite lock for stable flight.
- Arming Failure: If the drone does not arm, the issue might be related to the compass calibration. The solution involves connecting the Pixhawk 4 flight controller to a computer via its micro-USB port and recalibrating the compass using QGroundControl software. This ensures the drone's internal navigation system is accurate, which is often a prerequisite for arming.
Safety Protocols and Operational Limitations
The manual places significant emphasis on safety and operational limitations, which are crucial for responsible drone use:
- Licensed Operators: All drones must be operated by a licensed drone operator, adhering to local and federal regulations. This highlights the professional or regulated context of the drone's use.
- Safe Distance: Operators must stay at least 10 feet away from the drone while arming and during flight to prevent injury from spinning propellers.
- Weather Conditions: The drone should not be flown in inclement weather, as adverse conditions can compromise flight stability and safety.
- Battery Charge: Ensuring the battery is fully charged before flight is critical to avoid a crash landing due to power loss.
- Safe Location: Drones should only be operated in a safe location, further emphasizing the need for responsible flight planning.
- FAR 107 Compliance: The drone is designed to comply with FAR 107 regulations, which are specific rules for small unmanned aircraft systems in the United States. Users are directed to the FAA website for more information, indicating the importance of legal and regulatory adherence.