1
3 4
2
e
HOW TO CONNECT THE CONTROLLER
f
CONNEXION DE LA RADIOCOMMANDE
E
CÓMO CONECTAR EL CONTROL
d
VERWENDEN DER FERNSTEUERUNG
n
DE CONTROLLER VERBINDEN
i
COME CONNETTERE IL RADIOCOMANDO
p
COMO CONECTAR O CONTROLE
r
КАК ПОДКЛЮЧИТЬ УСТРОЙСТВО УПРАВЛЕНИЯ
P
JAK POŁĄCZYĆ KONTROLER
c
PŘIPOJENÍ OVLADAČE
s
PRIPOJENIE OVLÁDAČA
h
A TÁVVEZÉRLŐ CSATLAKOZTATÁSA
R
CONECTAREA TELECOMENZII
g
ΠΩΣ ΝΑ ΣΥΝ∆ΕΣΕΤΕ ΤΟ ΧΕΙΡΙΣΤΗΡΙΟ
C
POVEZIVANJE UPRAVLJAČA
B
КАК ДА СВЪРЖЕТЕ КОНТРОЛЕРА
l
NAVODILA ZA POVEZAVO KRMILNIKA
t
KUMANDAYI BAĞLAMA
z
e
HOW TO CORRECT WHEEL ALIGNMENT
f
CORRIGER L'ALIGNEMENT DES ROUES
E
CÓMO CORREGIR LA ALINEACIÓN DE LAS RUEDAS
d
KORRIGIEREN DER RADAUSRICHTUNG
n
DE WIELUITLIJNING CORRIGEREN
i
COME CORREGGERE L'ALLINEAMENTO DELLE RUOTE
p
COMO CORRIGIR O ALINHAMENTO DAS RODAS
r
КАК ОТРЕГУЛИРОВАТЬ ПОЛОЖЕНИЕ КОЛЕС
P
JAK SKORYGOWAĆ GEOMETRIĘ KÓŁ
c
JAK NAPRAVIT SEŘÍZENÍ KOL
s
AKO OPRAVIŤ NASTAVENIE POLOHY KOLIES
h
A KEREKEK IRÁNYÁNAK KORRIGÁLÁSA
R
CUM SE CORECTEAZĂ ALINIAMENTUL ROŢILOR
g
ΠΩΣ ΝΑ ∆ΙΟΡΘΩΣΕΤΕ ΤΗΝ ΕΥΘΥΓΡΑΜΜΙΣΗ ΤΡΟΧΩΝ
C
KAKO PODESITI PORAVNANJE KOTAČA
B
КАК ДА НАСТРОИТЕ ИЗРАВНЯВАНЕТО НА КОЛЕЛАТА
l
POPRAVILO PORAVNAVE KOLES
t
TEKERLEK HİZALAMASINI DÜZELTME
z
e
DIRECTIONAL CONTROL
f
COMMANDES DE DIRECTION
E
CONTROL DE DIRECCIÓN
d
RICHTUNGSSTEUERUNG
n
STUURKNUPPEL
i
CONTROLLO DIREZIONALE
p
CONTROLE DIRECIONAL
r
УПРАВЛЕНИЕ ДВИЖЕНИЕМ
P
STEROWANIE KIERUNKIEM
c
OVLÁDÁNÍ SMĚRU
s
OVLÁDANIE SMERU
h
IRÁNYÍTÁS
R
CONTROLUL DIRECŢIEI
g
ΕΛΕΓΧΟΣ ΚΑΤΕΥΘΥΝΣΗΣ
C
KONTROLA SMJERA
B
НАСОЧВАЩО УПРАВЛЕНИЕ
l
KRMILJENJE SMERI
t
YÖN KONTROLÜ
z
e
HOW TO INSTALL BATTERIES
f
INSTALLATION DES PILES
E
INSTALACIÓN DE LAS PILAS
d
EINLEGEN DER BATTERIEN
n
DE BATTERIJEN PLAATSEN
i
COME INSTALLARE LE PILE
p
COMO COLOCAR AS PILHAS
r
УСТАНОВКА ЭЛЕМЕНТОВ ПИТАНИЯ
P
WKŁADANIE BATERII
c
VLOŽENÍ BATERIÍ
s
INŠTALÁCIA BATÉRIÍ
h
AZ ELEMEK BEHELYEZÉSÉNEK MÓDJA
R
INSTALAREA BATERIILOR
g
ΤΟΠΟΘΕΤΗΣΗ ΜΠΑΤΑΡΙΩΝ
C
KAKO UMETNUTI BATERIJE
B
КАК СЕ ПОСТАВЯТ БАТЕРИИТЕ
l
NAMESTITEV BATERIJ
t
PİLLERİ TAKMA
z
1 2 3
INSTALLATION DES PILES
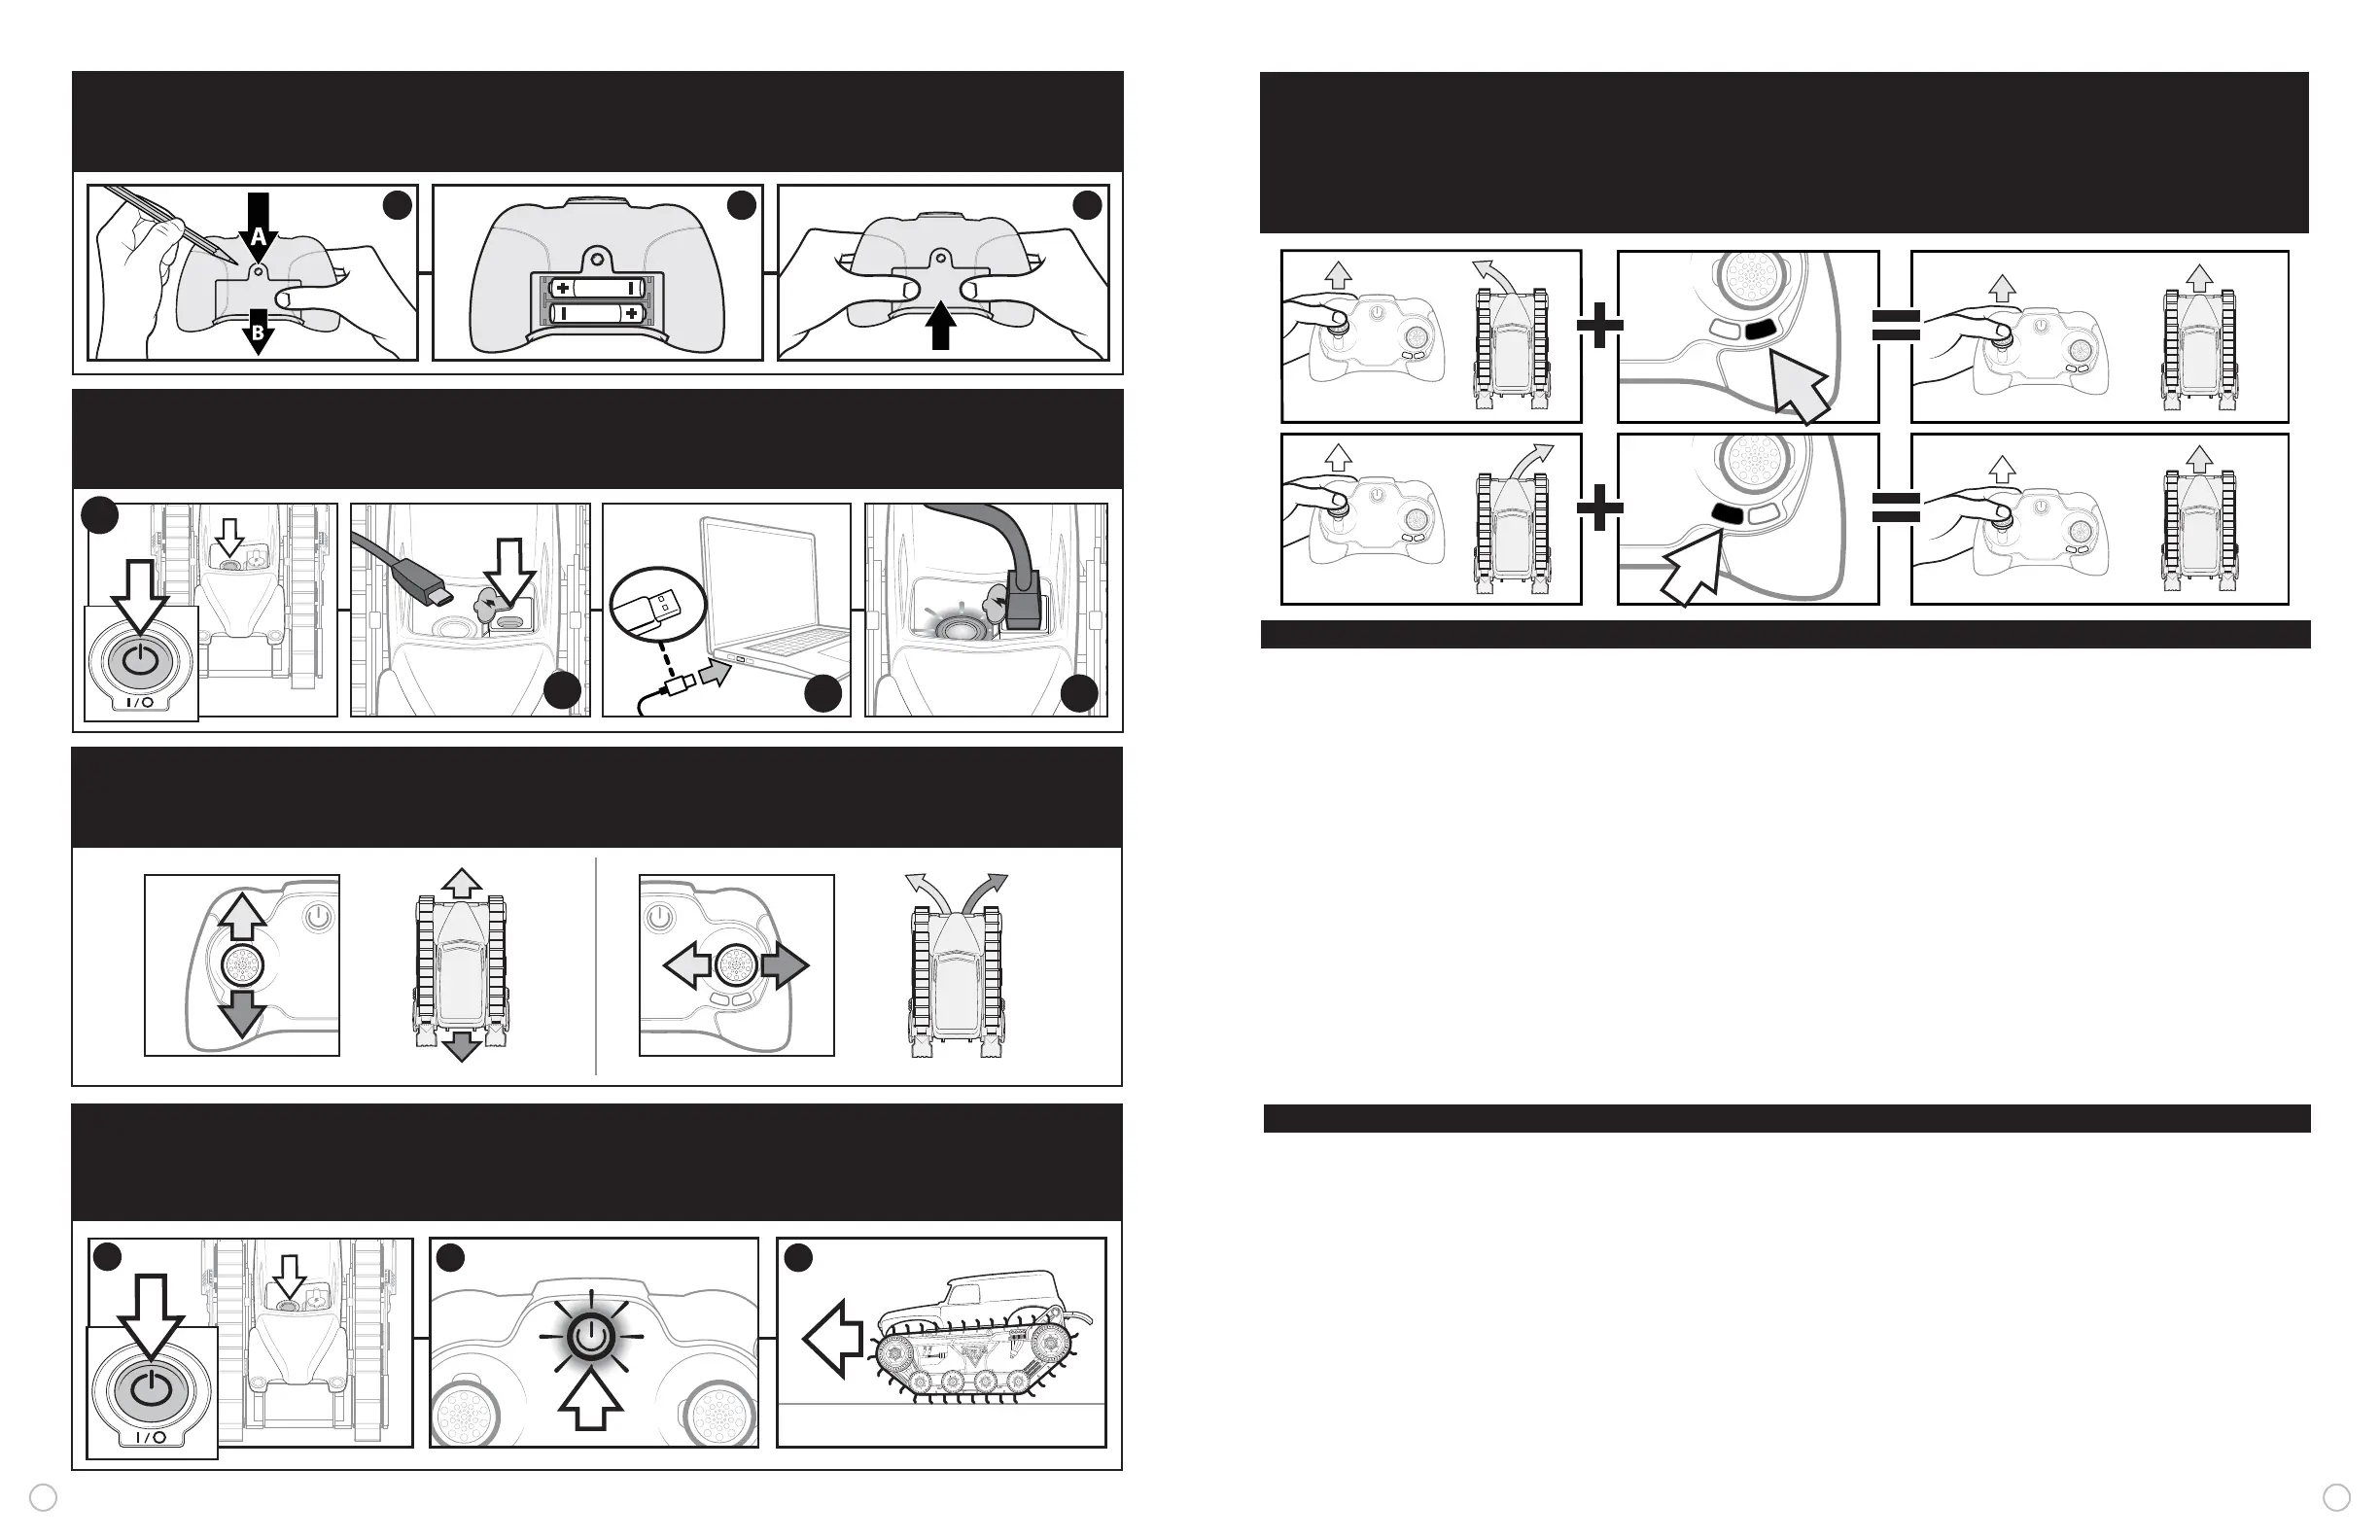
1.
Pour ouvrir le compartiment des piles, appuyer sur le bouton (A), puis faire glisser le couvercle vers le bas (B).
2.
Installer des piles neuves comme indiqué sur le schéma de polarité (+/-) du compartiment des piles.
3.
Bien refermer le compartiment des piles. Consulter la législation locale concernant le recyclage et/ou
l'élimination des piles.
CHARGE
1.
Éteindre le véhicule.
2. Insérer la petite extrémité du câble de charge dans le port de charge.
3. Insérer le câble de charge dans une prise d'ordinateur 5 V CC.
4. La LED clignote lorsque la batterie est en charge et reste allumée lorsque la batterie est
chargée.
CONNEXION DE LA RADIOCOMMANDE
1. Mettre le véhicule en marche et le poser sur une surface plane.
2. Tenir la radiocommande près du véhicule, appuyer sur le bouton d'alimentation et attendre
que le voyant d'alimentation arrête de clignoter.
3. Le véhicule est prêt à être utilisé. Utiliser la radiocommande pour piloter le véhicule.
ÉCHEC DE LA CONNEXION DE LA RADIOCOMMANDE
En cas d'échec de la connexion entre le véhicule et la radiocommande, éteindre le véhicule, retirer et
remettre les piles de la radiocommande, puis suivre à nouveau les instructions de la section CONNEXION
DE LA RADIOCOMMANDE.
CONDUITE SUR L'EAU
NE PAS UTILISER LA RADIOCOMMANDE DANS L'EAU.
REMARQUE: Avant de conduire le véhicule sur l'eau, S'ASSURER QUE LE PORT DE
CHARGEMENT EST BIEN COUVERT.
Aucune autre préparation n'est nécessaire avant de conduire
le véhicule sur l'eau. Il n'est pas recommandé d'immerger entièrement le véhicule dans l'eau.
VÉHICULE HORS DE PORTÉE/BATTERIE FAIBLE
1. La radiocommande émet un bip lorsque le véhicule s'approche d'une zone hors de portée.
2. Conduire le véhicule vers soi jusqu'à ce que le signal sonore s'arrête.
3. Si le bruit continue, cela signifie que la batterie est faible.
4. Faire revenir le véhicule et le charger immédiatement.
REMARQUE :
De fortes interférences électromagnétiques peuvent perturber ou interrompre le
fonctionnement normal du produit. Pour le réinitialiser, l'éteindre complètement et le rallumer. Si le produit ne
fonctionne toujours pas normalement, changer de lieu d'utilisation et réessayer. Des piles faibles peuvent
empêcher le produit de fonctionner correctement. Pour des performances optimales, remplacer les piles.
f
HOW TO INSTALL BATTERIES
1.
Press down on release button (A) to slide down battery cover (B).
2.
Install new batteries as shown in the polarity diagram (+/-) inside the battery compartment.
3.
Replace battery door securely. Check your local laws and regulations for correct recycling and/or
battery disposal.
HOW TO CHARGE
1. Turn the vehicle off.
2. Plug the small end of the charging cable into the charging port.
3. Plug the charging cable into a 5V DC computer outlet.
4. Pulsing ON/OFF LED indicates battery is charging, solid ON for fully charged.
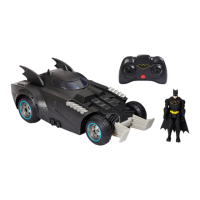
HOW TO CONNECT THE CONTROLLER
1. Turn on the vehicle and place it on a flat surface.
2. Hold the controller near your vehicle, press the power button and wait until the power light
stops flashing.
3. You are ready to drive. Use the remote control to drive.
CONTROLLER NOT CONNECTING
If your vehicle does not connect to the controller the first time, turn the vehicle off, remove batteries
from the controller, put the batteries back in and repeat the HOW TO CONNECT THE CONTROLLER
instructions.
DRIVING ON WATER
DO NOT USE REMOTE IN WATER.
NOTE: Before driving on water ENSURE THE CHARGING PORT IS FIRMLY COVERED.
There is no additional preparation required to drive on water. Fully submerging the vehicle in
water is not recommended.
OUT OF RANGE / LOW BATTERY
1. Controller will beep when you are close to driving out of range.
2. Drive vehicle toward you until beeping stops.
3. If beeping continues, this indicates low battery.
4. Return and immediately fully charge the vehicle.
NOTE: If normal function of the product is disturbed or interrupted, strong electromagnetic
interference may be causing the issue. To reset product, turn it completely off, then turn it back on.
If normal operation does not resume, move the product to another location and try again. To ensure
normal performance, change the batteries, as low batteries may not allow full function.
Safety Precautions: - Keep hands, hair and loose clothing away from the motor/ wheels when
power switch is turned ON. - Remove batteries when not in use. - Parental guidance is
recommended for the play. - Keep your toy in your sight so that you can supervise it all the time.
-New alkaline batteries are recommended to obtain maximum performance. - Users should
keep strict accordance with the instruction manual while operating the product.
Note:
Parental guidance is recommended when installing or replacing batteries. Under the
environment with electrostatic discharge, the toy may malfunction and require user to reset the toy.
CARE AND MAINTENANCE: Always remove batteries from the toy when it is not being used for
a long period of time. Wipe the toy gently with a clean damp cloth. Keep the toy away from direct
heat. Do not submerge the toy in water. This can damage the electronic assemblies.
SPECIAL NOTE TO ADULTS: Regularly examine for damage to the plug, enclosure and other
parts. In the event of any damage, the toy must not be used with the charger until the damage has
been repaired. This toy is not intended for children under 3 years old. This toy must only be used
with the recommended charger.
e
2 3
1
e
HOW TO CHARGE
f
CHARGE
E
CÓMO CARGAR
d
AUFLADEN
n
OPLADEN
i
COME RICARICARE
p
COMO CARREGAR
r
ЗАРЯДКА ИГРУШКИ
P
ŁADOWANIE
c
NABÍJENÍ
s
NABÍJANIE
h
TÖLTÉS
R
CUM ÎNCĂRCAŢI
g
ΤΡΟΠΟΣ ΦΟΡΤΙΣΗΣ
C
UPUTE ZA PUNJENJE
B
КАК ДА ЗАРЕДИТЕ
l
NAPAJANJE
t
ŞARJ ETME
z
32
 Loading...