14
www.spokey.eu
www.spokey.pl
USER’S GUIDE
NOTES Please keep this operation manual for future use. This exercise machine is intended for home use only.
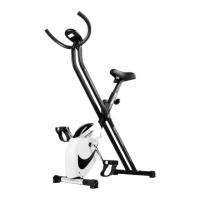
TECHNICAL SPECIFICATIONS
Net weight – 22,5 kg, Flywheel –5 kg
Dimensions of the assembled exercise machine – 86 x 44,5 x 140 cm
Maximum weight of the user – 100 kg
The equipment is designed for full body exercise
Prior to the assembly of the device and training, read carefully this
instruction manual. Safe and effective use of the device can be
guaranteed only if it is assembled, maintained, and used appropriately,
in a manner described in the manual. If you are not the user, please
provide all the users with this instruction and inform them about all
possible hazards and precautions.
Prior to starting with any exercises, please consult a doctor in order to
make sure that there are no mental or physical conditions that could be
harmful to your health and safety. The consultancy with a doctor may also
protect you against an inappropriate use of the device. A doctor will
specify whether taking drugs that would have an effect on pulse, pressure
or cholesterol level is justified.
Pay attention to your body signals. Inappropriate or excessive training
may have a negative influence on your health. Immediately stop
exercising if any of the following symptoms occurs: pain, chest
constriction, irregular pulse, exceptional shortness of breath, faints,
vertigo, nausea. If any of the above symptoms occurs, contact your
doctor immediately and give up training until then.
Children and animals should be kept away from the device. The device
is intended only and exclusively for adults.
The device should be placed on a straight, stable and tough surface,
protected with a mat or a carpet. For the sake of safety, 2 m of free space,
needed for a safe usage, should be left to each side around the device.
Prior to starting any exercises, make sure that all the bolts and nuts are
tightly fitted. Please, pay special attention to the parts that are prone to
wearing out the most.
An appropriate safety level of this device may by guaranteed only if it is
subject to regular service and inspection.
The device should be always used in accordance with its purpose.
Should during the assembly or use any of the parts appear to be faulty
or make alarming sounds, stop using the exerciser and have it serviced .
You must not use a damaged device.
During training, wear appropriate clothes. Avoid loose clothes that could
get caught in the device or such that could restrict or even make
movement impossible. It is also advised to exercise in appropriate sport
shoes. At the beginning, set a slow pace. During exercises, hold
handgrips and do not leave the saddle.
The bicycle is intended for home use. Maximum allowed user’s body
weight amounts to 100 kg.
Take special precautions while lifting and moving the device. The device
should be always moved by two persons. While lifting or moving the
equipment, maintain an appropriate posture so as to avoid backbone
damage.
The equipment was counted among class H and C and is intended for
home use exclusively. It cannot be used as a therapeutic or rehabilitation
equipment.
While assembling the device, strictly follow the enclosed instruction and
use only the parts included in the set. Prior to the assembly, check
whether the set contains all the parts that the enclosed list includes.
It is advised against leaving control devices, which could restrict
movement, in such a position that any of the elements sticks out.
Warning: prior to starting a training on this device, read the instruction
manual carefully.we do not hold responsibility for injuries or damages to
objects caused by an inappropriate use of this product. Body injuries may
happen due to an inappropriate or too intensive training.
WARNING! Heart rate monitoring system May be inaccurate. Over
excercising May result In serious injury Or death. If you feel faint stop
excercising immediately.
Health injury may result from the incorrect or too intensive training
PREPARATIONS
1. Before assembly make sure there is enough space.
2. Use the recommended tools.
3. Before assembly check if there are all the parts in the box.
It is recommended that product should be assembled by at least two people
to avoid injuries.
Most of the assembly equipment listed here has been packed separately,
but some elements come preassembled in certain assembly parts. If it is
required, dissassemble them and assemble again.
Read the instructions of all assembly steps and familiarize with all the
devices installed.
ASSEMBLY INSTRUCTIONS (Drawings – p. 2-4)
Note: Follow the assembly instructions below:
STEP 1
Attach the front stabilizer (2) and rear stabilizer (3) to the main frame (1)
with the carriage bolts (5), arc washers (6) and acorn nuts (7) as shown.
Note: The Leveler end caps of the rear stabilizer can be ADJUSTED to
keep the equipment stable.
STEP 2
Attach the pedals (9L/R) to the Crank (8L/R) respectively, viewed from the
rider’s exercising position.
Always make sure the pedals are securely tightened before any exercise.
Note: Both pedals are labeled L FOR LEFT and R FOR RIGHT.
To tighten the left pedal COUNTERCLOCKWISE and the right pedal
CLOCKWISE.
STEP 3
Attach the seat (33) to the seat post (16) with three the nylon nut (35) and
flat washer (36) as shown.Finally, insert the seat post (16) into the main
frame (1) with the knob (29) at a proper height as shown.Note: Please make
sure the seat (33) tightens in the seat post (16) when do exercise.
STEP 4
1. Insert the handlebar post cover (22) into the handlebar post (17); and
connect the Extension Wire (13) with the sensor wire (11), at the same time,
hook the tension cable (12) to the cable from tension controller (25).2. After
making sure the wires are well connected, then fix the handlebar post (17)
to the main frame (1) with the Inner hex bolts (14) and arc washers (6).
STEP 5 Assembly of the counter
1. Feed the pulse wire (28) out of the handlebar post (17) through the top
of the computer bracket.
2. Attach the handlebar (27) to the handlebar post (17) with the inner hex
bolt (31), spring washer (30) and flat washer (34), and then cover the
handlebar chuck cover (32) as shown
STEP 6
Connect all the wires (13 & 28) to the wires come from the computer (24),
and then install the computer (24) onto the computer bracket on the top of
the handlebar post (17) with the cross pan head screw (21) as shown
 Loading...