7) Empty the cistern ready to set the fill time : Hold the SET button, tap Manual Flush to start filling,
release the SET button. When flushing starts, tap Manual Flush to close the valve. While filling, check
for a good flow of water and adjust with trickle cock on pipe end if required. If flow noise is a problem,
e.g. next to sleeping quarters or classrooms, reduce the flow by means of a trickle cock.
8) Set the fill time : Each time the valve opens, it should stay open long enough to fill and flush, hence it
should start and end empty, so this is where we tell it how long to stay open. Hold the SET button, tap
Manual Flush to start filling, release the SET button. The light in the domed lens flashes every 2
seconds to show setting in progress. Wait until the cistern is part way through flushing then tap the
Manual Flush button to close the valve. The cistern fill time is now memorised and will be used every
time a flush is started whether automatically or manually. Maximum fill time is 31 minutes.
9) Set switch 3 as required (see 4 overleaf). Check all screws, gland and connections for security.
Screw controller unit lid onto box.
10) Fill in your part of the registration sheet and leave it with these instructions with the owner/manager.
Please explain section 4 (switch settings) to the person in charge of building maintenance.
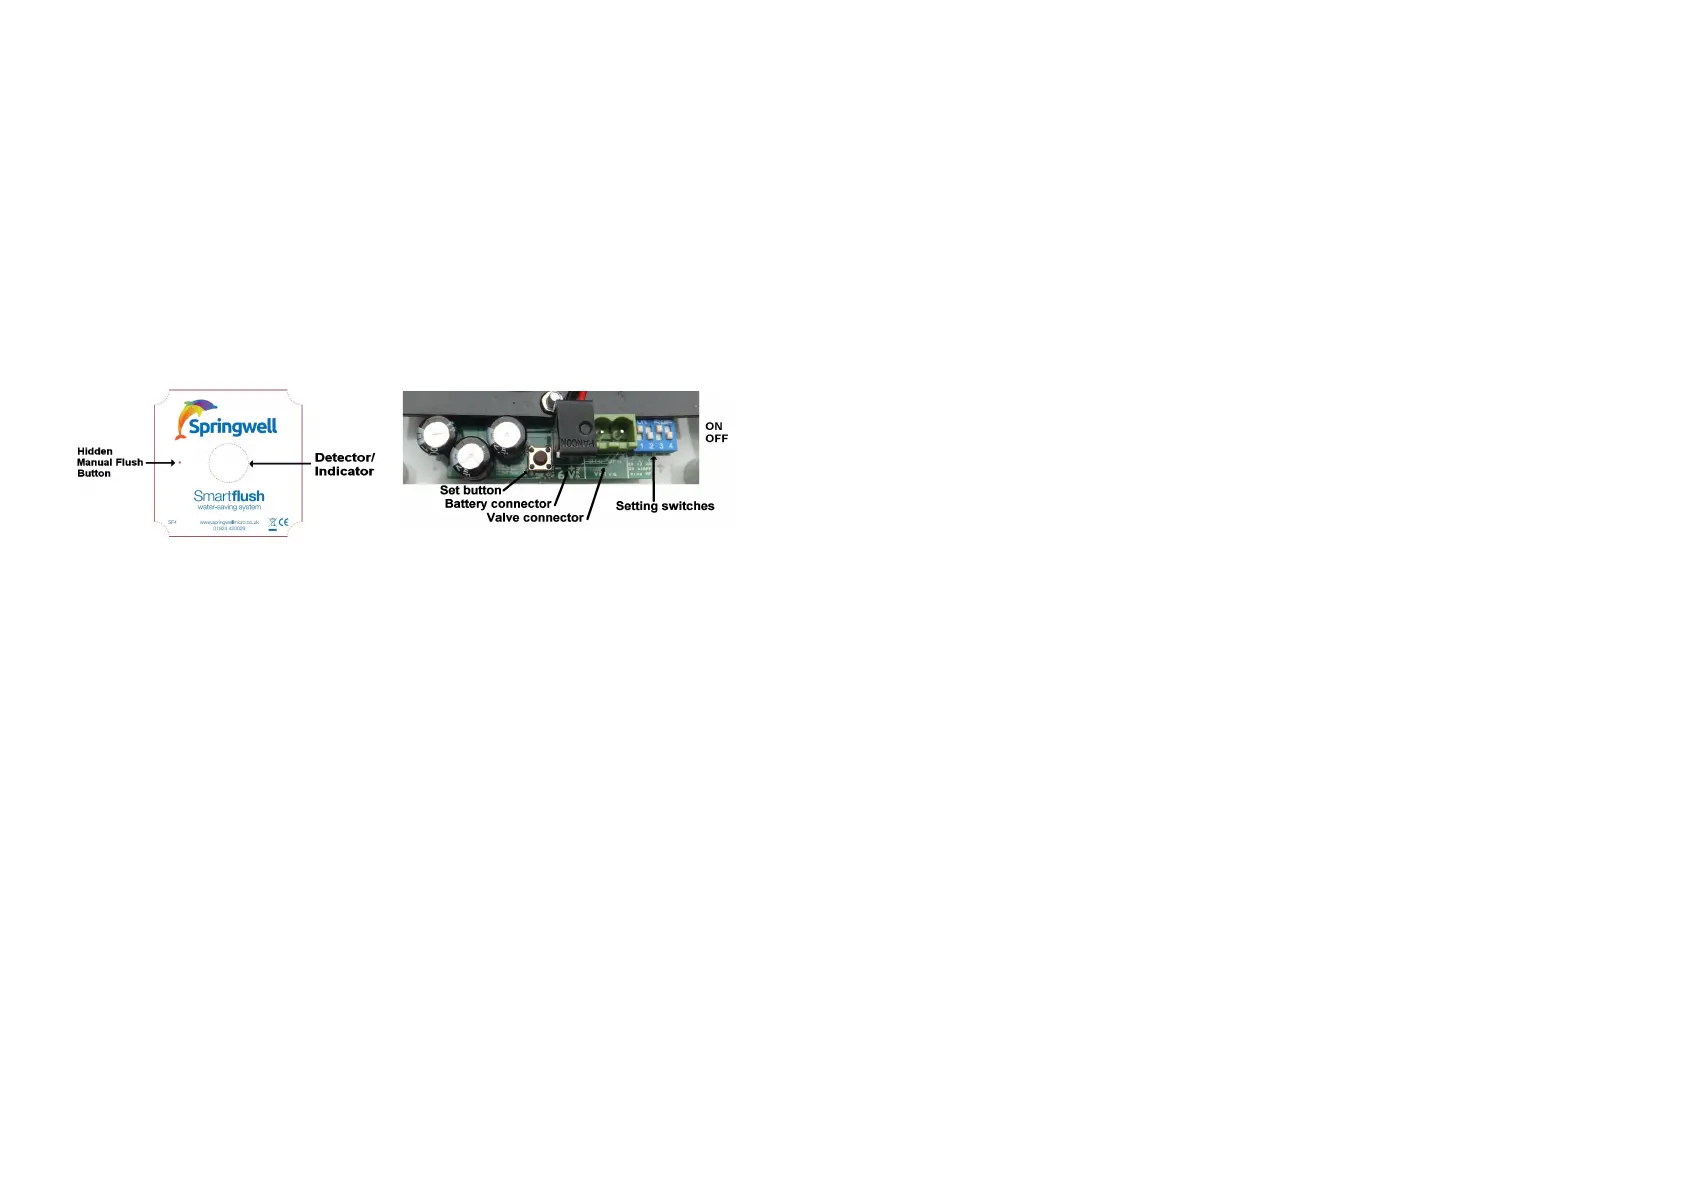
SWITCHES / CONNECTIONS / INDICATOR
Multiple cisterns
2 or 3 cisterns with a common feed may be controlled by a single controller and valve. In this case,
adjust outlet cocks feeding each cistern so that they have roughly equal fill times (during step 7), then set
up the fill time using the slowest cistern (step 8). Contact technical support if further advice is required.
Regular Maintenance
Every 3 years in hard water areas, dismantle and if necessary clean the valve and internal strainer, then
reassemble and operate Manual Flush to confirm correct operation. It is wise to change the battery at
this time rather than waiting for failure to operate (typically 4-6 years). Ensure that the view from the
controller is not obstructed. Test PIR detector as below.
Smartflush Installation Troubleshooting Guide
All units are fully tested prior to despatch. If there is an apparent fault please check the following :-
PROBLEM - UNIT WORKS ON MANUAL FLUSH BUT DOES NOT APPEAR TO SEE ANYONE
Test the infra-red detector (PIR) as follows :-
1) Ensure valve is closed. (If necessary, use Manual Flush button with switch 3 on).
2) Press and hold SET button, watching the domed lens. It should flash once to confirm that the battery
is good, then again a second later to show that test mode has been entered. Release button.
3) Watch the light, which flashes when slow movement is detected. (Can take up to 1 second ).
4) Exit test mode by a short press of the SET button or the Manual Flush button if enabled. (If left in test
mode, the unit automatically reverts to normal operation after 16 minutes to avoid call-backs).
5) After testing, return switch 3 to the desired position to leave Manual Flush button enabled or not.
6) To avoid false triggering, e.g. by scent sprays, switch on switch 4 for lower sensitivity.
N.B. If the above test works and Manual Flush also works and fills for the correct time, then the unit will
work correctly in normal use. The controller normally gives no indication that it has seen anyone,
except that the red light flashes just once at the start of each timing cycle. The unit can be reset ready for
a new cycle by opening and closing the valve using Manual Flush, then waiting for 10 seconds.
PROBLEM - VALVE WILL NOT CLOSE
N.B. The valve has a magnetic latch so it may be left open or shut when disconnected.
a) Test battery and connections:- Press and hold the Manual Flush button; after the first flash, it will
then flash a few times depending on the battery state, up to 4 flashes or a beep to show battery
change is needed. With switch 3 on, Manual Flush should alternately open and close the valve. If
no response, check that wires and connector are correctly connected and have not been damaged.
Disconnect battery then reconnect, ensuring both pins are connected and that red wire goes to "+".
b) Press the Manual Flush button (see facing page). It opens or closes the valve on each press.
Ensure that switch 3 is switched ON (Away from edge of box) otherwise Manual Flush is disabled.
The red light flashes each time the unit tries to open the valve using Manual Flush, to test for
reversed wires. If the red light flashes as the valve closes, the blue and brown wires are reversed.
c) Is the valve fitted the correct way round ? On the Asco valve, the inlet end is stamped with the
word 'IN'. A reversed valve will usually allow water to flow all the time mains pressure is applied.
d) Remove the coil retaining clip. Slide off the coil assembly. If the valve stays open, the problem
is inside the valve body. Dismantle and inspect as per (e) below.
e) If the valve was previously working or it appears to be trying to close, debris or scale inside the
valve is a likely cause. Dismantle the valve, taking careful note of order of assembly and direction of
the spring. Clean moving parts and strainer (soaking in lemon juice removes scale well). The plunger
should move freely against the spring pressure. Inspect the orifice and seal for dirt or damage. The
orifice should be a smooth circle; in areas with very hard, abrasive water, the orifice may become
pitted, causing leakage through the valve, needing valve replacement. See (2) on front page.
f) Wiring fault ? Check valve and controller connectors for loose or shorting wires. Check connector
polarity :- Brown +2 goes to pin 2 on the Asco valve. Check battery connector on both pins.
PROBLEM - VALVE WILL NOT OPEN
a) Slacken compression nuts on each side of the valve to test that there is water pressure on the
Inlet side and that there is no blockage after the valve (e.g. a stuck washer on a cistern cock.)
b) See a,b,e and f of previous problem.
PROBLEM - CISTERN ALWAYS SEEMS TO BE EMPTY / UNIT NOT WORKING
The cistern should be empty between flushes. When a fill cycle occurs, the cistern should fill and
flush and the valve should turn off during the flush, hence the cistern will usually remain empty. With
a typical fill time of 3 minutes and a cycle time of 30 minutes the unit will appear to be 'not working'
for 27 out of every 30 minutes even at busy times, so the chance of seeing any activity on a spot
check is small. If in doubt see first problem (facing page).
PROBLEM - FILLING TIME TOO SHORT OR LONG
Set the filling time again, carefully following the fitting instructions. Remember to start the self-
timed fill with the cistern empty, i.e. having just flushed. The fill time is accurate to 1 second or so
due to the quartz crystal used for timing. Any fill time up to 30 minutes may be set. If a 20 minute
cycle is selected and fill time is longer than 20 minutes, the valve will open immediately on detection
and stay open for the set fill time. If a fill time longer than 30 minutes is needed, then either there is
a restriction to the flow or the water pressure is too low. As supplied Springwell Smartflush can work
with a 20 litre cistern fed with as little as a 1 metre head. A low pressure valve is available for more
extreme conditions.
Fluctuations in mains water pressure may cause the fill time to be a little too short or too long, but
this will only result in a missed or double flush occasionally. Minor fluctuations are compensated for
because the unit will remain "in step" as long as the valve turns off during the emptying of the
cistern, because the cistern always empties to the same level.
PROBLEM - CONTROL UNIT IS CHIRPING
If the unit starts to sometimes make a chirping noise, then the battery is overdue for replacement. At
first, on detection of movement, if the battery is low the unit will sound a double chirp but will still try
to open the valve as normal. Pressing the Manual Flush button will sound the double chirp then
flash the red light and if switch 3 is on, will open the valve.
Once the battery is too weak to open the valve, the unit will sound a double chirp when movement is
detected, limited to once per minute. The unit does not chirp unless movement is detected or the
Manual Flush button is pressed.
 Loading...