EasyManua.ls Logo

Spytec Wireless Charging Weatherproof - User Manual

Spytec Wireless Charging Weatherproof
7 pages
Print Icon
To Next Page IconTo Next Page
Loading...
1Spytec GL300 Tracker - User Manual
Wireless Charging
Weatherproof
AssetTracker
User Manual
Question and Answer IconNeed help?

Do you have a question about the Spytec Wireless Charging Weatherproof and is the answer not in the manual?

Overview

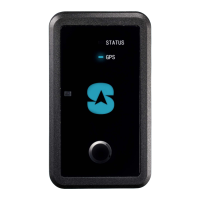
This document is a user manual for the Spytec GPS Wireless Charging Weatherproof Asset Tracker.

Function Description:

The Spytec GPS Wireless Charging Weatherproof Asset Tracker is a device designed for tracking assets. It utilizes GPS technology to provide location data and is equipped with wireless charging capabilities and a weatherproof design, making it suitable for various outdoor and demanding environments. The tracker comes with a pre-installed SIM card for cellular connectivity, enabling it to transmit location data to a mapping platform accessible via a computer or smartphone.

Important Technical Specifications:

  • Interfaces:
    • LTE antenna: Internal
    • GNSS antenna: Internal
    • Buttons: Power on/off
    • Power/configuration connector: Wireless
    • Additional interfaces: 2 x Light sensors
    • LED indicators: Status and GPS
  • Environmental:
    • Operating temperature: -13°F ~ 140°F (-11°C ~ 60°C)
    • Water resistance: IP67 compliant
  • Electrical:
    • Charging method: Wireless
    • External battery voltage: 3.7 V DC
    • Battery: Lithium-polymer 2400 mAh
    • Estimated battery life: 1 Year
    • Report frequency when moving: Every 10 minutes
    • Report frequency when stationary: 1 per day
  • Physical:
    • Dimensions: 3.43" x 2.01" x 1.18″ (8.7 x 5.1 x 3 cm)
    • Weight: 4.94 oz. (140 g)
    • USB charging cable length: 3.9" (100 mm)

Usage Features:

  • Activation and Setup:
    1. Locate IMEI: The International Mobile Equipment Identity (IMEI) number, a 15-character code, is located on the right side of the tracker and is required for account setup.
    2. Account Creation & Login: Users must visit www.spytec.com/gps-activation from a browser, click "Activate a new tracker," and complete a multi-screen form. Login details will be emailed within 24 hours, after which the tracker will be activated and its location visible on the mapping platform.
  • Placement:
    • The tracker requires maximum access to the open sky to maintain its connection with GPS satellites.
    • It should not be surrounded by metal, as metal can block GPS signals.
    • Avoid placing the tracker in metal enclosures, the middle of the undercarriage, the engine compartment, wheel wells, metal bumpers, the trunk, glove compartment, or any other closed/lidded compartment.
    • When using the included mount, it clips onto the back of the tracker. The four tapping screws provided allow for a more permanent mounting solution.
  • LED Indicators:
    • Status LED (Green) and GPS LED (Blue):
      • During power-on, both LEDs will flash for approximately 5 minutes, then turn off. This is normal.
      • During this 5-minute cycle, the green status LED will slowly blink about once every 3 seconds.
      • During this 5-minute cycle, the blue GPS LED will rapidly blink when searching for a GPS signal and then slowly blink once connected to the GPS network.
      • When powering off, both lights will flash simultaneously.
  • Troubleshooting:
    • Incorrect Location (e.g., New Jersey, 1000 days ago): Ensure the green light is blinking every 3 seconds. Take the device for a drive lasting at least 10 minutes.
    • Blue Screen or Coast of Africa on GPS Platform: This indicates no GPS signal lock. Take the device outside for a 10-minute walk or drive to update its location.
    • "Last updated X days ago" (even if in use): Verify the green light is blinking every 3 seconds and the device is properly positioned. If the issue persists, contact support@spytec.com.
    • Not Updating (device on for some time): If the green LED blinks every 3 seconds, take it for a 10-15 minute drive. If still not updating, contact Tech Support.

Maintenance Features:

  • Charging:
    1. Plug the Qi Charger into a wall outlet using the USB cable.
    2. Place the tracker on the Qi Charging pad, ensuring it is centered.
    3. The Status LED and GPS LED will flash during charging.
    4. Charge for at least 8 hours.
    5. After charging, remove the tracker from the Qi charger; both LEDs will turn off.
  • Warranty:
    • The product comes with an Unconditional Lifetime Warranty, applicable to manufacturing defects during normal use with an active Spytec GPS subscription.
    • The warranty does NOT cover damages from improper use, incompatible accessories, unauthorized modifications, negligence, environmental/natural disasters, loss, theft, or water damage.
    • Proof of sale from Spytec GPS or approved resellers is required.
    • Covered devices will be repaired or replaced at Spytec GPS's discretion, with new or refurbished units.
    • To claim warranty, users should visit http://www.spytec.com/pages/returns, review the Returns Policy, and complete the Return Authorization Form.

Spytec Wireless Charging Weatherproof Specifications

General IconGeneral
BrandSpytec
ModelWireless Charging Weatherproof
CategoryGPS
LanguageEnglish

Related product manuals