Do you have a question about the SRAM Quarq AXS and is the answer not in the manual?
Defines the warranty period and scope for SRAM products, applying only to the original owner.
Addresses how local laws may grant consumers additional rights beyond this warranty statement.
Limits SRAM's liability for indirect, special, incidental, or consequential damages.
Lists conditions and product types not covered by the warranty, including improper installation and wear.
Identifies specific components considered wear-and-tear parts, subject to normal use damage.
Emphasizes wearing safety glasses and protective gloves when servicing Quarq products for personal safety.
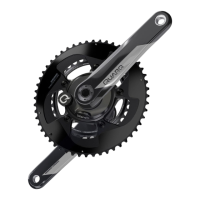
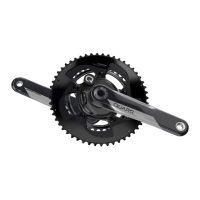
How to identify an AXS Power Meter by its logo near the battery compartment and its green LED.
How to identify DZero platform meters by model name and their green LED indicator.
How to identify Legacy meters via the Quarq product archive and their red LED indicator.
Troubleshooting for rapid battery drain or a continuously lit LED indicating pairing failure.
Troubleshooting for firmware issues causing a continually flashing LED and pairing problems.
Resolving problems with calibration, data gaps, pairing to head units, or missing cadence/power data.
Addressing inaccurate power readings or unstable zero offset values.
Lists necessary parts, safety supplies, lubricants, and common tools for battery compartment service.
Instructions for safely removing the outer battery cover on AXS Power Meters.
Steps for counter-clockwise removal of the battery compartment lid and battery.
Guidance on tightening the battery compartment screw to ensure proper connection.
Instructions for lifting battery contacts upward to ensure consistent signal.
How to install a new battery and check its height for proper compartment fit.
Steps for installing the lid and verifying LED indicators for AXS, DZero, and Legacy meters.
Instructions for reinstalling the outer battery cover on AXS Power Meters.
Connecting to update firmware or perform a manual zero offset if the LED indicates success.
Steps to remove the outer battery cover on AXS Power Meters for a reboot.
Instructions for removing the battery compartment lid to access the battery.
Using pliers or coins as alternative methods to drain voltage for a power meter reboot.
Installing a new CR2032 coin cell battery with the positive side facing outward.
Installing the lid and confirming LED indicators for AXS, DZero, and Legacy meters post-reboot.
Reinstalling the outer battery cover on AXS Power Meters after the reboot process.
Connecting to update firmware or contacting support if the power meter does not respond.
An exploded diagram showing all components of the legacy power meter battery compartment.
Lists necessary parts, safety supplies, lubricants, and common tools for spider inspection.
Crucial notice to perform inspection only on Legacy meters, not AXS or DZero, to avoid damage.
Steps for safely removing the battery lid from legacy power meters by hand.
Instructions for removing the battery compartment screw and the compartment itself.
Instructions for carefully removing the o-ring situated between the battery compartment and the spider.
Checking the clocking pin hole for damage such as gouging or scarring.
Inspecting the battery compartment clocking pin for wear or breakage.
Cleaning the battery compartment and spider using isopropyl alcohol and a lint-free rag.
Applying SRAM Butter grease to the o-ring before installing it onto the battery compartment base.
Installing the compartment onto the spider, rotating to seat the clocking pin, and verifying fit.
Installing the battery compartment screw assembly and tightening it gently.
Lifting the battery contact prongs upward to ensure proper battery contact.
Installing a new CR2032 battery and checking its height for proper seating.
Installing the lid and verifying the red LED indicator for legacy power meters.
Connecting to update firmware or rebooting if the power meter does not pair.
Performing a manual zero offset according to the power meter user manual instructions.
| Accuracy | +/- 1.5% |
|---|---|
| Water Resistance | IPX7 |
| Cadence Measurement | Yes |
| Power Balance | Yes |
| Connectivity | Bluetooth, ANT+ |
| Compatibility | AXS |
| Measurement Type | Total power, left/right balance |