1
A0730, A0730P, A0730PL Revision 2
A) Mounting
1) Select a suitable mounting location for the block assembly. In general, the necessary line
connections will be simpler with the block located near the master cylinder. If the vehicle has a
factory combination block bracket, the prop block can be mounted to that, otherwise the block
can be mounted to an inner fender or frame rail.
2) Secure the block using 5/16" hardware of the appropriate length for your specific application.
B) Line Connections
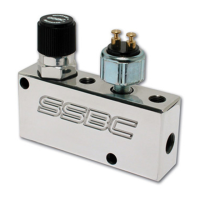
1) All of the in and out connections on the block are 3/8"-24 thread with an SAE flare for a standard
3/16" brake line. The supplied tube nuts can be flared onto any 3/16" brake lines; however, it is
not necessary to use these as long the lines you are using have a 3/8"-24 fitting already flared
on.
2) Connect the front brake outlet of the master cylinder to the port marked "F I" on the top of the
Prop Block. The outlet of the master cylinder for the front brakes will typically be the one for the
larger reservoir. If the reservoirs are the same size, a good rule of thumb is that the front
reservoir feeds the front brakes with GM master cylinders, while the rear reservoir feeds the front
brakes on Ford and Mopar master cylinders.
3) Next connect the two ports marked "F O" on the front and bottom of the Prop Block to the lines
feeding the front brakes of the vehicle. Most vehicles will have two separate brake lines: one
feeding the left (driver) front wheel and one feeding the right (passenger) front. If your vehicle
uses only one front brake line to feed both wheels, it is acceptable to plug the remaining front
outlet port of the Prop Block.
4) Connect the rear brake outlet port of the master cylinder to the port marked "R I" on the top of
the Prop Block.
5) Connect the port marked "R O" on the back of the Prop Block to the line feeding the rear brakes.
If your vehicle is equipped with a 1/4" rear brake line, use the supplied adapter fitting to connect
the line to the outlet of the prop block. SSBC has supplied the 1/4" adapter for the most popular
sizes. In the event that this fitting will not fit your line, you will need to locate a fitting from your
local parts store.
6) Tighten all fittings using a tube wrench and be sure to check for any leaks after the brake system
is bleed.
C) Switch Connections
1) The switch supplied with the Prop Block is a pressure switch designed to activate the brake lights
on the vehicle (and not the brake warning light on your dash). If your vehicle is equipped with a
brake light switch on the brake pedal, the switch in the Prop Block will not be used. If your vehicle
has no other brake light switch, then this switch must be properly connected for the brake lights
to function.
2) Your brake lights should already be connected to a chassis ground. The switch supplied will be
used to send power to the brake lights when pressure is applied to the brake system.
3) Connect the orange wire of the supplied pig tail to a fused constant 12V power supply. A 15-amp
circuit should be appropriate for most vehicles.
4) If your vehicle has separate circuits for the brake lights and turn signals, then the white wire of
the pig tail can be extended to the back of the vehicle and used to power the brake light pig tails
in the tail lights. If your vehicle uses the same circuit for brake lights and turn signals, then the
white wire will be run to your turn signal switch. Refer to the wiring diagram for your specific turn
signal switch for the proper connections.
 Loading...