Do you have a question about the SSV Works WP3-DF04 and is the answer not in the manual?
Covers enclosures with a lifetime warranty and electronics/speakers with a 1-year warranty.
Lists necessary tools including sockets, wrenches, Torx drivers, and wire cutters/crimpers.
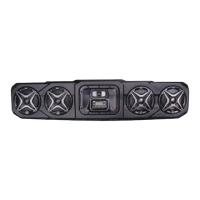
Visual identification of stereo, mounting brackets, fuse holder, nuts, screws, and zip ties.
Attaching brackets to the unit and preparing the roof by removing it if necessary.
Guide harness, use a second person to lift the enclosure into place.
Secure mounting brackets to visor with screws, then fasten M6 washers and nuts from inside the cab.
Tighten stereo to visor, then remove screws to lower stereo for roof reinstallation.
Reinstall the roof after the stereo has been positioned or adjusted.
Guide harness and fasten stereo back to mounting brackets using M6 T30 Torx screws.
Route power, ground, and amp trigger wires into the dash cavity along factory harnesses.
Prepare wires and connect power/ground to the bus bar terminals for system operation.
Operate radio tuning, Bluetooth pairing, music playback, and external audio input.
Advises against disassembly, recommends contacting SSV Works, and voids warranty for unauthorized changes.
Recommends disconnecting the negative battery terminal before starting any installation.
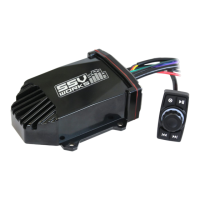
Diagram showing power, speaker, USB, and audio line connections for the amplifier.
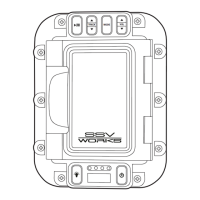
Identifies and describes the functions of the MRB3 controller buttons (Play/Pause, Volume, Mode, Track).
Instructions for powering on/off, adjusting volume, muting, and switching audio sources.
How to adjust Bass, Treble, Balance, Fader, Equalizer, Loudness, and Area settings.
Details on customizing speaker grilles with interchangeable Chroma inserts in various colors.
Information on adding a 3.5mm AUX input and 2.1A USB charge port to the system.
This document describes the SSV Works WP3-DF04 Can-Am Defender Overhead 4-Speaker Stereo System, an audio accessory designed for Can-Am Defender vehicles. The system integrates an overhead stereo unit with four speakers, providing an enhanced audio experience for the vehicle's occupants.
The WP3-DF04 is a complete overhead stereo system that includes an MRB3 Bluetooth Media Controller, four speakers, and all necessary wiring and mounting hardware for installation in a Can-Am Defender. Its primary function is to provide audio playback through various sources, including FM/AM radio, Bluetooth audio streaming, and an optional external audio device via an AUX input. The system is designed to be robust and suitable for off-road environments, with components built to withstand the elements.
The MRB3 Bluetooth Media Controller serves as the central interface for the stereo system. It allows users to control audio playback, switch between different audio sources, adjust volume, and fine-tune sound settings. The controller features a clear LCD display that shows current settings and information.
The system's speakers are integrated into the overhead unit, providing a distributed sound field within the vehicle's cabin. The design aims to deliver clear and powerful audio, enhancing the driving experience whether on trails or open roads.
The WP3-DF04 offers a range of user-friendly features for audio playback and control:
While the document primarily focuses on installation and usage, it also provides important information regarding maintenance and warranty:
In summary, the SSV Works WP3-DF04 system is designed to be a durable, feature-rich, and user-friendly audio upgrade for the Can-Am Defender, offering various playback options and customization possibilities, backed by a clear warranty structure and important safety guidelines.
| Impedance | 4 ohms |
|---|---|
| Compatibility | Universal marine applications |
| Type | Marine Stereo System |
| Speaker Size | 6.5" |
| Frequency Response | 20 kHz |
| Speakers | 2 |
| Enclosure Material | Polypropylene |
| Amplifier Type | Class D |
| Input Voltage | 12V |
| Speaker Configuration | 2-way |
| Water Resistance | Marine certified, water resistant |