7
Unit will not operate
1. The halogen bulb may have blown. Check bulb filament. If the filament is coiled and unbroken, the bulb is not blown. Otherwise, replace the
bulb following the instructions in this manual.
2. The battery may be completely discharged. Charge the unit following the directions in this manual.
3. If the spotlight does not operate after recharging as directed, contact manufacturer at (877) 571-2391.
ACCESSORIES
Recommended accessories for use with your tool are available from your local dealer or authorized service center. If you need assistance regarding
accessories, please contact manufacturer at (877) 571-2391.
WARNING: The use of any accessory not recommended for use with this tool could be hazardous.
SERVICE INFORMATION
Whether you need technical advice, repair, or genuine factory replacement parts, contact the manufacturer at (877) 571-2391.
ONE-YEAR LIMITED WARRANTY
Manufacturer warrants this product for one year against any defects in material or workmanship. The defective product will be replaced or
repaired at no charge in either of two ways.
The first, which will result in exchanges only, is to return the product to the retailer from whom it was purchased (provided that the store is a
participating retailer). Returns should be made within the time period of the retailer’s policy for exchanges (usually 30 to 90 days after the sale).
Proof of purchase may be required. Please check with the retailer for their specific return policy regarding returns that are beyond the time set for
exchanges. The second option is to return the product (prepaid) to the manufacturer for repair or replacement at our option. Proof of purchase
may be required.
This warranty does not apply to accessories. This warranty gives you specific legal rights and you may have other rights which vary from state to
state or province to province. This product is not intended for commercial use.
SPECIFICATIONS
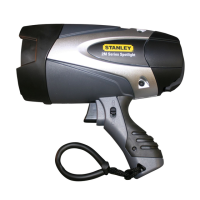
Spotlight Bulb: 12 volt, H3 series, 100 watt
Battery: Maintenance-free, sealed lead acid, 12 volt, 3 amp hour
AC input: 120Vac, 60Hz, 9W
DC input: 12Vdc, 8A
Imported by
Baccus Global
399 NW 2nd Avenue, Suite 150,
Boca Raton, FL 33432
(877) 571-2391
RD042809
6
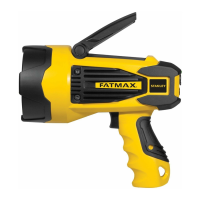
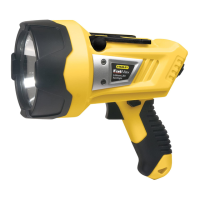
2. Push the rubber bezel forward toward the front of the spotlight to reveal two small Phillips screws in the retaining ring.
3. Using the screwdriver, remove (counterclockwise) the two screws. Set them aside.
4. Lift off the retaining ring, glass lens and rubber “O”ring and set them aside.
5. Carefully remove the reflector and bulb assembly.
6. Disconnect the bulb wire from the red power wire.
7. Unsnap the hairpin retaining wires from the reflector’s flange.
8. Using the screwdriver, loosen the retaining screw to remove the bulb from the reflector (no need to completely remove this screw).
9. Lift out the bulb and detach wire.
10. Insert the replacement bulb into the reflector’s flange.
11. Put back and secure the hairpin retaining wires.
12. Connect the bulb power wire to the red power wire.
13. Tighten the retaining screw on the flange.
14. Place the reflector in position in the body of the spotlight.
15. Replace the rubber “O”ring in the groove around the perimeter of the reflector.
16. Replace glass and retaining ring so the screw holes are aligned.
17. Secure retaining ring with two screws.
18. Replace rubber bezel.
19. Operate switch to ensure proper operation of spotlight.
WARNING: To reduce the risk of electric shock, replace bulb with 12 volt, H3 100 watt only.
12 volt DC charger plug fuse replacement
The fuse in the plug end of the 12 volt DC charger protects the adapter’s charging circuit. If the 120 volt AC charger operates, but the DC charging adapter
does not, then this fuse may be opened (blown).
To replace the fuse:
1. Unscrew the end cap of the DC plug (counterclockwise).
2. Remove spring center contact and fuse.
3. Check fuse with a continuity checker.
4. If blown, locate a replacement 10 amp/250 volt fuse.
5. Replace the fuse, spring, contact and end cap.
6. Screw end cap clockwise until it is finger tight – DO NOT OVER-TIGHTEN.
7. Test for proper operation of the 12 Volt DC Charging Adapter.
TROUBLESHOOTING
The charging status indicator LED does not flash when charging
IMPORTANT:
The charge status LED does not light while using the DC charging method.
1. Check connection to the 120 volt AC charger.
2. Check connection to AC power source.
3. Confirm there is a functioning AC current.
PHILLIPS SCREW
PHILLIPS
SCREW
RETAINING
SCREW
ON/OFF
TRIGGER
RUBBER BEZEL
Use a screwdriver to gently
pry the Rubber Bezel off.
RETAINING
RING
HALOGEN BULB ASSEMBLY
HAIRPIN
RETAINING
WIRE
LIGHT REFLECTOR
GLASS
LENS
RUBBER
"O" RING
LIGHT
REFLECTOR
HALOGEN BULB
ASSEMBLY
Only replace the bulb in an integrated
assembly of lamp holder, wire and tab.