10 • ENGLISH
c. Disconnect the plug from the power source and/or
the battery pack from the power tool before
making any adjustments, changing accessories,
or storing power tools. Such preventive safety measures
reduce the risk of starting the power tool accidentally.
d. Store idle power tools out of the reach of children
and do not allow persons unfamiliar with the power
tool or these instructions to operate the power
tool. Power tools are dangerous in the hands
of untrained users.
e. Maintain power tools. Check for misalignment
or binding of moving parts, breakage of parts and
any other condition that may affect the power
tools operation. If damaged, have the power tool
repaired before use. Many accidents are caused by
poorly maintained power tools.
f. Keep cutting tools sharp and clean. Properly
maintained cutting tools with sharp cutting edges are
less likely to bind and are easier to control.
5. Service
a. Have your power tool serviced by a qualified
repair person using only identical replacement
parts. This will ensure that the safety of the power
tool is maintained.
6. Electrical safety
Your tool is double insulated; therefore no earth
wire is required. Always check that the main
voltage corresponds to the voltage on the rating
plate.
Warning! If the power cord is damaged, it must
be replaced by the manufacturer, authorized
STANLEY Service Center or an equally
qualified person in order to avoid damage or
injury. If the power cord is replaced by an equally
qualified person, but not authorized by
STANLEY, the warranty will not be valid.
7. Labels on tool
The label on your tool may include the following symbols:
ADDITIONAL SAFETY INSTRUCTIONS
FOR BLOWERS
Do not collect still smoldering cigarette ashes, freshly
cut metals shaving, screws, nails and the like.
Never block suction inlet and outlet.
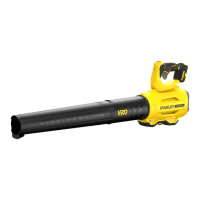
FEATURES (Fig. A)
This tool includes some or all of the following features.
1. Nozzle
2. Blast Port
3. Trigger Switch
4. Variable Speed Knob
5. Lock-On Button
6. Suction Port
7. Dust Bag
ASSEMBLY
Warning! Before assembly, make sure that the tool is
switched off and unplugged.
USE
Mounting The Nozzle for Blowing Operations
(Fig. A)
Insert the pin located inside the nozzle into the notch
provided on the blast port (1).
To lock nozzle in place, turn the nozzle
in the direction indicated.
To remove nozzle, turn the nozzle
in the opposite direction.
Mounting The Nozzle and Dust for Dust Collection
(Fig. B)
For dust collection, mount the dust bag at the blast
port (2) and nozzle at the suction port (6).
To remove dust bag and nozzle, simply pull out by first
turning in the opposite direction.
Empty the dust bag frequently to ensure maximum
dust collecting efficiency.
Operating The Blower (Fig. C)
• To switch your Blower on, depress the Switch (3). To
stop your Blower, release Switch.
Adjust variable speed knob (4) for different
speed requirement.
When continuous operation is required, first depress
the switch and then the lock-on button (5) and release
to disengage lock, squeeze and release switch.
Warning! Continuous running of machine should not
exceed 30 minutes.
Read
Instructions
Manual
Use Eye
Protection
Use Ear
Protection
V ........ Volts
A ........ Amperes
Hz ....... Hertz
W ........ Watts
min ..... minutes
..... Alternating
Current
..... Direct
Current
n
0
....... No-Load
Speed
...... Class II
Construction
.... Earthing
Terminal
.... Safety Alert
Symbol
.../min.. Revolutions
or Recipro-
cation per
minute
 Loading...