EasyManua.ls Logo

StarTech.com 1U User Manual

StarTech.com 1U
2 pages
To Next Page IconTo Next Page
Page #1 background imageLoading...
Page #1 background image
Quick-Start Guide
Manual Revision: 10/11/2018
Product Design
Actual product may vary from photos
Front View
1 Handle 5 Mounting Bracket (installed)
2 Port Selection Buttons/
LEDs
6 Keyboard LEDs
3 Current Port 7 Display Menu Buttons
4 Rail(s) 8 Release Switch
Rear View
1 Power Connection Port 6 Daisy Chain Port
2 Power Switch 7 USB-A Ports
3 Ground Connection Screw 8 Console Monitor Port
4 Console Mouse Port 9 Host Port
5 Console Keyboard Port
SKU #: RKCONS1708K
8-Port VGA Rackmount LCD Console | 17 in | 1U
For the latest information, specications, and support visit www.startech.com/RKCONS1708K.
Package Contents
LCD Rackmount Console x 1
KVM Cables x 8
M5 Cage Nuts x 8
M5 Screws x 8
Regional Power Cords (NA, JP, EU, UK, ANZ) x 5
Mounting Rails x 2
Quick-Start Guide x 1
Requirements
1U of Rack Space
Grounding Wire
Power Source
Up to 8 Computers or Servers
Phillips Type Screwdriver
Requirements are subject to change. For the latest requirements,
please visit www.StarTech.com/RKCONS1708K.
Installation
Note: It’s easier to install the LCD Rackmount Console if another
person helps you with the installation.
Warning: Use caution and proper lifting techniques when
installing the LCD Rackmount Console.
1. Based on the mounting depth of the server rack that you are
using, select the appropriate length of Mounting Rails.
2. Decide where in the server rack you want to install the LCD
Rackmount Console.
3. Insert the M5 Cage Nuts (two per Mounting Post) into the
square Mounting Holes on the Mounting Posts.
4. Align the rear Mounting Bracket Rails with the M5 Cage Nuts
on the corresponding Mounting Post.
5. Insert an M5 Screw (two per Mounting Post) through the rear
Mounting Bracket Rail and into the M5 Cage Nut. Do not
tighten the M5 Screws.
6. With assistance, slide the LCD Rackmount Console into the
server rack guiding the rear Mounting Bracket Rails into the
Rail Assembly.
7. Insert a M5 Screw (two per Mounting Post) through the front
Mounting Bracket Rail into the M5 Cage Nut.
8. Use a Phillips Type Screwdriver to tighten the M5 Screws.
9. Ensure that the rear Rails are properly aligned.
10. Use a Phillips Type Screwdriver to tighten the M5 Screws.
7
2
3
6
4
5
4
5
1
2
3
4
5
6
7
8
9
1
8
Question and Answer IconNeed help?

Do you have a question about the StarTech.com 1U and is the answer not in the manual?

StarTech.com 1U Specifications

General IconGeneral
BrandStarTech.com
Model1U
CategoryLCD Drawer
LanguageEnglish

Summary

Product Design Overview

Front View Components

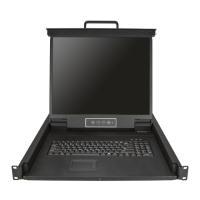
Identifies and labels the physical components visible on the front of the LCD Rackmount Console.

Rear View Ports and Connections

Labels and describes the ports and connections located on the rear of the LCD Rackmount Console.

Package Contents

System Requirements

Installation Guide

Rack Installation Steps

Step-by-step instructions for installing the LCD Rackmount Console into a server rack, including rail mounting and securing.

Connecting the Console

Ground Connection

Details on connecting the grounding wire to the console and the earth-ground connection for safety.

KVM Cable Connections

Instructions for connecting KVM cables between computers/servers and the console's host ports.

Power Connection

Guidance on connecting the regional power cord to the console and a power source.

Powering On

Steps to power on the LCD Rackmount Console and connected computers/servers.

Login Procedure

Instructions for logging into the console, including first-time use and existing credentials.

Console Operation

Opening the Console

Procedure for opening the LCD Rackmount Console using the release switch and handle.

Selecting Ports

How to use the port selection buttons to switch between connected computers.

Closing the Console

Instructions for closing the LCD Rackmount Console and sliding it back into the rack.

Important Considerations

Safety Measures and Compliance

General Safety Precautions

General safety warnings regarding wiring, installation by professionals, and local building codes.

FCC Compliance Statement

Details on FCC compliance, potential interference, and measures to correct it.

Industry Canada Statement

Compliance information for Industry Canada regarding digital apparatus and licensing.

Warranty Information

Information about the product's two-year warranty, coverage, and limitations.

Limitation of Liability

Statement regarding StarTech.com's liability for damages related to product use.