Quick-Start Guide
To view manuals, FAQs, videos, drivers, downloads, technical drawings, and more, visit www.startech.com/support.
Manual Revision: November 6, 2021 12:28 AM
To view manuals, FAQs, videos, drivers, downloads, technical drawings, and more, visit www.startech.com/support.
Product ID
M2-USB-C-NVME-SATA
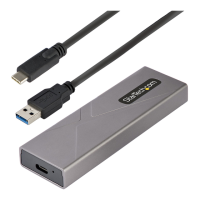
Product Diagram
Front Back
Component Function
1 Drive Tray Cover • Enclosure component
2 USB-C Port • Connect the Enclosure to the Host Computer
3
Power and Activity
LED Indicator
• Solid Blue indicates the Enclosure is receiving
power
• Flashing Blue indicates Drive read/write
activity
4 Drive Tray Release Tab • Pull down to eject the Drive Tray
Package Contents
• M.2 SSD Enclosure x 1
• USB-C to USB-C Cable x 1
• USB-C to USB-A Cable x 1
• Thermal Pad x 1
• SSD Fastener Pegs x 2
• Quick-Start Guide
Product Information
For the latest product information, technical specications, manuals, and Declarations
of Conformance, please visit:
www.StarTech.com/M2-USB-C-NVME-SATA
M.2 SATA/NVMe SSD Enclosure - Tool-less - USB 3.2 (10Gbps) w/ USB-C and USB-A Cables
Product Requirements
• SSD x 1
• M-Key and B+M-Key PCI Express M.2 NVMe and M.2 SATA
• 30 mm, 42 mm, 60 mm, or 80 mm Drive Length
Installation
Install a Drive
Warning! Handle Drives with care.
1. Pull the Drive Tray Release Tab down to eject the Drive Tray. (Figure 1)
2. Carefully pull the Drive Tray out of the Enclosure.
3. Insert one SSD Fastener Peg into the Drive Tray Hole that corresponds with the
length of the Drive and slide the SSD Fastener Peg into the Notch. (Figure 2)
4. Gently slide the Connector on the Drive at a 30-degree angle into the
corresponding Drive Connector, located on the Drive Tray. (Figure 3)
Note: The Connector on the Drive is keyed so that it only ts one way.
5. Pull the SSD Fastener Peg away from the Drive, lightly push the Drive down into
position on the Drive Tray, and release the SSD Fastener Peg. (Figure 3)
1
3
2 4
Figure 2
SSD Fastener Peg
Notch
Figure 1
Drive Tray
Drive Tray
Release Tab