Quick-Start Guide
To view manuals, FAQs, videos, drivers, downloads, technical drawings, and more, visit www.startech.com/support.
Manual Revision: March 28, 2019 1:31 PM
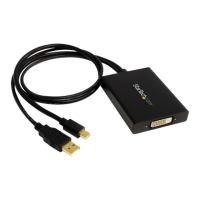
Product Diagram (MDP2DVID)
Component Function
1 USB-A Connector
• Used to connect the Adapter to the Host
Computer.
2
Mini DisplayPort
Connector
• Used to connect the Adapter to the Host
Computer’s Video Card.
3 DVI-D Port
• Used to connect the Adatper to a Video
Display Device.
Requirements
For the latest requirements, please visit www.startech.com/MDP2DVID.
• Mini DisplayPort enabled video source (i.e. computer, laptop, etc)
• DVI-D enabled display device (i.e. monitor, projector, HDTV, etc)
• Available USB port on video source device
Installation
Mini DisplayPort to DVI Dual-Link Converter | USB Powered
1
1. Make sure the video display device (i.e. monitor, projector, HDTV, etc) is turned o,
before connecting to the adapter.
2. Connect a standard male/male DVI-D cable from the MDP2DVID adapter to the
video display device. If using a screen resolution larger than 1920x1200, a dual-link
DVI cable is required.
3. Turn on the video display device.
4. Connect the Mini DisplayPort and USB connectors on the MDP2DVID adapter to
video source device (i.e. computer, laptop, etc). The computer can be on or o, as it
should be able to automatically detect and congure for the MDP2DVID.
5. Once the external display is detected and congured, the video output should be
visible on the display device. Some adjustments may be necessary from the video
source device’s output settings for optimal viewing.
Specications
Video Signal • DisplayPort 1.1
Connectors • Mini DisplayPort male x 1
• USB-A male x 1
• 25-pin Dual-Link DVI-D female x 1
Maximum Video Resolution • 2560x1600
HDCP Support • Yes
Integrated Cable Length • 6 in
Operating Temperature • 0°C ~ 70°C (32°F ~ 158°F)
Storage Temperature • -10°C ~ 80°C (14°F ~ 176°F)
Humidity • 10% ~ 85 % RH
Dimensions (LxWxH) • 208.0mm x 160.0mm x 12.0mm
Weight • 119 g
2
3