9
9
Machine-specic Safety Warnings
- Hold the machine with a rm grip. High reaction torque
can briey occur while driving in and loosening screws.
- Secure the workpiece. A workpiece clamped with
clamping devices or in a vice is held more secure than
by hand.
- Always wait until the machine has come to a complete
stop before placing it down. The tool insert can jam and
lead to loss of control over the power tool.
- Never use the machine with a damaged cable. Do not
touch the damaged cable and pull the mains plug when
the cable is damaged while working. Damaged cables
increase the risk of an electric shock.
Functional Description
Read all safety warnings and all instructions.
Failure to follow the warnings and
instructionsmay result in electric shock, re
and/or serious injury.
While reading the operating instructions, unfold the
graphics page for the machine and leave it open.
Intended Use
The machine is intended for driving in and loosening
screws.
Product Features
The numbering of the product features refers to the
illustration of the machine on the graphics page.
1 Screwdriver bit*
2 Stop bushing
3 Adjustment sleeve for screwing-depth stop
4 Screwing-depth stop
5 Belt clip
6 Lock-on button for On/Off switch
7 On/Off switch
8 Rotational direction switch
9 Universal bit holder*
*The accessories illustrated or described are not included as
standard delivery.
Noise/Vibration Information
Measured values determined according to EN 60745
Typically the A-weighted noise levels of the product are:
Sound pressure level 85 dB(A); Sound power level 96
dB(A) . Uncertainty K=3dB
Wear hearing protection!
Vibration total values (triax vector sum) determined
according to EN 60745:
Drilling into metal: Vi bration emission value a
h
<2.5 m/s
2
,
Uncertainty K=1.5 m/s
2
Screwdriving: Vibration emission
value a
h
<2.5 m/s
2
, Uncertainty K=1.5 m/s
2
The vibration emission level given in this information sheet
has been measured in accordance with a standardised
test given in EN 60745 and may be used to compare
one tool with another. It may be used for a preliminary
assessment of exposure.
The declared vibration emission level represents the main
applications of the tool. However if the tool is used for
different applications, with different accessories or poorly
maintained, the vibration emission may differ. This may
signicantly increase the exposure level over the total
working period.
An estimation of the level of exposure to vibration should
also take into account the times when the tool is switched
off or when it is running but not actually doing the job. This
may signicantly reduce the exposure level over the total
working period.
Identify additional safety measures to protect the operator
from the effects of vibration such as: maintain the tool and
the accessories, keep the hands warm, organisation of
work patterns.
Technical Data
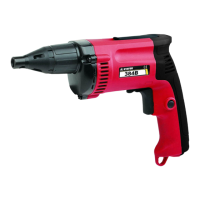
Screwdriver 384B
Power input W 600
No-load speed min
-1
0-4500
Max. screw dia. mm 6,3
Tool holder Hexagonal
Weight kg 1,8
Protection class / II
The values given are valid for nominal voltages [U] 230/240
V ~ 50/60 Hz - 110/120 V ~ 60Hz. For lower voltage and
models for specic countries, these values can vary.
Please observe the article number on the type plate of
your machine. The trade names of the individual machines
may vary.
Declaration of Conformity CE
We declare under sole responsability that this product is in
coformity with the following standards or standardisation
documents:
EN 60745, according to the provisions of the directives
2006/42/CE, 2004/108/CE, 2006/95/CE
Ramiro de la Fuente
Director Manager
May 27, 2014
Assembly
Changing the Tool
Pull off the screwing-depth stop 4 toward the front. Pull out
the screwdriver bit 1. If required, the universal bit holder 9
can also be pulled off and replaced.
After changing the tool, reattach the screwingdepth stop
4.


 To Next Page