Merlin Quick Start Guide
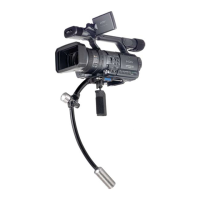
3 – With your camera’s center of gravity point lined up on the letter H, note which hole on the plate is
closest to camera’s tripod mount and using the larger silver screw, mount the camera in that hole
(with an HDSLR it’s typically M, N or O). Make sure the screw is tight. The flat edge of the plate goes
toward the front of the camera.
4 - Start with the fore-and-aft and side-to-side trim rollers in about the middle of the stage.
5 - The Merlin comes with 9 weights. On the lower spar, put on the starter weight (looks like a finish
weight, but with a threaded hole in the front), add appropriate middle weights and add the finish
weight. Knowing the total weight of the camera and added accessories is important.
· Rule of thumb: One middle weight on the bottom for each pound of camera payload. (Camera
complete with lens and any added accessories, i.e. filters, batteries, microphone, etc.)
· At the front of the folding caliper hinge, if the payload is 3 pounds or less, put on the other
finish weight. If 4 pounds or more, put on one middle weight and finish weight.
6 - With payload of 2-3 pounds, start with arc about in the middle. Don't forget to loosen the two
locking knobs at the folding caliper hinge BEFORE turning the caliper adjusting knob to adjust
the arc size. If you do not loosen them first, you will damage the hinge joint. With payload of 4-5
pounds, start with arc open all the way.
7 - On the top of the stage, you will see numbers. Mount the front of the dovetail camera mounting
plate on the Merlin in the middle of the stage (#0 on Merlin, #5 on Merlin
2
) and lock into place.
Camera lens should be pointing toward the front finish weight.
8 - Make adjustments to get the camera to sit relatively level.
· For example, if camera is tipping dramatically forward, move the plate back. If camera is
tipping dramatically back, move the plate forward. If camera is tipping only slightly forward
or back, use the fore-and-aft trim roller to balance. If the camera is tilting left or right, use the
side-to-side trim roller under the stage in the back to balance.
9 - DROP TIME IS THE KEY. If you get the drop time right, everything else HAS to be right.
How to determine the correct drop time:
Hold the Merlin handle with your right hand and hold the lower spar straight out sideways with your
left hand. Then let go to check how long it takes to go from sideways, back to the bottom. Stop the
swing once it goes past the bottom. It should be not too fast, not too slow. The DVD talks about 1
second, but since everyone perceives one second differently, you need to watch the DVD where it
shows Garrett Brown demonstrating drop time (DVD, Section 7, at the 4:00 mark). If you get it to
LOOK like that, you are good.
If your drop time is too fast, make the arc smaller by turning the caliper adjusting knob counter
clockwise. If your drop time is too slow, make the arc larger by turning the caliper adjusting knob
clockwise. (Don’t forget to loosen the two locking knobs on the caliper hinge first and re-tighten
when done).
Keep in mind that when you change the arc, the weights do not move straight up or down, they move
at an angle. So after you change the arc, re-trim to make the camera sit level again.
3
 Loading...