EasyManua.ls Logo

SteamandGo SAG399 - User Manual

SteamandGo SAG399
7 pages
Print Icon
To Next Page IconTo Next Page
Loading...
All in One System
Ironing Board with Pressurized
Steam Iron
Model SAG399
INSTRUCTIONS
Please Read These Instructions Before Use.
IMPORTANT SAFETY INSTRUCTIONS
Please Read These Instructions Before Use:
When using electrical appliances, always follow basic safety precautions,
including the following:
1. This appliance is only used indoors.
2. Use this product for its intended purpose only.
3. To protect against risk of electrical shock, do not submerge the appliance
in water or other liquids.
4. THIS APPLIANCE IS NOT A TOY. Close supervision is necessary
when any appliance is used by or near children. Children should be
supervised to ensure that they do not play with the appliance
5. Unplug from electrical outlet when not in use, before putting on or taking off
parts, and before filling with water, emptying, or cleaning.
6. Avoid contact with hot parts. Keep hands, hair, and clothing away from hot
parts to prevent burns. Burns can occur by touching hot parts, hot water, or
steam
7. Don't operate any appliance with a damaged power cord or plug, after it
malfunctions, or is dripped or damaged in any manner. A damaged power
cord, plug or unit may result in fire, electrical shock, or injury. Please
replace the power cord through manufacturer, authorized agent or a
qualified electrician. Do not leave the appliance unattended while in
operation.
Caution: To reduce the risk of electric shock, don't disassemble or
attempt to repair the appliance, take it to a qualified service person
for examination and repair, incorrect reassembly or repair could
cause a risk of fire, electric shock or injury to person when the
appliance is used.
Question and Answer IconNeed help?

Do you have a question about the SteamandGo SAG399 and is the answer not in the manual?

Summary

IMPORTANT SAFETY INSTRUCTIONS

General Usage Precautions

Covers basic safety, indoor use, handling hot parts, electrical shock, and use as a toy.

Operational Hazards

Addresses risks from damaged cords, improper repair, unattended operation, and steam burns.

Handling and Storage Safety

Includes cooling, accessory use, cord management, and storage precautions.

Usage Restrictions and Disposal

Covers circuit overload, extension cords, use by children, and environmental disposal.

PRODUCT INFORMATIONS

Component Identification

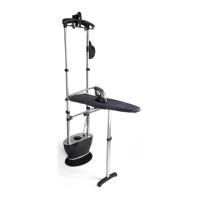
Diagram and list of all parts included with the garment steamer.

Assembly Instructions

Step-by-step guide for assembling the garment steamer unit and its components.

Using Your Pressurized Garment Steamer

Filling the Water Tank

Instructions for safely filling the boiler with water, including recommended water types.

Operation and Readiness Indicator

Steps for plugging in, turning on, and understanding the pre-heating and steam readiness indicators.

Pressing With Steam

Vertical Ironing Procedure

Guide for ironing garments while they are hung, using the steamer vertically.

Horizontal Ironing Procedure

Instructions for ironing garments laid flat on the ironing board.

Refilling Water Reservoir

Steps for safely refilling the water tank when steam production stops.

Quick Storage

Storage Preparation

Steps to safely prepare the unit for storage, including cooling and draining.

Cleaning and Long Term Storage

Regular Cleaning Procedure

Monthly maintenance steps using vinegar solution to descale and clean the unit.

Surface Cleaning

Method for cleaning the exterior of the appliance using a damp cloth or alcohol solution.

Problem Solving Guide

Troubleshooting Common Issues

Guide to diagnosing and resolving problems like no steam, water drips, or burning clothes.

Ironing Board Installation Instructions

Parts Identification and Assembly

Lists parts and provides steps for assembling the ironing board to the steamer poles.

Overview

This document describes the All in One System Ironing Board with Pressurized Steam Iron, Model SAG399, a versatile appliance designed for both vertical and horizontal ironing with the benefit of pressurized steam.

Function Description

The SAG399 is an integrated ironing system that combines a traditional ironing board with a pressurized steam iron. Its primary function is to efficiently remove wrinkles from garments and refresh clothes using high-pressure steam. The system allows for both vertical steaming of hanging garments and horizontal ironing on the built-in board. The pressurized steam is delivered through the soleplate of the iron head, ensuring effective wrinkle removal.

Important Technical Specifications

  • Model Number: SAG399
  • Rating: AC120V 60Hz, 1600W
  • Water Tank Capacity: 1000ML
  • Telescopic Pole: Three-section extendable pole, must be fully extended during operation for adequate height.
  • Power Cord: Grounded three-prong plug.
  • Pre-heating Time: 8-10 minutes (Red light indicates pre-heating, Blue light indicates steam is ready).
  • Safety Features: Safety cap for the boiler, grounded plug, automatic shut-off if no steam is produced (to prevent dry boiler damage).

Usage Features

The SAG399 offers a comprehensive ironing experience with several user-friendly features:

Assembly: The assembly process involves several steps to set up the ironing board and steam iron components:

  1. Unpacking: Take out all parts and verify against Figure 1.
  2. Telescopic Pole Extension: Fully extend the three-section telescopic pole by opening clips, extending poles, and then closing clips to lock them securely. Ensure the pole is firmly in place and cannot be pushed down. It is crucial that the pole is fully extended to provide sufficient height for steaming clothes.
  3. Pole Base Insertion: Insert the bottom of the telescopic poles into the pole base (Figure 3), ensuring stability.
  4. Iron Holder Attachment: Fix the iron holder onto the telescopic pole (Figure 4) and attach the steam nozzle to its holder (Figure 5). A caution is given not to upside down the nozzle (Figure 6) as it is dangerous and can cause the nozzle to fall off.
  5. Connecting Rod and Hanger: Attach the connecting rod to the poles (Figure 7). Align the hanger hole with the pole top and push down to secure it (Figure 8).
  6. Clothes Hanger Attachment: Attach the clothes hanger to the pole top hanger by aligning its hole with the hanger tab and pushing down (Figure 9).
  7. Ironing Board Installation: Refer to the ironing board installation instructions. Take out the ironing board, align it with the fixing holes on the two side poles, and screw in the M8 screws by hand (Figure 10).
  8. Support Pole Attachment: Fit the two supported poles onto the hooks of the extension poles (Figure 11).
  9. Cloth Cover: Place the cloth cover on the ironing board and tighten it.

Ironing Modes:

  • Vertical Ironing:
    • Place the garment on the clothes hanger, which is hung on the Hanger Hook.
    • Fold the ironing board if desired.
    • Set the temperature to MAX before ironing (Figure 15).
    • Wait for the power light to turn Blue, indicating steam is ready. Ironing with a Red light may cause water spray.
    • Press the steam button to release pressurized steam from the iron head.
    • Slide the iron head from bottom to top to remove wrinkles and refresh clothes (Figure 16).
  • Horizontal Ironing:
    • Lay down the ironing board and adjust it to a proper height.
    • Place the cloth on the ironing board.
    • Press the steam button to release pressurized steam.
    • Slowly slide the iron head from bottom to top to remove wrinkles and refresh clothes (Figure 17).
    • Temperature Setting: Dial the knob to align with the black dot, adjusting temperature based on fabric material. Clockwise increases temperature, counterclockwise decreases it.
    • Test Ironing: It is recommended to test the iron on a small area of clothing after setting the temperature to ensure it's not too high, which could burn the clothes.
    • Caution: Do not press the steam button while setting the temperature, as hot steam may escape and cause burns.

Water Filling:

  1. Unscrew Safety Cap: Unscrew the safety cap from the unit (Figure 12).
  2. Fill Water: Use the measuring cup and funnel to fill the boiler with water. Only water should be used; no cleaning detergents are allowed. Distilled or de-mineralized water is recommended to prolong the steamer's lifetime. Be careful not to spill water.
  3. Screw Cap Back: Screw the safety cap back on tightly to prevent steam leakage (Figure 13).
  4. Plug In: Plug the unit into a properly grounded three-pronged outlet, ensuring the electric voltage matches the unit's requirements.
  5. Power On: Step on the pedal switch. The switch will illuminate Red during the 8-10 minute pre-heating phase. It will turn Blue when the steam is ready (Figure 14).
  6. Caution: If no steam comes out, turn off the power switch or unplug the unit immediately to prevent dry boiler damage, which can affect service life.

Refilling Water During Use:

  1. Unplug: Unplug the appliance from the electrical outlet.
  2. Unscrew Safety Cap Slowly: Unscrew the safety cap slowly. Wait for any hissing noise from residual steam to stop before completely removing it.
  3. Cool Down: Allow the unit to cool for at least 30 minutes.
  4. Fill Water: Unscrew the safety cap completely and use the measuring cup and funnel to fill the boiler with water. Be careful not to let water leak out.
  5. Screw Cap Back: Screw the safety cap back on.
  6. Plug In: Plug the unit back into the electrical outlet and continue use.
  7. Note: Due to high pressure and temperature, filling water when the unit is still hot may cause water to spray out.

Maintenance Features

Quick Storage:

  1. Power Off: Turn off the pedal switch.
  2. Unplug: Unplug the power cord.
  3. Cool Down: Allow the unit to cool for 40 minutes.
  4. Disassemble: Remove the clothes hanger, hanger hook, ironing board, and telescopic pole.
  5. Drain Water: Tilt or invert the unit and unscrew the bottom drain plug to drain remaining water (Figure 18). Loosening the safety cap first makes draining easier. Screw the safety cap and drain plug back on before storage.
  6. Caution: Do not unscrew the safety cap when the boiler is hot, as hot steam and water remaining in the boiler can cause burns.
  7. Store: Place the unit in a convenient storage location.

Cleaning and Long Term Storage: It is recommended to follow this procedure at least once a month. Using distilled or de-mineralized water helps reduce cleaning frequency and prolong the steamer's life.

  1. Power Off: Turn off the pedal switch.
  2. Unplug: Unplug the unit from the power outlet.
  3. Cool Down: Wait for the unit to cool completely (at least 40 minutes).
  4. Disassemble: Remove the telescopic pole and other attachments, setting them aside.
  5. Prepare Cleaning Solution: Mix a solution of 50% vinegar and 50% water (1000ml is usually sufficient).
  6. Fill Boiler: Unscrew the safety cap and pour the water-vinegar solution (1000ml) into the boiler. Wait for 30 minutes.
  7. Drain Solution: Carry the unit to a sink or tub. Unscrew the bottom drain plug and drain out the solution.
  8. Rinse Boiler: Rinse the boiler with fresh water. Tilt or upside down the unit to remove all water. Flush until no vinegar smell remains.
  9. Reassemble and Clean Exterior: Re-screw the safety cap and drain plug. Reattach the telescopic pole, hook hanger, and nozzle. Wipe the outside of the appliance with a wet cloth.
  10. Surface Cleaning: If the unit surface is dirty, use a dry cotton cloth or a 30% alcohol solution for cleaning.

Problem Solving Guide:

  • Unit fails to steam, pedal switch light off:
    • Cause: Steamer not plugged in, household circuit breaker/ground fault interrupter tripped, or fuse blown.
    • Solution: Plug into electrical outlet, reset circuit breaker/ground fault interrupter, or replace fuse. Contact a qualified electrician if needed.
  • Unit fails to steam, pedal switch light on:
    • Cause: Mineral buildup in the unit, water tank empty.
    • Solution: Follow cleaning procedures in the manual, refill water tank.
  • Water drips from nozzle:
    • Cause: Temperature setting too low.
    • Solution: Follow temperature setting procedure to re-set the temperature.
  • Burns clothes:
    • Cause: Temperature setting too high.
    • Solution: Follow temperature setting procedure to re-set the temperature.

Safety Instructions:

  • For indoor use only.
  • Use for intended purpose only.
  • Do not submerge in water or other liquids.
  • Not a toy; supervise children.
  • Unplug when not in use, before changing parts, filling, emptying, or cleaning.
  • Avoid contact with hot parts, water, or steam to prevent burns.
  • Do not operate with a damaged power cord or plug; replace through manufacturer or qualified electrician.
  • Do not leave unattended while in operation.
  • Do not disassemble or attempt to repair; refer to qualified service personnel.
  • Allow unit to cool before storage.
  • Use only recommended accessories.
  • Turn off before plugging/unplugging.
  • Keep power cord away from hot surfaces and water; avoid kinks.
  • Exercise care due to steam emission.
  • Do not operate without properly filled water container. Unplug during filling/cleaning.
  • Grounded plug feature: fits three-prong outlet one way; do not defeat.
  • Pull plug, not cord, to disconnect.
  • Avoid circuit overload by not operating other high-wattage appliances on the same circuit.
  • EU Waste Disposal: Product should not be disposed of with household waste; recycle responsibly.
  • Check for steam leaks from base, hose, handle, and nozzle.
  • If extension cord is necessary, use a 3-pronged, 20-ampere cord; arrange to avoid tripping.
  • Can be used by children aged 8+ and persons with reduced capabilities if supervised and instructed.
  • Cleaning and user maintenance should not be done by children without supervision.
  • Never unscrew the fill cap during use; only unscrew after all pressure has been released.

SteamandGo SAG399 Specifications

General IconGeneral
BrandSteamandGo
ModelSAG399
CategoryIron
LanguageEnglish