The Step2 Company, LLC.
10010 Aurora-Hudson Rd.
Streetsboro, OH 44241 USA
1-800-347-8372 USA & Canada Only
(330)656-0440
www.step2.com
06/14/2019 194217A01B
4836
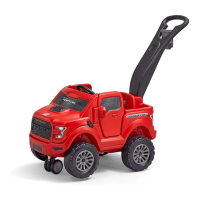
2-IN-1 FORD
®
F-150 RAPTOR
™
WARNING:
CHOKING HAZARD
Small parts. Sharp points. Adult assembly required.
WARNING:
BURN HAZARD
• Always check the temperature of the product before
letting your children play on it.
• Remember that the product may cause burns.
• Always be aware of the sun and weather conditions,
and do not assume that the equipment is safe
because the air temperature is not very high.
INSPECT THIS PRODUCT BEFORE EACH USE. TIGHTLY
SECURE CONNECTIONS AND REPLACE DAMAGED OR
WORN COMPONENTS. CONTACT THE STEP2 COMPANY,
LLC. FOR REPLACEMENT PARTS.
INTENDED FOR USE BY CHILDREN FROM AGES 1.5 5 YEARS.
OBSERVE ALL STATEMENTS AND WARNINGS TO REDUCE THE
LIKELIHOOD OF SERIOUS OR FATAL INJURY.
SAVE THIS SHEET FOR FUTURE REFERENCE.
SAFETY INFORMATION:
• Supervise children at all times.
• Indoor use recommended only if environment is free of obstacles
& obstructions.
• Maximum child’s weight: 42 lbs. (19,05 kg.). Limit 1 rider.
• DO NOT over-tighten screws or they will not hold parts together
appropriately.
• Take notice that screws are designed to pierce the plastic and form
their own threads.
• Take indoors or do not use when the temperature drops below 32°F (0°C).
INSTRUCT CHILDREN:
• not to use product until properly assembled.
• to keep hands, feet, loose clothing and long hair away from the
wheels during use.
DECAL APPLICATION:
Clean and dry area thoroughly. Center decal in area. Apply pressure
from center to outer edge.
DISPOSAL INSTRUCTIONS:
Please recycle when possible. Disposal must be in compliance with
all government regulations.
CLEANING INSTRUCTIONS
Electronic Components:
• Do not submerge in water or spray liquid directly on unit.
• Use mild detergent solution. Wipe with damp cloth.
General Cleaning:
• Use mild soapy water.
• Parents should thoroughly wash accessories before use.
IMPORTANT:
• Do not mix old and new batteries.
• Do not mix dierent types of batteries.
• Insert batteries with correct polarity.
• Remove exhausted batteries from the toy.
• Follow battery manufacturer’s warnings and recommendations.
THIS DEVICE COMPLIES WITH PART 15 OF THE FCC
RULES. OPERATION IS SUBJECT TO THE FOLLOWING TWO
CONDITIONS: 1 THIS DEVICE MAY NOT CAUSE HARMFUL
INTERFERENCE, AND 2 THIS DEVICE MUST ACCEPT ANY
INTERFERENCE RECEIVED, INCLUDING INTERFERENCE THAT
MAY CAUSE UNDESIRED OPERATION .
THIS CLASS B DIGITAL APPARATUS COMPLIES WITH
CANADIAN ICES003.
WARNING: CHANGES OR MODIFICATIONS TO THIS UNIT
NOT EXPRESSLY APPROVED BY THE PARTY RESPONSIBLE FOR
COMPLIANCE COULD VOID THE USER’S AUTHORITY TO OPERATE
THE EQUIPMENT.
NOTE: THIS EQUIPMENT HAS BEEN TESTED AND FOUND TO COMPLY
WITH THE LIMITS FOR A CLASS B DIGITAL DEVICE, PURSUANT TO PART
15 OF THE FCC RULES. THESE LIMITS ARE DESIGNED TO PROVIDE
REASONABLE PROTECTION AGAINST HARMFUL INTERFERENCE IN A
RESIDENTIAL INSTALLATION. THIS EQUIPMENT GENERATES, USES, AND
CAN RADIATE RADIO FREQUENCY ENERGY AND, IF NOT INSTALLED
AND USED IN ACCORDANCE WITH THE INSTRUCTIONS, MAY CAUSE
HARMFUL INTERFERENCE TO RADIO COMMUNICATIONS. HOWEVER,
THERE IS NO GUARANTEE THAT INTERFERENCE WILL NOT OCCUR
IN A PARTICULAR INSTALLATION. IF THIS EQUIPMENT DOES CAUSE
HARMFUL INTERFERENCE TO RADIO OR TELEVISION RECEPTION,
WHICH CAN BE DETERMINED BY TURNING THE EQUIPMENT OFF
AND ON, THE USER IS ENCOURAGED TO TRY TO CORRECT THE
INTERFERENCE BY ONE OR MORE OF THE FOLLOWING MEASURES:
- REORIENT OR RELOCATE THE RECEIVING ANTENNA.
- INCREASE THE SEPARATION BETWEEN THE EQUIPMENT AND RECEIVER.
- CONNECT TH E EQUIPMENT INTO AN OUTLET ON A CIRCUIT
DIFFERENT FROM THAT TO WHICH THE RECEIVER IS CONNECTED.
- CONSULT THE DEALER OR AN EXPERIENCED RADIO/ TV
TECHNICIAN FOR HELP.
Required | Requis | Componentes necesarios
Funziona con | Vereist | Necessário | Wymagane
Erforderlich | 需要:| :
:
2“AAA” batteries (NOT INCLUDED).
2 piles «AAA » (NON INCLUSES).
2 pilas AAA (NO INCLUIDAS).
2 batterie “AAA” (NON INCLUSE).
2 ‘AAA’ batterijen (NIET MEEGELEVERD).
2 Pilhas “AAA” (NÃO INCLUÍDAS) .
2 baterie „AAA” (NIE DOŁĄCZONO).
2 „AAA“-Batterien (NICHT INBEGRIFFEN).
2“AAA”电池(不包括)。
.(
) “AAA”2
WARNING:
TO AVOID SERIOUS INJURY:
• Provide adult supervision at all time.
• Do not use in areas unsafe for pedestrians.
• Do not use on steps or steep inclines where product
could roll away.
• Keep away from pools or other bodies of water.
• Shoes must be worn during use.
• Allow only one rider per seat.
• Periodically check the handle and hardware for wear
and proper assembly.
• Bottle Holder can only contain bottled water. Not
intended for hot beverages.
1