Réservé uniquement à un usage familial et domestique à l’extérieur par des enfants de 1 an et demi à 5 ans.
Outils requis: tournevis Phillips. Il est recommandé d’utiliser un tournevis électrique.
Nous vous remercions d’avoir acheté un produit Step2. Pour toute question sur ce produit, veuillez composer
le numéro sans frais de The Step2 Company : 1-800-347-8372 ou contacter la société via le site.
• Pour jeter au rebut un produit Step2, démontez-le et mettez-le au rebut en prenant toutes les précautions nécessaires
de manière à prévenir tout danger. Les produits Step2 sont en plastique recyclable. Pour un triage approprié de
chaque pièce, veuillez vous reporter au chiffre qui accompagne le logo sur chacune d'elle. Veuillez recycler.
VEUILLEZ APPLIQUER LES MESURES DE SÉCURITÉ ET RESPECTER LES AVERTISSEMENTS
SUIVANTS AFIN DE RÉDUIRE LES RISQUES DE BLESSURES GRAVES VOIRE MORTELLES :
6/20/08 1
Some of the components of this product are small and may contain sharp points, care should be
taken when unpacking and assembling this product. Adult assembly required.
WARNING: Choking Hazard - Small parts. Adult assembly required.
WARNING:
• Falls onto hard surfaces could result in head or other serious injuries. Never put on concrete, asphalt,
wood, or other hard surfaces. Carpet over hard floors may not prevent injury.
• Instruct children not to use equipment other than intended.
• Instruct children not to attach items to the playground equipment that are not specifically designed
for use with the equipment, such as but not limited to, jump ropes, clothes lines, pet leashes, cables
and chains as they may cause a strangulation hazard.
Certains des composants de ce produit sont de petite taille et peuvent être pointus. Faites attention
lorsque vous déballez et assemblez ce produit. Assemblage par un adulte requis.
MISE EN GARDE
: Danger d'étouffement- Pièces de petites tailles. Assemblage par un adulte requis.
ADVERTENCIA: Riesgo de asfixia. Piezas pequeñas. Requiere ensamblaje adulto.
Algunas piezas de este producto son pequeñas y pueden tener extremos puntiagudos.
Tenga cuidado cuando lo desempaque y lo arme. Requiere ensamblaje adulto.
ADVERTENCIA:
• Las caídas en superficies duras pueden ocasionar lesiones en la cabeza u otras lesiones serias.
Nunca lo coloque sobre concreto, asfalto, madera ni ninguna otra superficie dura. El uso de alfombras
sobre superficies duras no evitará las lesiones.
• Indíqueles a los niños que usen el equipo con el propósito para el que fue diseñado.
• Enséñeles que no coloquen en el equipo de juego artículos que no estén específicamente diseñados
para que se usen con el mismo, tales como cuerdas de saltar, tendederos, correas de animales,
cables y cadenas, entre otros, ya que puede existir el riesgo de estrangulamiento.
MISE EN GARDE:
• Les chutes sur des surfaces dures peuvent causer des traumatismes crâniens ou d’autres types de
blessures graves. N’installez jamais le produit sur du béton, de l’asphalte, du bois ou sur toute autre
surface dure. Une moquette sur un sol dur peut s’avérer insuffisante pour prévenir les blessures.
• Apprenez aux enfants à servir de l’équipement uniquement aux fins prévues.
• Expliquez aux enfants de ne jamais attacher sur l’équipement de terrain de jeux des objet qui ne sont pas
conçus spécifiquement pour une utilisation avec celui-ci, notamment mais sans s'y limiter, des cordes à sauter,
des cordes à linge, des laisses, des câbles ou des chaînes. De tels objets présentent un risque d’étranglement.
For family and domestic outdoor use only by children from ages 1-1/2 to 5 years.
Tools Required: Phillips Screwdriver. We recommend an Electronic Screwdriver.
Thank you for purchasing a Step2 product. If you have any questions about this product, please call The
Step2 Company toll free at 1-800-347-8372 or contact us via the internet at www.step2.com.
• If you decide to dispose of a Step2 product, disassemble and dispose of it in such a way that no
unreasonable hazards exist. Step2’s products are recyclable plastic. Refer to the recycling symbol for
the level number located on each part for appropriate sorting; please recycle.
OBSERVE THE FOLLOWING STATEMENTS AND WARNINGS TO REDUCE THE LIKELIHOOD OF
SERIOUS OR FATAL INJURY.
7769/8804
The Step2 Company, LLC.
10010 Aurora-Hudson Rd.
Streetsboro, OH 44241 USA
1-800-347-8372
(330)656-0440
Valid only in U.S.A. and Canada
Numéro disponible uniquement aux États-Unis et au Canada
Numero valido solo en EUA à Canada
Step2 UK LTD
Lowkbers
Lowkbers Lane, Ingleton
North Yorkshire, England
LA6 3JD
Uk freephone: 0800 393159
Step2 UK website: www.step2uk.com
Adult assembly required
Requiere ser armando por un adulto
Necesita ser ensamblado por un adulto
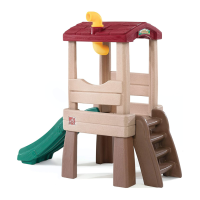
Lookout Treehouse
™
Maisonnette d’observation
Casa del Árbol de Observación
llame al teléfono gratuito de la Compañía Step2, 1-800-347-8372 o visite nuestro sitio web www.step2.com.
• Si usted decide desechar un producto de Step2, desármelo y deséchelo de forma que no ocasione riegos
innecesarios. Los productos de Step2 son de material plástico reciclable. Consulte el símbolo con el número
de nivel de reciclado en cada una de las partes para clasificarlas apropiadamente. Por favor recicle el producto.
TENGA EN CUENTA LOS SIGUIENTES ENUNCIADOS Y ADVERTENCIAS PARA REDUCIR LA
PROBABILIDAD DE LESIONES SERIAS O MORTALES:
CONSERVEZ CES INSTRUCTIONS POUR TOUTE RÉFÉRENCE ULTÉRIEURE
GUARDE ESTA HOJA PARA REFERENCIA FUTURA.
INSTALLATION and OPERATION INSTRUCTIONS
This product is designed to create an exciting, fun-filled environment for your children. So that all
children who use this product can play securely, we ask adults who supervise play follow these
important guidelines for the unit’s use and care:
INSTALLATION:
1. Use containment, such as digging out around the perimeter and/or lining the perimeter with landscaping
edging.
2. Create a site free of obstacles that could cause injury. Maintain a minimum distance of 6.5 feet (2
m) from any structure or obstruction such as a fence, buildings, low hanging branches, tree stumps/roots,
large rocks, bricks, concrete, laundry lines, or overhead wires.
3. Choose a level location for the equipment. This can reduce the likelihood of the play set tipping over
and loose fill surfacing materials washing away during heavy rains.
4. A fall onto hard surface can result in serious injury. Recommend using Playground Surfacing Materials
(other than loose-fill material) which comply to the safety standards ASTM 1292 Standards Specification for
Impact Attenuation of Surfacing Materials within the Use Zone of Playground Equipment. Reference table X3.1.
5. Do not install product or surfacing material over concrete, asphalt, packed earth, or any other hard surface.
6. Installations of rubber tiles or poured-in-place surfaces (other than loose-fill materials) generally
require a professional and are not “do-it-yourself” projects.
7. Fall Height: 19.5 inches. See Consumer Information Sheet for Playground Surfacing Materials
included in this Instruction Sheet.
8. Locate bare metal platforms and slides (metal, plastic or otherwise) out of direct sunlight to reduce
the likelihood of serious burns. A slide that faces north will receive the least direct sunlight.
9. Provide enough room so that children can use equipment safely. For example, for structures with
multiple activities, a slide should not exit in front of a swing.
10. Separate active and quiet activities from each other. For example, locate sandboxes away from
swings or use a guardrail barrier to separate the sandbox from the movement of the swings.
11. Check to be sure all connections are tight. Advise children not to use equipment until properly assembled.
OPERATION INSTRUCTIONS:
1. As with all play equipment, an adult should supervise children’s play on this product, instructing
children not to use the equipment in a manner not intended.
2. Adult supervision required. Adults supervising play should make sure children are dressed properly in
well-fitting clothes and shoes. Children should not wear potentially hazardous items such as ponchos,
scarves, capes, or bicycle helmets while playing on equipment.
3. This product was designed to accommodate 2 children or a total weight of 60 lbs at a time.
4. When temperatures fall below 32F (0C), outdoor use of this product is not recommended. In extreme
cold plastic materials loose their resilience and may become brittle and crack upon impact. Store product
in a warmer, protected place.
5. Do not allow children to climb on equipment when it is snow-covered or wet.
6. Slide feet first. One child down slide at a time.
MAINTENACE INSTRUCTIONS
1. Check all connections and bolts at least twice monthly during the usage season and at the beginning
of each season for tightness, and tighten as required. Inspect the toy periodically for loose or damaged
components. Replace when necessary. Call 1-800-347-8372 for replacements.
2. Rake surfacing periodically to prevent compaction and maintain appropriate depths.
3. For general cleaning we recommend mild soapy water
Para uso familiar en exteriores solamente y para que lo usen niños en las edades de -1 a 5 años.
Herramientas requeridas: Destornillador Phillips. Recomendamos el uso de un destornillador eléctrico.
Gracias por comprar un producto de Step2. Si tuviera alguna pregunta acerca de este producto, por favor