EasyManua.ls Logo

Step2 Atherton Reserve Storage Mailbox

Step2 Atherton Reserve Storage Mailbox
16 pages
To Next Page IconTo Next Page
Loading...
194451B01B03/21/2023 5005 / 5375
Owner’s Manual
le manuel du propriétaire | el manual del propietario
Atherton Reserve Storage Mailbox
Scan for assembly video.
Recherchez la vidéo d’assemblage.
Escanee para ver el video de ensamblaje.
youtube.com/step2assembly
INSTALLATION
Outdoor Users:
When the temperature is freezing or below, remove all water and
store indoors.
CLEANING INSTRUCTIONS:
General Cleaning:
Use a 50/50 mixture of white vinegar and water.
DISPOSAL INSTRUCTIONS:
Please recycle when possible. Disposal must be in compliance with
all government regulations.
INSPECT THIS PRODUCT PERIODICALLY. REPLACE
DAMAGED OR WORN COMPONENTS.
OBSERVE ALL STATEMENTS AND WARNINGS TO REDUCE
THE LIKELIHOOD OF SERIOUS OR FATAL INJURY.
INSTALACIÓN
Usuarios al aire libre:
Cuando la temperatura baje a cero o menos, retire toda el agua y
guárdela en interiores.
INSTRUCCIONES PARA LA LIMPIEZA:
Limpieza general:
Use una mezcla 50/50 de vinagre blanco y agua.
INTRUCCIONES PARA LA ELIMINACIÓN:
Recicle los componentes si tiene la posibilidad. La eliminación de este
producto se debe realizar de conformidad con la Normativa Gubernamental.
INSPECCIONE ESTE PRODUCTO PERIÓDICAMENTE.
SUSTITUYA LAS PIEZAS DAÑADAS O DESGASTADAS.
RESPETE LAS SIGUIENTES RECOMENDACIONES Y
ADVERTENCIAS PARA DISMINUIR LA PROBABILIDAD DE
SUFRIR LESIONES GRAVES O MORTALES.
INSTALLATION
Utilisateurs extérieurs:
Lorsque la température descend à zéro ou en dessous, retirez
toute l’eau et conservez-la à l’intérieur.
INSTRUCTIONS DE NETTOYAGE :
Nettoyage général:
Utilisez un mélange 50/50 de vinaigre blanc et d’eau.
INSTRUCTIONS DE MISE AU REBUT:
Veuillez recycler dans la mesure du possible. LLélimination doit être
conforme à toutes les lois nationales.
INSPECTEZ LE PRODUIT REGULIEREMENT, REMPLACEZ
LES PIECES ENDOMMAGEES OU ABIMEES.
RESPECTEZ LES ÉNONCÉS ET AVERTISSEMENTS SUIVANTS
POUR RÉDUIRE LA PROBABILITÉ DE BLESSURE GRAVE,
VOIRE MORTELLE.
THIS INSTRUCTION BOOKLET
CONTAINS IMPORTANT
SAFETY INFORMATION.
PLEASE READ AND KEEP FOR
FUTURE REFERENCE.
CE LIVRET D’INSTRUCTIONS
CONTIENT DES INFORMATIONS
IMPORTANTES SUR LA SÉCURITÉ.
S’IL VOUS PLAÎT LIRE ET GARDER
POUR RÉFÉRENCE FUTURE.
ESTE FOLLETO DE INSTRUCCIONES
CONTIENE INFORMACIÓN
IMPORTANTE DE SEGURIDAD.
POR FAVOR LEA Y CONSERVE PARA
FUTURAS REFERENCIAS.
¡Antes De Devolverlo Llámenos!
NO REGRESE A LA TIENDA.
Please, Call Us First!
DO NOT RETURN TO STORE.
N’hésitez pas à nous appeler!
NE RENVOYEZ PAS LE PRODUIT AU MAGASIN.
Question and Answer IconNeed help?

Do you have a question about the Step2 Atherton Reserve Storage Mailbox and is the answer not in the manual?

Step2 Atherton Reserve Storage Mailbox Specifications

General IconGeneral
BrandStep2
ModelAtherton Reserve Storage Mailbox
CategoryPlay Sets & Playground Equipment
LanguageEnglish

Summary

Safety Information

Observe All Statements and Warnings

Reduce the likelihood of serious or fatal injury by observing all statements and warnings.

Installation and Maintenance

Outdoor Installation Precautions

Remove water and store indoors when temperature is freezing or below.

General Cleaning Instructions

Use a 50/50 mixture of white vinegar and water for general cleaning.

Disposal Guidelines

Recycle when possible and comply with all government regulations for disposal.

Periodic Inspection

Inspect product periodically and replace damaged or worn components.

Adjusting Existing Posts

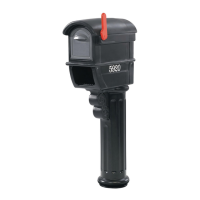
Check post stability, height (35-36 in.), and use extenders if needed.

Mailbox Placement Requirements

Ensure mailbox height (41-45 in.) and setback (6-8 in.) from road edge.

Assembly Overview

Parts Identification

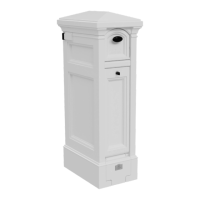
Identify and familiarize yourself with all included parts (A-H) before assembly.

Required Tools and Materials

Gather necessary tools like a socket, drill bit, and materials like a 4x4 post.

Lock Assembly

Step 1: Initial Lock Components

Begin lock assembly by inserting cylinder and washer components into the door.

Step 2: Securing Lock Components

Attach lock components using washers and nuts for secure installation.

Step 3: Securing Lock Mechanism

Secure the lock mechanism to the door using screws and additional hardware.

Step 4: Attaching Mail Flap

Attach the mail flap (G1/G2) to the door assembly.

Step 5: Orienting Base Component

Ensure part 'A' is correctly oriented, with the arrow pointing towards the road.

Main Body Assembly

Step 6: Connecting Base and Side Panel

Attach part 'C' to part 'A', ensuring the surfaces are flush.

Step 8: Attaching Second Side Panel

Repeat steps 6-7 to attach part 'B' to the main assembly.

Step 9: Installing Inner Shelf

Insert and secure part 'F1' into the assembled mailbox body.

Step 10: Securing Inner Shelf

Secure part 'F1' to the main assembly using screws.

Step 11: Drilling for Shelf Support

Drill holes as indicated to properly support the inner shelf 'F1'.

Step 12: Attaching Base to Side Panel

Attach part 'A' to part 'C' using bolts and a socket.

Important Key Handling Warning

Remove key before completing step 14 to prevent damage; avoid door falling open with key.

Door and Top Assembly

Step 14: Attaching Access Door

Attach the access door 'E' to the main mailbox structure.

Step 15: Installing Top Cover

Place and secure the top cover part 'F2' onto the assembled mailbox.

Step 16: Attaching Mail Flap to Door

Attach the mail flap 'G1' to the door assembly.

Step 17: Attaching Top Section

Attach the top section 'D' to the mailbox structure.

Step 18: Securing Top Section

Secure the top section 'D' to the mailbox using screws.

Reserve Storage Feature

Converting to Storage Mode

Remove the floor panel to expose the large volume storage compartment for travel.

Retrieving Stored Mail

Unlock the rear access door to retrieve mail, then relock and replace the floor panel.

Optional Mail Post Extender Bracket

Benefits of the Extender Bracket

Adds height without digging, easy installation for existing posts.

Related product manuals