194594D01B02/10/2023 5185 / 5369
INSTALLATION
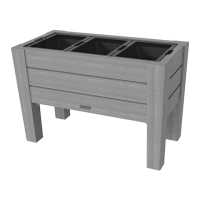
• Maximum total soil weight: 20 lbs. (9.07 kg). 6.7 lbs (3.03 kg) per tray.
• DO NOT remove any screws once installed. For disassembly, only
remove parts not secured by screws.
• DO NOT over-tighten screws or they will not hold parts
together appropriately.
• Take notice that screws are designed to pierce the plastic and form
their own threads.
CLEANING INSTRUCTIONS:
General Cleaning:
• Use a 50/50 mixture of white vinegar and water.
DISPOSAL INSTRUCTIONS:
Please recycle when possible. Disposal must be in compliance with
all government regulations.
INSPECT THIS PRODUCT PERIODICALLY. REPLACE
DAMAGED OR WORN COMPONENTS.
OBSERVE ALL STATEMENTS AND WARNINGS TO REDUCE
THE LIKELIHOOD OF SERIOUS OR FATAL INJURY.
INSTALACIÓN
• Peso total máximo del suelo: 9,07 kg (20 lb). 3,03 kg (6,7 lb) por
bandeja.
• NO quite ningún tornillo una vez que se haya montado. Para
desmontar, retire solo las piezas que no estén atornilladas.
• NO apriete los tornillos en exceso, ya que las piezas no quedarían
unidas de manera adecuada.
• Los tornillos están diseñados para perforar el plástico y formar sus
propias roscas.
INSTRUCCIONES PARA LA LIMPIEZA:
Limpieza general:
• Use una mezcla 50/50 de vinagre blanco y agua.
INTRUCCIONES PARA LA ELIMINACIÓN:
Recicle los componentes si tiene la posibilidad. La eliminación de este
producto se debe realizar de conformidad con la Normativa Gubernamental.
INSPECCIONE ESTE PRODUCTO PERIÓDICAMENTE.
SUSTITUYA LAS PIEZAS DAÑADAS O DESGASTADAS.
RESPETE LAS SIGUIENTES RECOMENDACIONES Y
ADVERTENCIAS PARA DISMINUIR LA PROBABILIDAD DE
SUFRIR LESIONES GRAVES O MORTALES.
INSTALLATION
• Poids total total du sol: 9,07 kg (20 lb). 3,03 kg (6,7 lb) par plateau.
• NE PAS retirer les vis une fois l’unité assemblée. Pour désassembler
l’unité, retirer uniquement les pièces qui ne sont pas fixées avec des vis.
• NE PAS trop serrer les vis, sinon celles-ci ne sont pas en mesure de
maintenir les pièces ensemble de manière adéquate.
• Veuillez prendre note que les vis sont conçues pour percer le
plastique et former leur propre letage.
INSTRUCTIONS DE NETTOYAGE :
Nettoyage général:
• Utilisez un mélange 50/50 de vinaigre blanc et d’eau.
INSTRUCTIONS DE MISE AU REBUT:
Veuillez recycler dans la mesure du possible. LL’élimination doit être
conforme à toutes les lois nationales.
INSPECTEZ LE PRODUIT REGULIEREMENT, REMPLACEZ
LES PIECES ENDOMMAGEES OU ABIMEES.
RESPECTEZ LES ÉNONCÉS ET AVERTISSEMENTS SUIVANTS
POUR RÉDUIRE LA PROBABILITÉ DE BLESSURE GRAVE,
VOIRE MORTELLE.
THIS INSTRUCTION BOOKLET
CONTAINS IMPORTANT
SAFETY INFORMATION.
PLEASE READ AND KEEP FOR
FUTURE REFERENCE.
CE LIVRET D’INSTRUCTIONS
CONTIENT DES INFORMATIONS
IMPORTANTES SUR LA SÉCURITÉ.
S’IL VOUS PLAÎT LIRE ET GARDER
POUR RÉFÉRENCE FUTURE.
ESTE FOLLETO DE INSTRUCCIONES
CONTIENE INFORMACIÓN
IMPORTANTE DE SEGURIDAD.
POR FAVOR LEA Y CONSERVE PARA
FUTURAS REFERENCIAS.
Scan for assembly video.
Recherchez la vidéo d’assemblage.
Escanee para ver el video de ensamblaje.
youtube.com/step2assembly
Assembly Instructions
Instructions de montage | Instrucciones de montaje
Lakewood Raised Planter
™