In the unlikely event
you find a part missing
please contact our
Customer Service
Helpline on 01684
299555 for immediate
despatch of part.
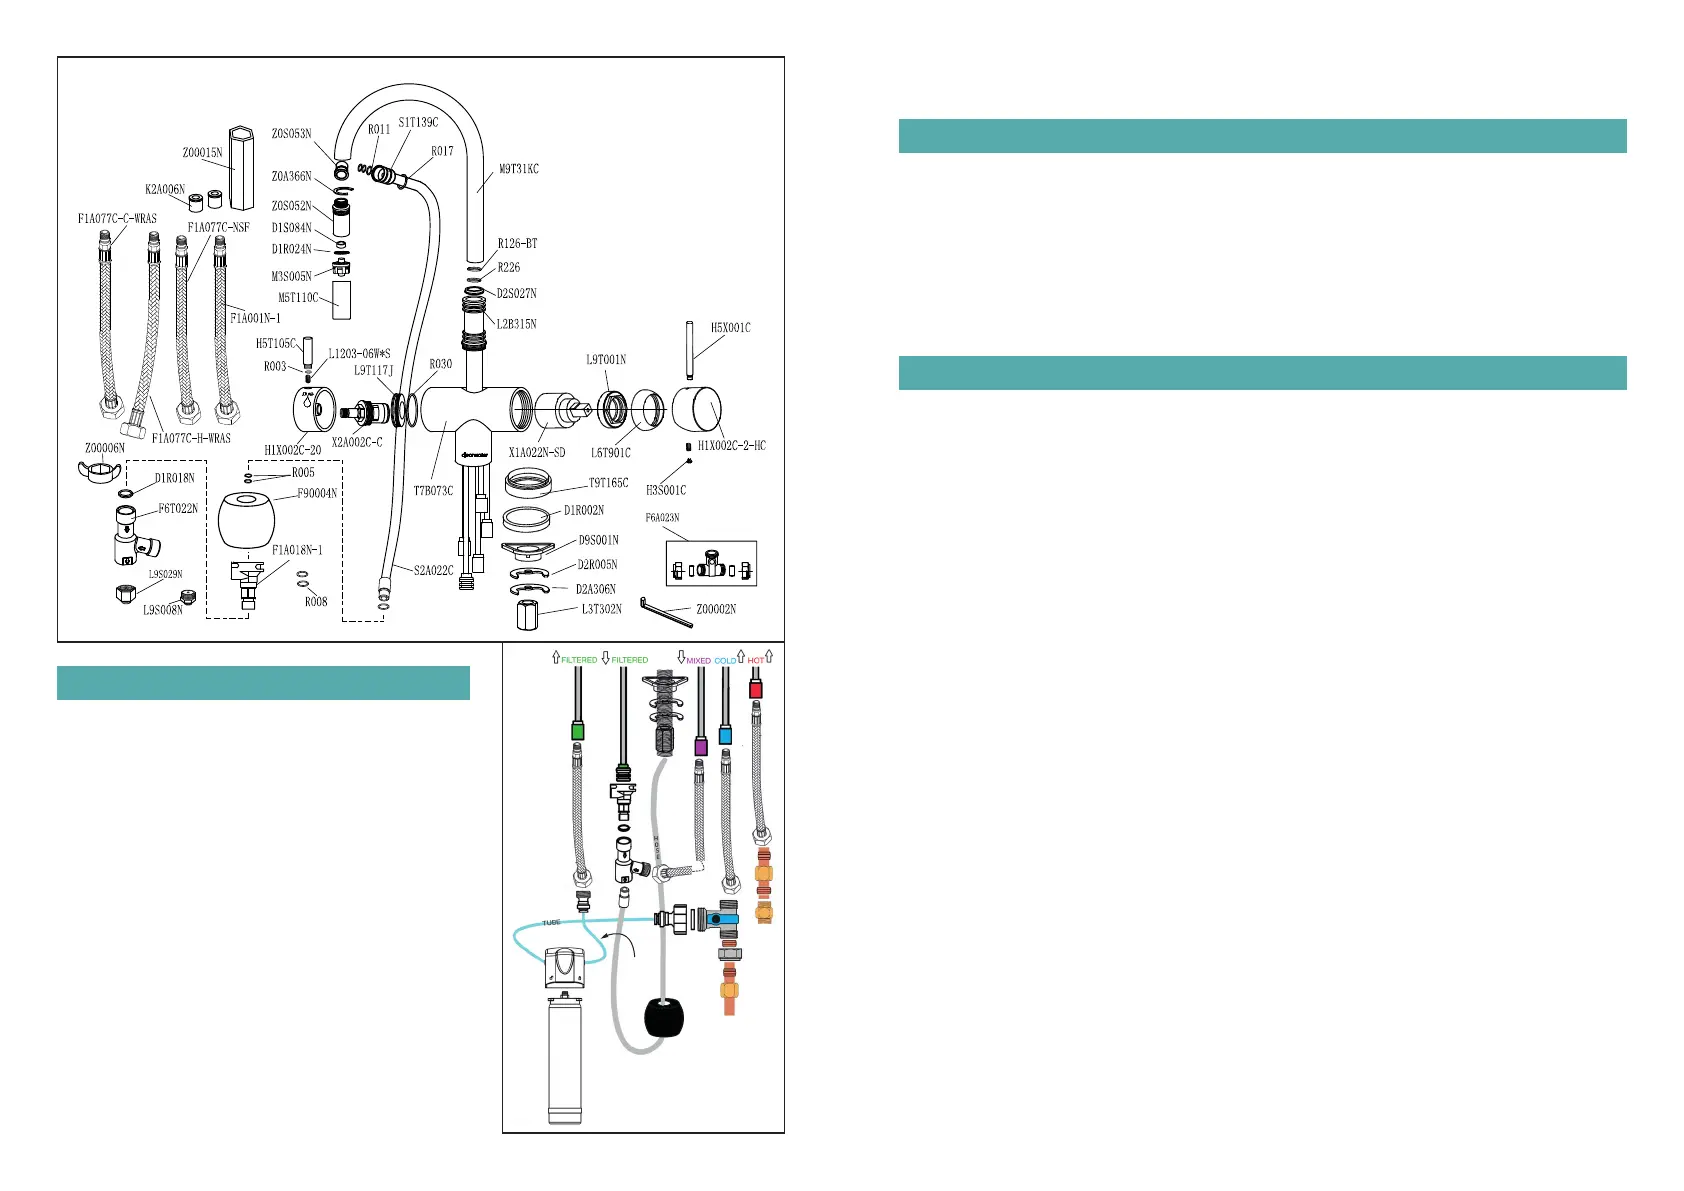
MAINTENANCE
PARTS LIST TOLEDO
Ref. TO2
IF THE FITTING BEGINS TO DRIP
1 Turn off the water supply
2 Loosen grub screw under handle lever, remove
handle and valve
3 Carefully clean seating, rubber washer and ceramic
disc
4 Replace valve and handle, then turn on the water
supply
5 If problem persists contact our helpline quoting the
product code
Where an aerator is fitted to the outlet of the spout, it
will need occasional cleaning. This will be evident
when the water flow slows down to an unacceptable
level. To accomplish this unscrew the outlet in an anti-
clockwise direction and remove the mesh. Immerse
the mesh in a suitable descaling fluid overnight, rinse
throughly in clean water and re-install.
PREPARATION
We strongly recommend installing particle filters and isolation valves to both hot and cold feeds.
This will help to prevent premature failure of valves and make any future maintenence easier.
Flush the plumbing system before installing the mixer tap. This is to void plumbing residues
clogging the mesh of the aerated outlet, or possibly damaging the valve’s washers. This is
especially important where extensive plumbing work has been carried out.
First shut off your water heating system then, with your mains stop cock closed, open the lowest
hot and cold taps in the house and allow to run until the cold storage tank and pipes are empty.
(The hot water storage cylinder always remains full).
INSTALLATION
It is very important that you read through the following instructions
BEFORE you install and use the tap.
Firstly prepare the area, isolate water supplies and plan your plumbing layout as per the
Diagram at the bottom of left hand page.
Place the base ring and seal on the base of the tap and then slide the tap through the tap hole.
Connect the fixings to the threaded fixing shaft, making sure the seal side is first. Use the triangle fixing
bracket if the sink / worktop is less then 20mm thick. Tighten fixing nut.
Attached the tails to the relevant colour coded rigid pipes, use the diagram for further reference.
Connect the chrome three way tee with isolation valve to the bottom of the cold flexi tail.
Connect the 1/2'' male x 1/4'' push connector to the flexi tail that connects to the green inlet rigid pipe.
Connect the 1/2'' female x 1/4'' connector & clear 1/2'' seal to the chrome three way tee.
Position the filter head in the cupboard vertical giving space to remove the filter and attached the filter head
to the carcass, using the screw provided.
Cut the quarter inch pipping into three section allowing for your positioning of the FlowPro.
Attach the filter to the filter head. Push in and twist to install.
Push the white tube into the chrome three way tee and the inlet ( left side) of the filter head.
Add a short run of white tubbing then install the Flow pro and sensor. Make sure the flow is in the correct
direction as mark on the sensor and only hand tight the fittings (over tightening will reduce the flow rate).
Push the last section of tubbing to the outlet of the sensor and into the green inlet tail.
Attach the Brass three way tee with green and purple marking, to the pull out hose. Screw the purple
marked tail to the purple marked side of the brass tee.
Connect the counter weight to the pull out hose as per the diagram depicts.
Connect the hot and cold to the mains supply's, check all connections are tight by hand only.
Turn on the isolations and check for leaks.
FOR BEST RESULTS
Run off around 5 litres of water from the filter line prior to drinking.
Reduce the filter water flow to around 2 litres per minute by adjusting the 3 way tee shut of valve (27916).
This will maximise the filter contact time.
The filter must be changed at least every 12 months. We suggest changing the cartridge every
6 months in normal household usage (filter life 4000 litres usage).
USING OTHER FILTERS/WATER SOFTENING SYSTEMS
Make sure that the filter line isn’t over pressurised, as this filter line is only designed for a maximum of 4
litres per minute and may fail if over pressurised. Install a pressure reducing valve in such instances.
OTHER
Remember to fill in and send off your freepost warranty form.
Add Flow
Pro here
a
 Loading...