Do you have a question about the Stinger HEIGH10 STH10CIV and is the answer not in the manual?
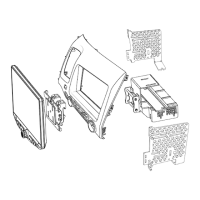
Lists the parts included in the HEIGH10 installation kit for the Honda Civic.
Lists the necessary tools for performing the vehicle installation and component setup.
Instructions for removing and transferring factory climate control and vent components to the new dash panel.
Visual guide detailing the connections between the HEIGH10, vehicle harness, and adapters.
Details on connecting the parking brake wire (pink) and optional camera reverse wire (green/white).
Procedure for connecting the optional speed sense wire (blue) for navigation and cameras.
Guidance on positioning and securing the GPS antenna for optimal performance.
Instructions for installing the SSUSB2 Dual USB Extension to provide accessible USB ports.
Steps for assembling the radio module with the metal and plastic mounting brackets.
Procedure for attaching the display mounting clamp to the HEIGH10 display unit.
Instructions for preparing the main panel and attaching side brackets.
Steps for inserting the assembled HEIGH10 unit into the dash kit and securing it.
Connecting display, power, and antenna cables to the HEIGH10 module.
Guide to sliding the assembled panel into place and securing it with clips.
Instructions for attaching the display unit to the bracket and securing it.
Steps to verify all functions and features of the HEIGH10 unit before final reassembly.
Step-by-step guide for reassembling the vehicle's interior panels after installation.
The Stinger HEIGH10 STH10CIV is a 10-inch multimedia infotainment system designed for 2006-2011 Honda Civic vehicles. This installation guide provides comprehensive instructions for integrating the system into the vehicle, covering everything from initial disassembly to final function testing and reassembly. The system aims to upgrade the vehicle's existing radio and climate control assembly with a modern, large-screen infotainment unit, enhancing the in-car experience with advanced multimedia and connectivity features.
The HEIGH10 STH10CIV system serves as a central hub for in-vehicle entertainment, navigation, and connectivity. Its primary function is to replace the factory radio/climate control assembly with a 10-inch multimedia display and radio module. Key functionalities include:
The HEIGH10 STH10CIV is designed for intuitive user interaction, offering a blend of touchscreen control and integration with existing vehicle controls.
Maintenance for the HEIGH10 STH10CIV primarily revolves around proper installation, software updates, and general care to ensure longevity and optimal performance.
| Display Size | 10.1 inches |
|---|---|
| Touchscreen | Yes |
| Bluetooth | Yes |
| GPS Navigation | Yes |
| Apple CarPlay | Yes |
| Android Auto | Yes |
| SiriusXM Ready | Yes |
| Backup Camera Input | Yes |
| Processor | Quad-core |
| RAM | 2 GB |
| Internal Storage | 32 GB |
| Expandable Storage | Yes, up to 128 GB |
| Wi-Fi | Yes |
| Front Camera | No |
| Power Supply | 12V DC |
| Resolution | 1280 x 720 |
| Operating System | Android |
| USB Ports | 2 |
| Rear Camera | Supports Rear Camera Input |