Do you have a question about the Stinger HEIGH10 UN1810E-VX1 and is the answer not in the manual?
Steps to remove the original car stereo unit from the dashboard.
Steps for correctly configuring and attaching the fascia plate to the radio module.
Connecting the vehicle interface harness, patch lead, and camera extension harness.
Instructions on how to set the dipswitches on the interface for vehicle compatibility.
Instructions on how to navigate the settings menu using steering wheel controls.
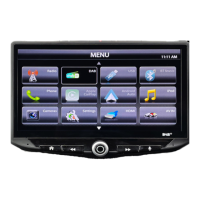
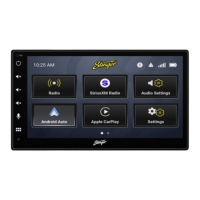
This document outlines the installation and functionality of the Stinger HEIGH10® integrated infotainment touch screen solution designed for the Vauxhall Astra J models from 2009 to 2016. This system is engineered to upgrade the vehicle's existing radio with a 10-inch infotainment display, while retaining all original equipment manufacturer (OEM) features, vehicle settings, and controls. The installation process is described as an easy, plug-and-play package.
The HEIGH10® system enhances the in-car experience by offering a larger screen size and a suite of infotainment features. Key functionalities include Apple CarPlay, Android Auto, DAB+ digital radio, and Bluetooth streaming. When paired with the provided vehicle retention interface, the system ensures that important vehicle settings are preserved and can be managed directly through the HEIGH10® display. Furthermore, the vehicle's existing steering wheel controls remain functional, allowing for convenient operation of the new infotainment system.
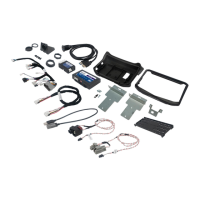
The kit is specifically designed for the Vauxhall Astra J (2009-2016) and includes several components necessary for a complete installation. These components are the HEIGH10® unit itself, along with its fitting accessories and wiring harness. A black double DIN fascia plate, complete with its own accessories, is also part of the package, ensuring a seamless integration into the dashboard. A crucial element is the vehicle retention interface, which comes with a plug-and-play harness to simplify the wiring process. To ensure optimal radio reception, a vehicle-specific antenna adapter for AM/FM is included. A Stinger stereo patch lead is also provided, and a comprehensive instruction manual guides users through the entire installation process.
It is important to note that this system is not compatible with Vauxhall Astra J models that are equipped with existing navigation systems or amplified audio systems. Users should verify their vehicle's configuration before attempting installation.
The installation guide begins with the stereo removal process. This involves several steps to carefully dismantle the existing radio and control panel. First, the gear stick cover needs to be lifted, and two screws on either side of the frame must be removed. Next, the fascia should be pulled firmly to release its clips. Tabs located under the heater vents must then be lifted to reveal and remove two additional screws. This allows for the removal of the control panel, which will have several connections that need to be detached. Finally, four bolts securing the radio's main unit to the vehicle are removed, and all connections at the rear of the unit are unplugged.
Once the original radio is removed, the climate controls and other various buttons from the old fascia panel must be transferred to the new fascia panel provided in the kit. This ensures that all essential vehicle controls remain accessible and integrated into the new setup.
The guide then moves on to the HEIGH10® assembly. Users are instructed to assemble the core components of the HEIGH10® unit according to the detailed "Installation Manual" that accompanies the unit. This step involves configuring the HEIGH10® unit correctly before integrating it into the vehicle.
The fascia plate setup involves attaching the fascia brackets to the sides of the radio module using the screws provided in the kit. The assembly is then test-fitted into the vehicle to ensure proper alignment and to determine if the brackets need any adjustment (moving forwards or backwards). Once the brackets are correctly aligned, the fascia is attached to them over the top of the unit using the provided screws. After all the steps in the "Stereo Installation" are completed, the entire assembly is placed into the dashboard and secured with the pre-existing screws. Finally, the main fascia panel is reassembled.
The interface setup details the electrical connections required for the HEIGH10® system. The 14-way connector on the vehicle interface harness is plugged into the relevant connection on the side of the interface. Similarly, the 12-way connector of the stereo patch lead is connected to the interface, and its 3.5mm jack is then attached to the HEIGH10® unit. The 4-way camera extension harness is connected to the interface. The antenna adapter is connected to the vehicle's pre-existing antenna connection and to the back of the new HEIGH10® unit. A USB retention lead is used to connect the vehicle's pre-existing USB connector to the HEIGH10® unit. For reverse camera functionality, the male yellow RCA cable is connected to the 'reverse camera input' on the back of the new stereo. If an aftermarket reverse camera is being installed, it should be connected to the female yellow RCA on the camera extension harness. It is crucial to ensure that the 'Camera Connected' option in the 'Preferences' menu is set to 'Yes' for the camera to function correctly.
Additional wiring connections are specified for the harness to the back of the stereo: the Pink wire for Speed Pulse, the Green wire for Park Brake, and the Purple wire for Reverse. After all these wires and any other additional accessories are connected, the final step is to make the power connections between the stereo and the vehicle's pre-existing connector. For a comprehensive breakdown of the HEIGH10® unit's connections, users are directed to consult the "Installation Manual" provided with the unit.
The document also includes information about the CTHVX01 CAN-Bus Steering Wheel Control Interface, which is part of the kit. This interface is designed for Vauxhall/Opel vehicles and retains the vehicle settings menu, vehicle chimes, and OEM phone buttons (if equipped). A detailed wiring colour code is provided for various speaker connections (Right Rear, Left Rear, Right Front, Left Front) and other essential connections such as Permanent 12V, Ignition 12V, Speed Pulse, Reverse Gear, Park Brake, Telephone Mute, and Antenna Remote.
Prior to installation, users are advised to read the manual thoroughly, as technical knowledge is necessary. The installation should be performed in a dry, heat-free environment, and the correct tools must be used to prevent damage to the vehicle or product. Connects2, the manufacturer, disclaims responsibility for installation issues. A specific note is included for Vauxhall Meriva vehicles: if steering wheel control functions are unresponsive after installation, users should press 'Track Down' repeatedly eight times until an audible beep is heard. This switches the interface to the Meriva protocol. To revert to non-Meriva protocol, the process should be repeated.
The setting of dipswitches on the interface is also detailed. Dipswitch 1 should be set to 'On' for Pioneer aftermarket stereos and 'Off' for Sony aftermarket stereos. For other stereo brands, its position does not matter. Dipswitch 2 should be 'On' for vehicles with a 2 Line Display and 'Off' for vehicles with a 4 Line Display. Dipswitches 3 and 4 have no functionality with this product and can remain in their default positions.
The steering wheel control functionality section maps the original buttons to their new functions with the HEIGH10® system. Volume + and Volume - retain their original functions. The Up Arrow now functions as Track +, and Down Arrow as Track -. A short press of the SRC button selects the Source, while a long press enters the Settings Menu. Pick Up/Speech functions as Pick Up, and Mute/Hang Up functions as Hang Up.
Navigating the Settings Menu is straightforward: a long press of "SRC" enters the menu. "Up Arrow" and "Down Arrow" are used to scroll through options. A short press of "SRC" enters a sub-menu or selects a desired option. Pressing "Mute/Hang Up" allows the user to go back.
For technical assistance, users can contact Stinger via email at uktechnical@aampglobal.com or by phone at 01384 958 500 during business hours (Mon-Fri 9am-5:30pm GMT). A digital copy of the manual and other product information can be found on the www.StingerElectronics-EU.com website. The manual is considered correct at the time of printing but is subject to change, and users are advised to refer to the website for the latest updates.
The agreement states that end users agree to use the product in compliance with instructions, terms of use, and all laws. Stinger provides instructions and safety warnings but disclaims liability for any misuse or use not in conjunction with the instructions. The product is intended for off-road and passenger use only.
| Display Size | 10.1 inches |
|---|---|
| Touchscreen | Yes |
| Bluetooth | Yes |
| USB Ports | 2 |
| Camera Input | Yes |
| GPS Navigation | Yes |
| Apple CarPlay | Yes |
| Android Auto | Yes |
| Navigation | Yes |
| SiriusXM Ready | Yes |
| Backup Camera Input | Yes |
| Processor | Quad-Core |
| RAM | 2GB |
| Storage | 32GB |
| Wi-Fi | Yes |
| HDMI Output | No |
| Front Camera | No |
| Expandable Storage | Yes, up to 128GB |
| Resolution | 1280 x 720 |
| Operating System | Android |