Do you have a question about the Stratco QUICK SCREEN PLUS and is the answer not in the manual?
Defines the calculation for actual slat width based on overall gate width.
Explains overall gate width calculation, considering hinge and latch gaps.
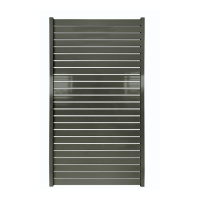
This document outlines the assembly process for a Stratco Quick Plus Pedestrian Gate, providing a comprehensive guide for construction and adjustment. The gate system is designed for ease of assembly and offers flexibility in height and width to suit various installation requirements.
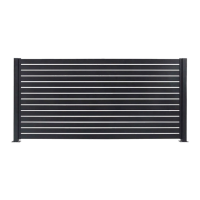
The Stratco Quick Plus Pedestrian Gate is a modular gate system designed for pedestrian access. It consists of a series of horizontal slats, two vertical gate side frames, and outer infills, all assembled to create a sturdy and aesthetically pleasing gate. The system is intended to be integrated with existing fencing or gate posts, providing a secure and functional entry point. The design emphasizes a clean, modern look with hidden screw heads for a polished finish.
The assembly process begins with the preparation of the gate components. The gate utilizes 2 1/2" x 5/8" slats and gate slats, which are the primary horizontal elements forming the gate's body. The vertical structure is provided by the gate side frames, which feature a slotted spacer infill to accommodate the slats. Outer infills are used to conceal the screw heads, contributing to the gate's neat appearance. Top caps are inserted into the side frames to finish the top edge of the gate. Hex head screws are used for securing the slats, and a D&D latch packer is included for latch installation.
One of the key features of this gate system is its adjustability. The gate is initially supplied at a standard height of 5' 11" (1797mm) and a width of 3' 3 1/2" (1000mm). However, both dimensions can be customized to fit specific site requirements.
For height adjustment, the gate side frames and outer infills can be cut down using an aluminium saw. It is crucial to remove the gate top caps before cutting. The guide specifies cutting the side frame at the top of the slot to ensure an 8mm space is maintained at both the top and bottom of the frame. This ensures proper alignment and functionality of the slats within the frame. The height adjustment is governed by the slotted spacer within the gate side frames, meaning the overall height is limited by the length of this component.
For width adjustment, all slats and gate slats need to be cut to the desired overall gate width. The document provides a formula for calculating the actual slat width: "OVERALL GATE WIDTH (i.e. outer edge of gate frame to outer edge of gate frame) MINUS 1 7/16" (36MM)". This accounts for the width of the side frames and ensures the slats fit correctly. An important note for width adjustment is the requirement to always use four gate slats when constructing the gate, regardless of the final width. This ensures structural integrity and proper spacing.
The assembly process is straightforward and designed for DIY installation. It starts by laying one gate side frame with its slotted spacer infill on a flat, protected surface. Slats are then rested against a padded stop and tapped into place. The positioning of the gate slats is critical for structural integrity and appearance: two gate slats are placed at the top, one in the middle, and one at the bottom of the gate. This distribution ensures even support and stability.
Once the first side frame is populated with slats, the entire assembly is elevated on two padded bearers. This allows for the attachment of the second gate side frame. The second frame is engaged with the slats and tapped until all slats are fully engaged. The tip provided is to start at one end and work the slats in from one end to the other, which helps in achieving a smooth and even fit.
After both side frames are attached and all slats are engaged, it is essential to check the diagonals of the gate to ensure it is square. This step is crucial for proper gate operation and alignment with hinges and latches.
The next step involves securing the slats. All gate slats are screwed into place, with four screws per slat. A specific note advises setting the cordless drill to "screw function" to prevent breaking the screw heads, indicating a focus on durability and ease of assembly.
To achieve a clean finish, the two outer infills are slid into position to hide the screw heads. For a secure fit, the outer infills are slid past the end of the gate side frame by approximately 1/2" (10mm). Pliers are then used to bend the inner legs of the outer infill slightly outwards. Finally, the outer infill is tapped back to be level with the gate side frame. This bending and tapping action is crucial as it locks the outer infill into position, preventing it from sliding down and maintaining the gate's aesthetic.
The final step in the assembly is to insert the top caps into the side frames, completing the gate's structure and providing a finished look.
While the manual primarily focuses on assembly, the design inherently incorporates features that contribute to ease of maintenance. The use of aluminium components suggests resistance to corrosion, which is a common issue with outdoor structures. The ability to replace individual slats, if damaged, is implied by the modular design, although specific instructions for replacement are not detailed. The hidden screw heads, achieved by the outer infills, not only enhance aesthetics but also protect the screw heads from environmental exposure, potentially extending their lifespan and reducing the likelihood of rust or damage. The robust construction with multiple screws per slat and the emphasis on squaring the gate during assembly contribute to the gate's long-term stability and reduce the need for frequent adjustments. Regular cleaning of the aluminium surfaces would likely be the primary maintenance requirement to preserve its appearance.
| Category | Fencing & Gates |
|---|---|
| Material | Aluminum |
| Height | 1800mm |
| Width | 2400mm |
| Finish | Powder-coated |
| Installation | DIY or Professional |
| Warranty | 10 Years |
| Color Options | Black, Grey |