www.StrikerConcepts.com
Questions? Call 704-508-1031
INSTRUCTIONS
INTRODUCTION
Let the Garage Parking Sensor help you consistently
guide your car to a safe stopping distance. The Garage
Parking Sensor is low maintenance and easy to install.
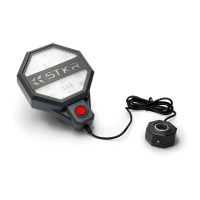
The Garage Parking Sensor consists of a sensor module
and a display module. The sensor module transmits
harmless ultrasonic pulses that are reected by an
incoming object.
When a vehicle is detected, more pulses are transmit-
ted to track the incoming vehicle speed and distance.
The display unit, mounted where the driver can easily
see it, uses a bright GREEN light to indicate that the
vehicle has been detected. A bright YELLOW light
indicates when you are close to your stopping
distance. When the vehicle reaches the desired
stopping distance, a RED light will illuminate and stay
on.
Installing Batteries
This unit requires 4 AA batteries.
Place the double-sided tape onto the back of the small
sensor module.
The large display unit will be mounted within the drivers
line of sight. The small sensor will be mounted directly
below the display. It should be level with the center of
the car bumper.
Peel o one side of the protective backing on the
adhesive Velcro, and stick it to the back of the display
unit.
Peel o the other side of the protective backing on the
Velcro and mount it to the wall, or mounting surface, in
front of the car at eye level for the driver. Be sure the
surface you are mounting the display to is clean and
free of any dust or debris. (See associated Images
marked with an “B”)
Mount the small sensor at bumper height of the
vehicle that is intended for use with the Garage
Parking Sensor. Be sure the area of the wall, or
mounting surface, is clean and free of any dust and
debris. (See associated Images marked with an “A”)
MOUNTING THE GARAGE PARKING SENSOR
ADHESIVE STRIPS & VELCRO MOUNTING:
Remove the battery compartment cover on the back
of the sensor module.
Insert 4 new ‘AA’ alkaline batteries (not included)
according to polarity diagram inside battery
compartment.
Replace cover.
When it is time to replace the batteries, the display
module will ash a yellow light every 6 seconds.
1.
2.
3.
B
A
Display Unit
A
B
Sensor Unit
DOUBLE-
SIDED
TAPE
DOUBLE
SIDED
TAPE
PARK YOUR CAR EXACTLY WHERE YOU WANT IT