Do you have a question about the Strong Extender 1600 and is the answer not in the manual?
Lists all items included in the product package: extender units, power adapters, and ethernet cables.
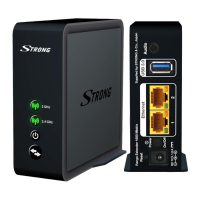
Identifies and describes the various ports and buttons on the extender unit, including status LEDs.
Position the first extender unit close to your gateway/modem/router.
Connect the first extender to your gateway/modem/router using an Ethernet cable.
Connect the power adapter and turn on the first extender unit.
Wait for the 5 GHz and 2.4 GHz LEDs to turn solid green.
Place the second extender unit approximately three meters from the first extender.
Connect the power adapter and turn on the second extender unit.
Wait for the 5 GHz and 2.4 GHz LEDs on the second extender to flash green.
Press the 'Connect' button on both extender units to start the pairing process.
The extenders automatically connect, indicated by flashing LEDs.
Confirmation that the extender units have been successfully configured.
Move the second extender to a room in your house for extended coverage.
The network connection between extenders will be automatically established.
Connect your devices to the new Wi-Fi network using default credentials.
Instructions for customizing the Wi-Fi network name and password via web browser.
Change SSID and password using the quick setup wizard menu.
Disable your current router's Wi-Fi for optimal performance.
| Type | Network transmitter & receiver |
|---|---|
| Maximum transfer distance | - m |
| Storage temperature (T-T) | -40 - 70 °C |
| Operating temperature (T-T) | 0 - 40 °C |
| Wi-Fi | Yes |
| Bandwidth | 5 GHz |
| Wi-Fi standards | 802.11a, Wi-Fi 5 (802.11ac), 802.11b, 802.11g, Wi-Fi 4 (802.11n) |
| Cabling technology | 10/100/1000Base-T(X) |
| Networking standards | IEEE 802.11ac, IEEE 802.11h |
| Ethernet LAN (RJ-45) ports | 2 |
| Product color | Black |
| Depth | 109 mm |
|---|---|
| Width | 40 mm |
| Height | 100 mm |